Undoubtedly, CSV files are fantastic when it comes to storing a huge amount of data. However, they are not that great for data organization. And when it comes to keeping your data formatted properly, there is nothing better than Google Sheets.
If you are wondering how to import CSV files into Google Sheets then keep reading, as I have listed some easy methods you can follow to upload your files with all the data intact.
I will also discuss common issues people have when uploading CSV files on Sheets and the best possible solutions.
- How to Automatically Import CSV into Google Sheets
- Copy and Paste from Another Document
- Import Multiple CSV Files into Google Sheets
- Troubleshooting Issues with Uploading CSV
- How to Export CSV Files in the Correct Way
- Tips for Formatting Worksheet After Importing CSV File
- Some Questions You May Have (FAQ)
- Final Thoughts
How to Automatically Import CSV into Google Sheets
Google Sheets have a hidden feature that converts the CSV files into a spreadsheet, so there is no need to use a formula. All you need to do is toggle on the “convert feature,” upload the file, and you are good to go. Here are the steps to do it within a minute:
Import Locally Stored CSV Files
Step 1: Open Google Drive on your PC. Or click on this link to get redirected to Drive’s homepage.
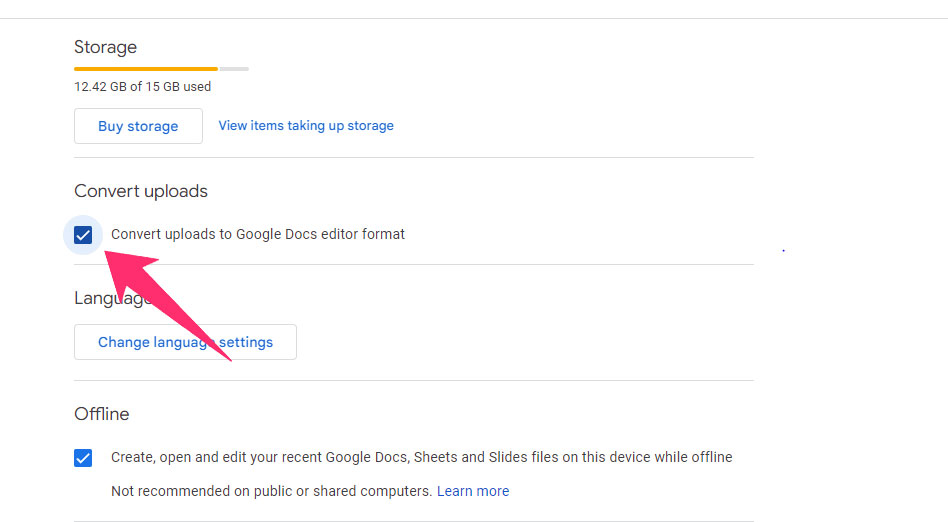
Step 2: Click on the gear settings icon and select Settings.

Step 3: Check the “Converts Uploads to Google Doc editor format” and close the tab.
Step 4: Now open the Google Spreadsheets homepage on your system, and open a new blank sheet.
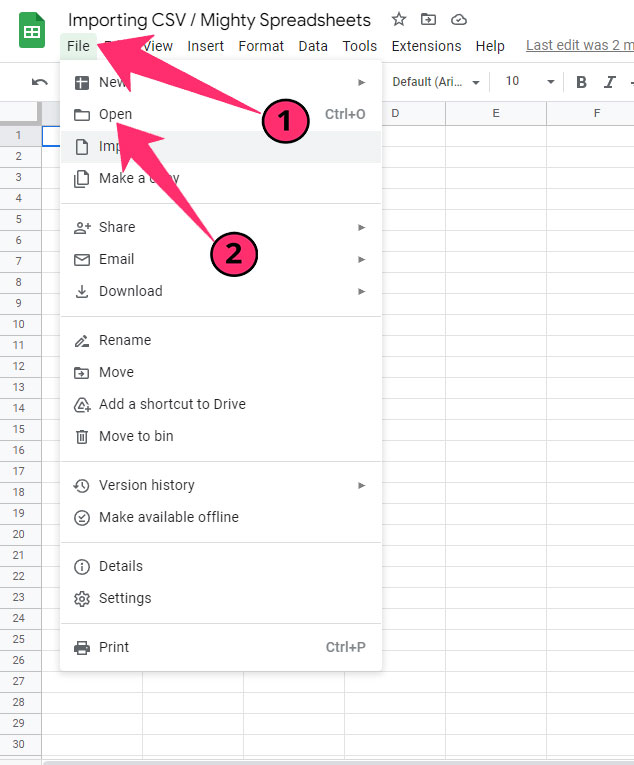
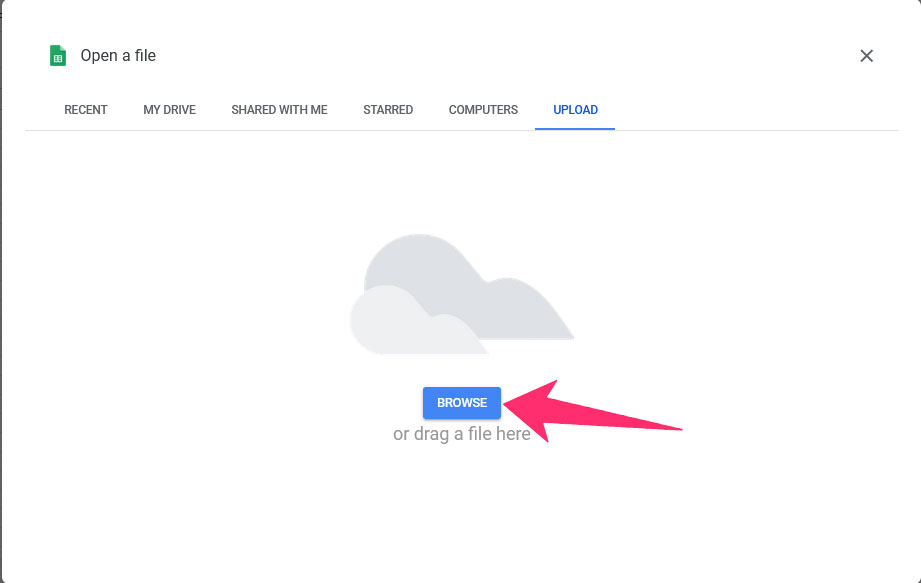
Step 5: Click on File and then Open. A dialog box will appear. Drag and drop the CSV file you want to upload into Google Sheets.
Step 6: You can even click on Browse and select a file from your system to upload it on Google Sheets.
Import Files from Google Drive
Step 1: Open Google Sheets on your system, and open a blank sheet.
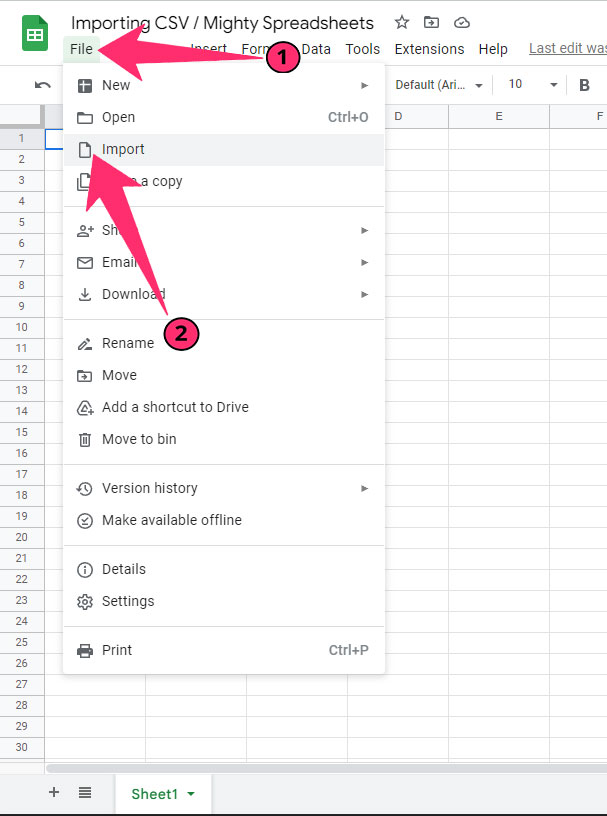
Step 2: Click on File and select Import.
Step 3: Under My Drive, you’ll see the files you have uploaded to your account. Also, you can search a file by its name to upload it on Google Sheets.
Step 4: Once selected, click on Upload. Now in the Import Menu, choose “Replace Data at Selected Cell.”
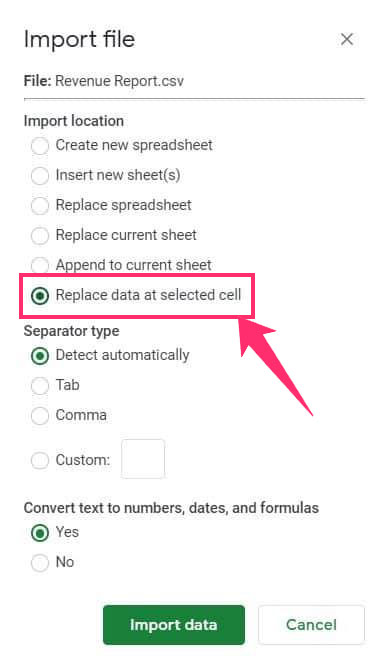
Step 5: Click on Import Data to successfully upload the CSV file into Google Sheets.
Copy and Paste from Another Document
If you don’t want the hassles of uploading files using the aforementioned methods, you can simply copy-paste data. This is a good method, especially if you want to copy some specific data entries and want them to organize in the sheets.
- Open the CSV file and Google Sheets together.
- Select the data from the CSV file that you want to copy.
- Paste it on the Google Sheets, and organize the format.
Note: Copying large amounts of data can be problematic, and you need to format the data manually. Hence, this method is not suitable for copying large amounts of data.
Import Multiple CSV Files into Google Sheets
There are two ways to import multiple CSV files into Google Sheets. Below I have explained both methods to help you get this done within a few minutes.
Import CSV Files into Sheets using Extensions
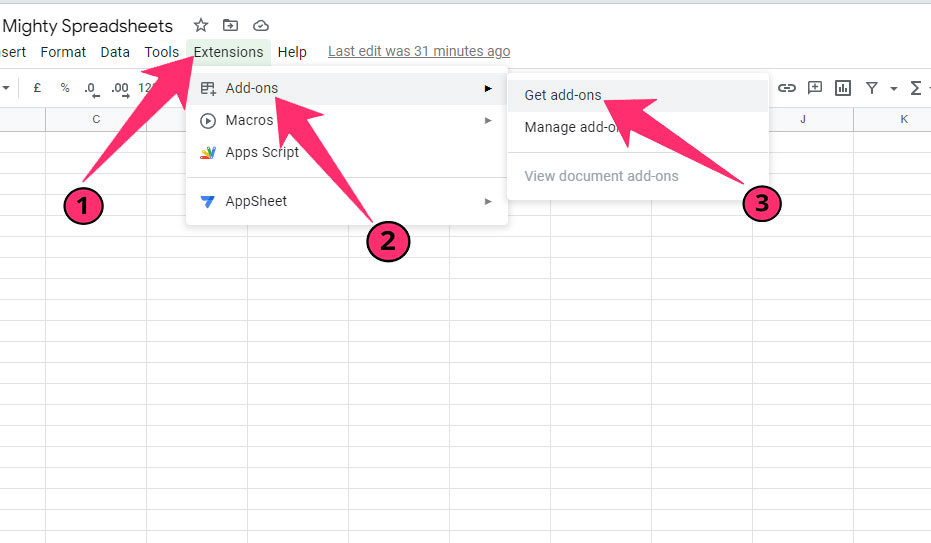
Step 1: Open a blank Google Sheet on your system. Click on Extensions and choose Get Add-ons.
Step 2: In the search bar, type “Coefficient,” and a list of results will be displayed.
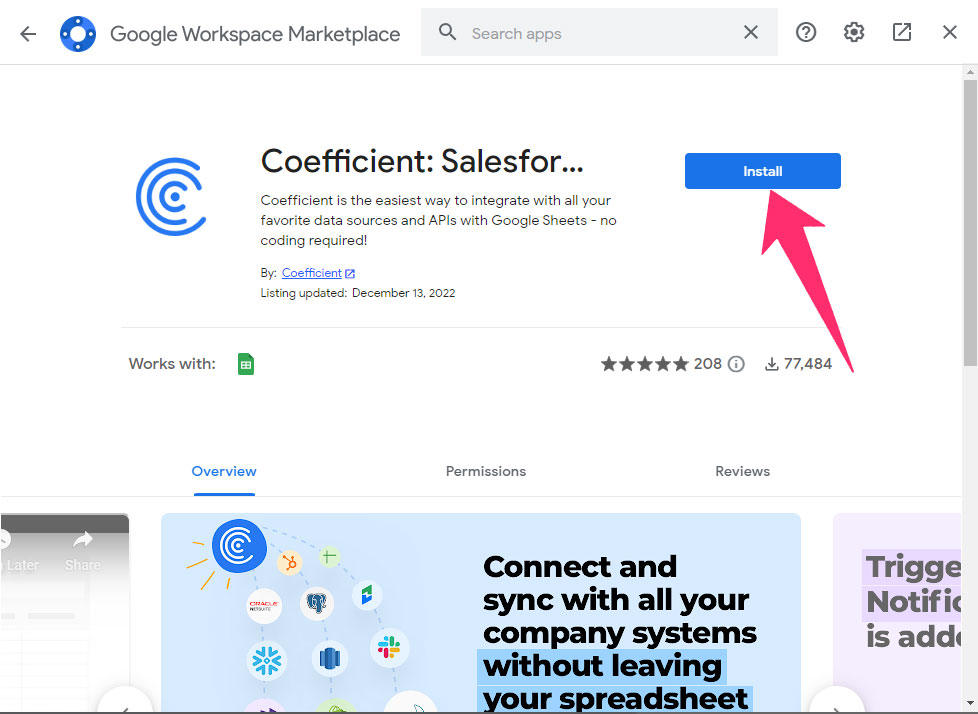
Step 3: Install the extension, and associate it with your Google Account by giving the necessary permissions.
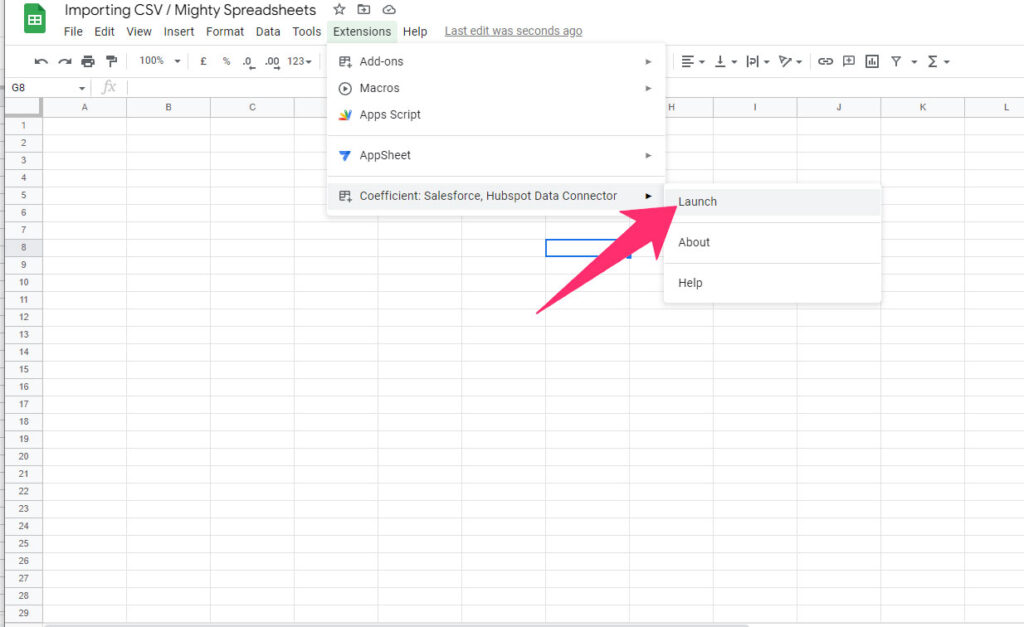
Step 4: Go back to Google Sheets, click on Extension, choose Coefficient: Salesforce, HubSpot Data Connector, and select Launch.
Step 5: Click Import from….. on the Coefficient app sidebar.
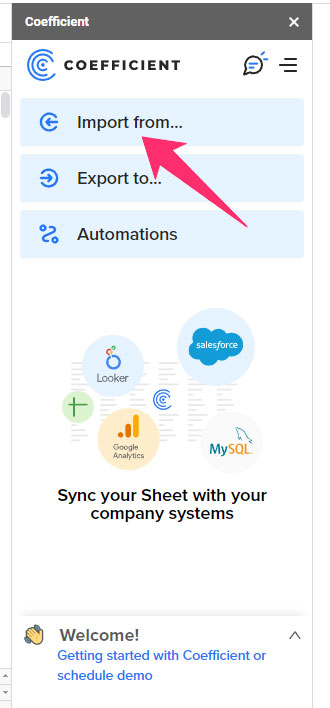
Step 6: Scroll through the list of available options, and click on CSV.
Step 7: You’ll get three options to choose from. Click on Upload File. You’ll need to authorize Coefficient with Google Drive. Click on Authorize.
Step 8: Once you connect to Google Drive, click on CSV files to upload them from your system. Your files will be automatically uploaded to Google Sheets.
Import CSV Files into Sheets Manually
If you don’t want to use any extensions, you can upload the CSV files manually. This process requires some coding knowledge, and if you know a bit of it, read the steps listed below:
Step 1: Get the URL of the CSV files you want to upload from the system.
Step 2: Fetch the contents of files by using the “UrlFetchApp.fetch()” method.
Step 3: Use the displayToastAlert() function so that you can work on the files.
function mightySheetsImportCSVfromURL() {
  const url = promptUserForInput("Please enter the URL of the CSV file");
  const contents = UrlFetchApp.fetch(url);
  displayToastAlert(contents);
}
Step 3: Save the script, and open Google Sheets on your system. Click on “Import from URL” and enter the URL of the CSV files you want to upload.

Step 4: After entering the URLs, you’ll see a Toast notification message on the screen.
Step 5: Click on import CSV Data and select Import from Drive.

Step 5: Enter the CSV file name you want to upload. For example, I have uploaded a students.csv file. Click on Ok
Step 6: Once the scripts finish running, your files will be uploaded into Google Sheets.
Troubleshooting Issues with Uploading CSV
Importing CSV files into Google Sheets may look like a straightforward task, but there may be some issues you can expect. Fortunately, there’s a quick solution to these issues, and you can quickly make things work fine.
File Size
One of the most common causes of CSV import issues is file size. If the file size exceeds the permitted limit, you won’t be able to upload it. You need to break the file into multiple small files and then upload them on Google Sheets.
Missing Data
Missing data is another reason why you are not able to upload the CSV files on Google Sheets. The simplest solution to this problem is to make manual edits to the CSV file to improve its format. You might need to make multiple edits to the CSV files before uploading them on Google Sheets.
Non-digestible Formats
Non-digestible formats, such as numbers without symbols, may cause issues when you try to upload the CSV file on Google Sheets. You need to remove all non-digestible formats manually, which can be a laborious task. After removing all the unsupported formats, you can try uploading the CSV files on the sheets.
Data Does Not Match
Another error you may encounter when importing a CSV file into Google Sheets is related to matching. The issue could be due to the columns don’t match or the absence of column names. You need to arrange the required fields in order so that there are no missing columns.
How to Export CSV Files in the Correct Way
After you are done making changes to the CSV files in Excel, you can export them. Below are the steps you need to follow:
Step 1: Open the Excel Document with the CSV file in it.
Step 2: Click on File and select Save As.
Step 3: Type the name of the file, and set the format as Comma Separated Values (.csv)
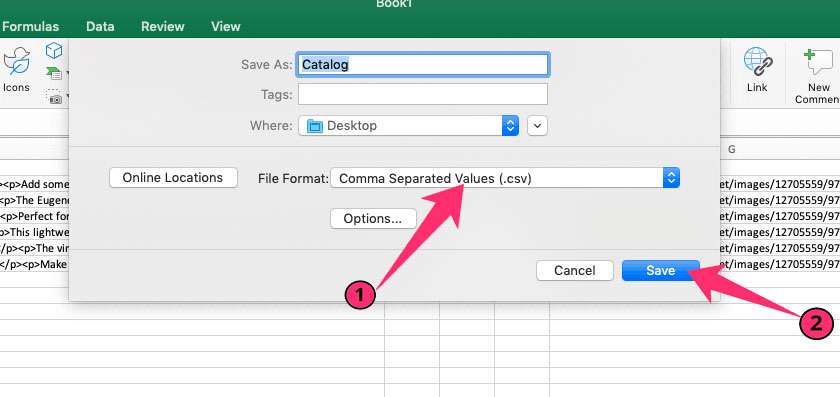
Step 4: Click on Save, and you are good to go.
You can move the files to another folder or drive them from the location you have saved them in.
Export from Numbers
If you are a Mac user and want to export a CSV file in Numbers format, you need to follow the below-mentioned steps.
Step 1: Open the Spreadsheets, and choose File > Export to > CSV from the pop-up menu.
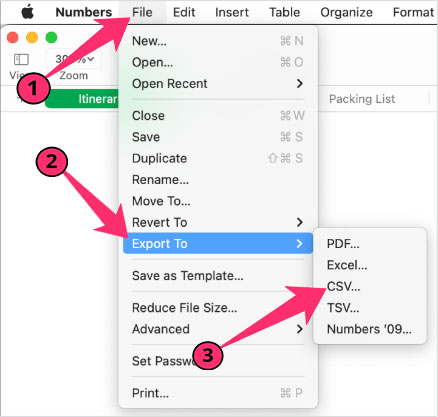
Step 2: Specify the export settings, such as whether you want to create tables or combine them. Click the disclosure to change the text encoding.
Step 3: Type the name for the spreadsheet, and do not use any extensions.
Step 4: Choose the locations where you want to save the spreadsheet, and click on Export.
Tips for Formatting Worksheet After Importing CSV File
You can avoid all kinds of issues when importing your CSV files into worksheets. Here are a few tips that’ll help you out:
Format Your Data Properly
It is essential to review the data to ensure that format is consistent. Importing a CSV file with an improper format can be painful. For example, if you have data with multiple commas, you should review the sections containing elements such as commas. A properly-formatted file is easier to format after you import it from a CSV file.
Add Column Headers
By adding column headers, you can keep the data in the worksheet well-organized. It is highly recommended that you add a single row at the top of a worksheet that will serve as the header for every column.
Import the File Properly
For formatting the worksheet after importing a CSV file, you should ensure that the file is imported properly. Make sure the file size does not exceed the permitted limit by Google Sheets. Also, the data should be organized in the CSV file so that you can easily format it in the worksheet.
Be Careful About Opening a CSV file.
Opening a CSV file and re-saving it in the Excel format can add unwanted formatting, such as trimming the leading zeros in data fields like zip codes. Saving the file improperly can cause data corruption.
Some Questions You May Have (FAQ)
Can Google Sheets open CSV files?
Yes, you can open CSV files in Google Sheets. All you need to do is click on File > Open and import the CSV file you want. Format the worksheet, and you can use the data.
What are the limitations of CSV?
The biggest limitation of a CSV file is that it has a character limit of 32,767 characters, whereas there is no such limit for Excel. Also, importing CSV files can be problematic if the file has more than 1000 rows.
How big of a file can Google Sheets handle?
The biggest file you can upload on a Google Doc should be around 20MB. Also, the file must have less than 400,000 cells and 256 columns.
Final Thoughts
I hope this detailed guide on importing CSV files into Google Sheets has helped you import your files without any issues. Make sure the format of CSV files is proper as per the Google Sheet requirements and that there are no missing data fields.
If you are having any trouble importing CSV files into Google Sheets, you can drop your queries in the comments section.
