In this article, I will give you a detailed guide on how to create drop-down lists in Google Sheets.
Drop-down lists are great for data entry, as they limit the user to choose from a predefined list of available options. This can help keep your data organized, accurate, and less error-prone.
For example, if you have a spreadsheet that contains address information, you could create a drop-down list of states so that only valid entries are accepted onto the sheet.
Hopefully, you get the idea. Now let’s cut to the chase.
- How to make a drop-down list in Google Sheets
- How to Create Multiple Drop-Down Options Using a Range of Cells (Dropdown from range)
- How to Change/Edit Drop-Down List in Google Sheets
- How to Remove Drop-Down List in Google Sheets
- How to copy a dropdown list into multiple cells
- How to Add Yes No Dropdown in Google Sheets
- How To Do a Drop-Down List In The Google Sheets Mobile App (iPhone, iPad, Android)
- My Final Thoughts
How to make a drop-down list in Google Sheets
Creating a drop-down menu in Google Sheets is relatively straightforward.
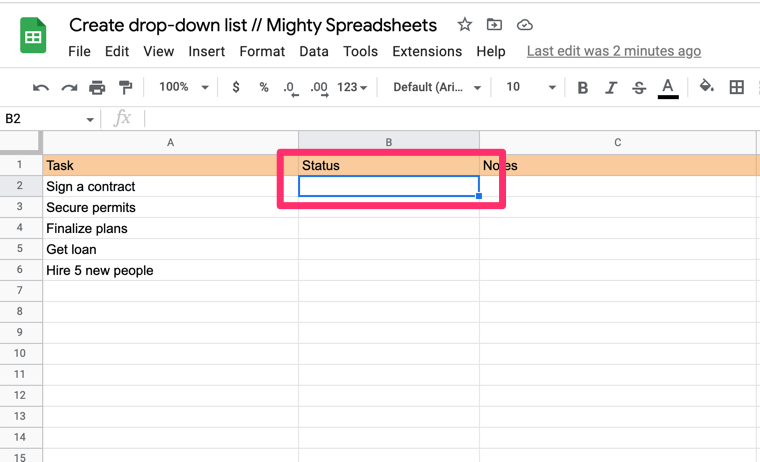
Step 1: Open your Google Sheets and click on the cell or column where you want the drop-down list to appear.
Step 2: On the top menu, click on Data and select Data Validation.
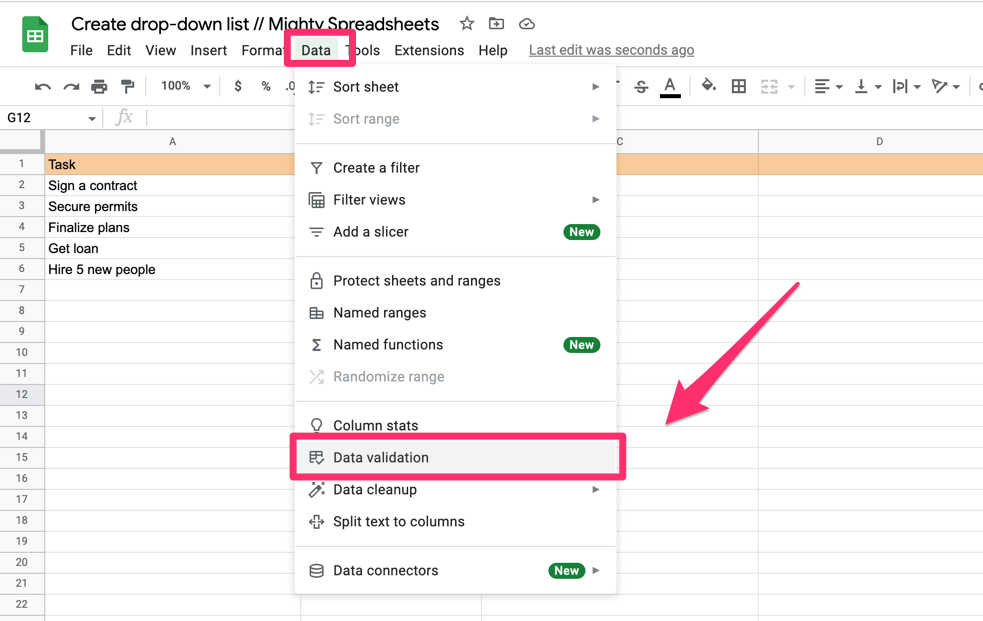
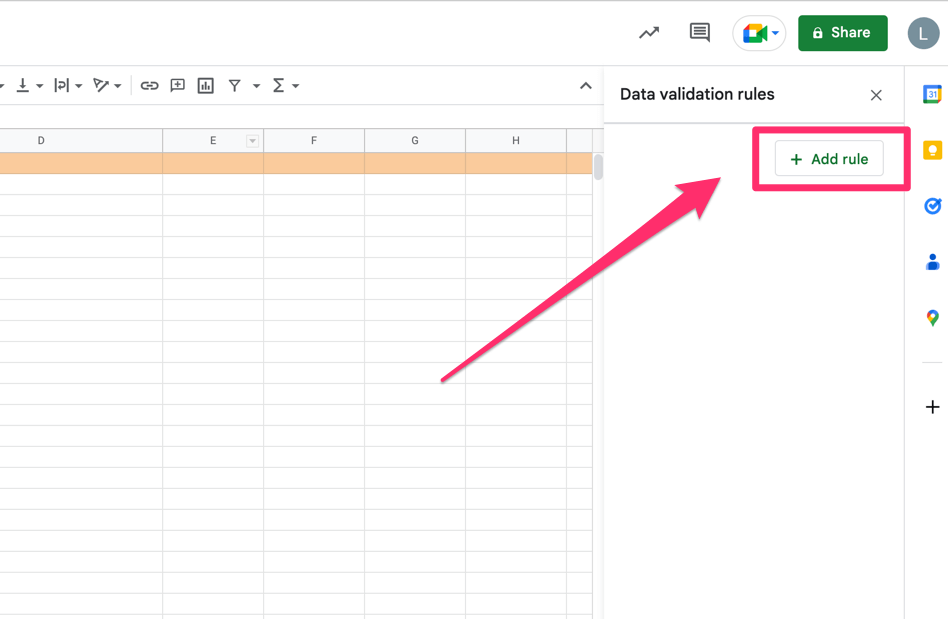
Step 3: When a pop-up window appears click on the “+ add rule” button and you will see several options.
Step 4: From the “Criteria” section select “Dropdown” or “Dropdown (from range)”
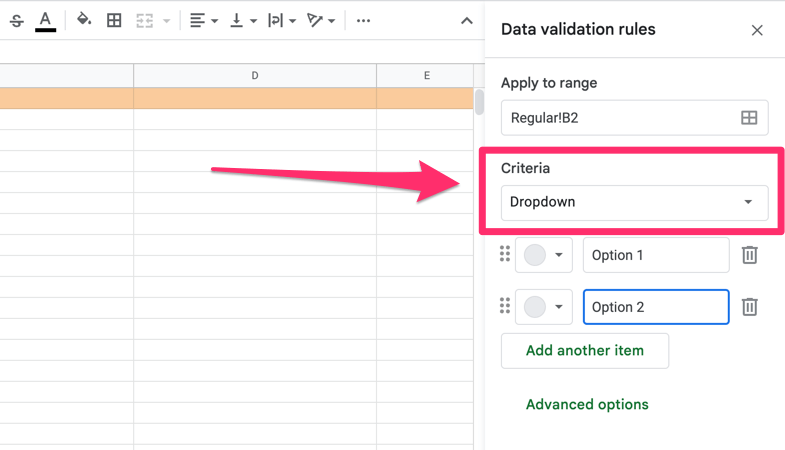
If you are wondering what’s the difference between those two the answer is simple – regular dropdown allows you to enter values manually. Dropdown from range takes values from a specified range of cells.
Let’s focus on the regular drop-down for now as it’s an easier option.
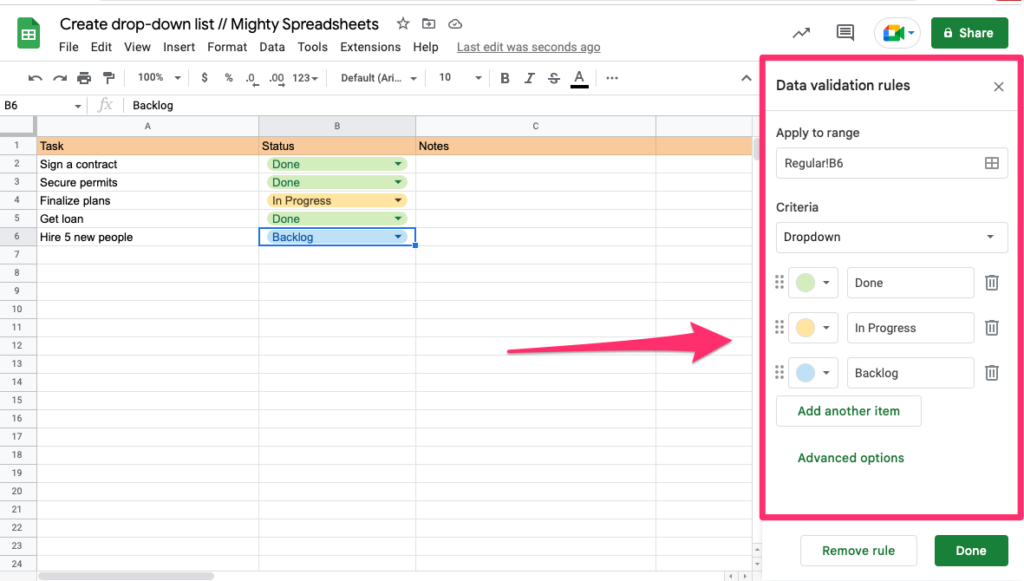
Step 5: Let’s create options for our drop-down.
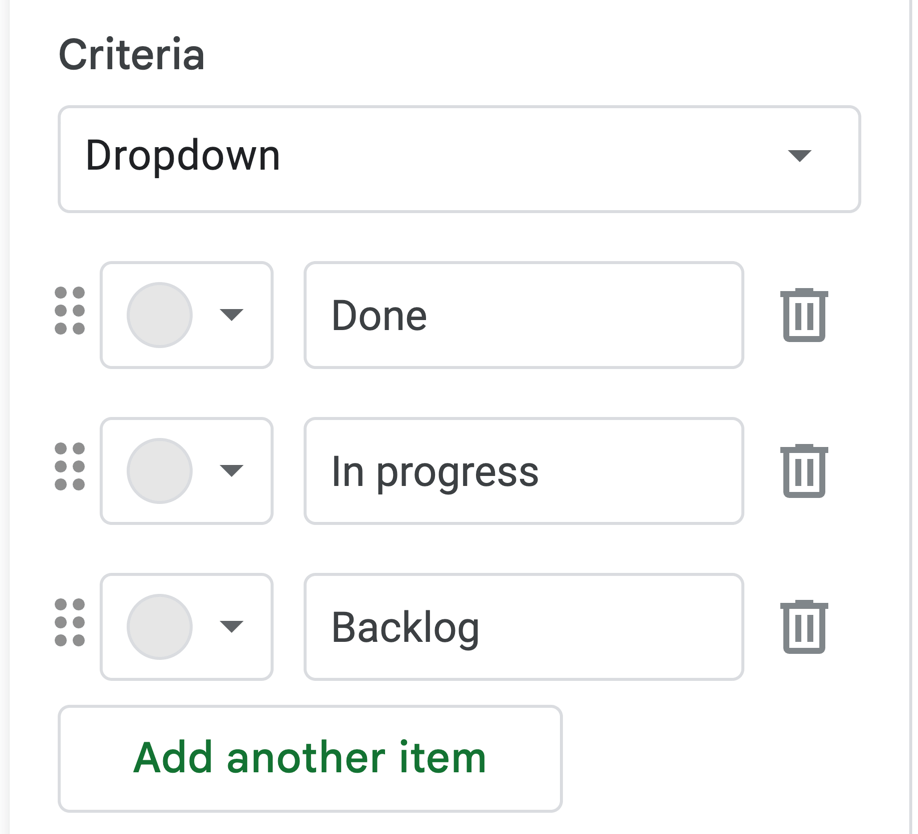
As you can see I created 3 different statuses for tasks that I have in my spreadsheet. The statuses are:
- Done
- In progress
- and backlog
Let’s assign them to each task we have on our list:
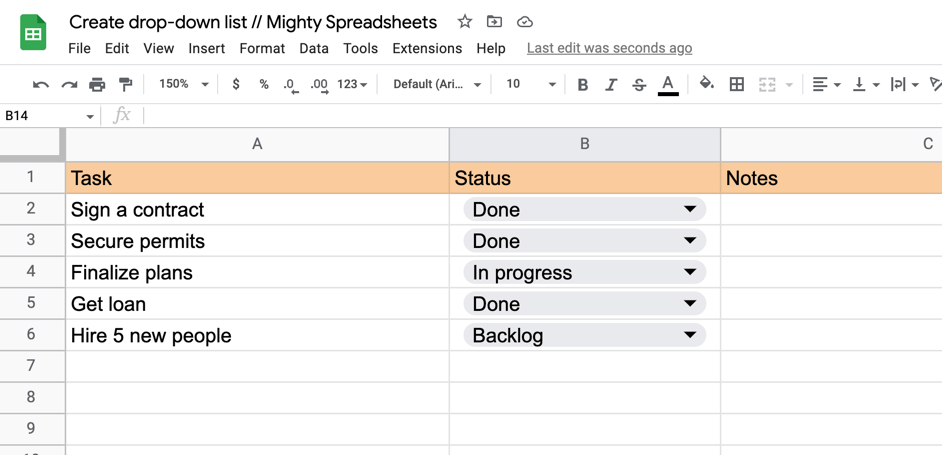
The list looks quite OK, but with a long list, it may not be that easy to navigate.
I think it definitely can benefit from having some colors don’t you think?
Step 6: Adding colors to the dropdown list
After a recent update in Google Sheets adding colors to the dropdown list is very simple. Just click on the grey dots next to the dropdown options and select the color you like. We are selecting green, yellow, and blue for our options.

What’s interesting you can’t filter them by color, but you still can filter them by value if you want to create a set of filters.
Step 7: Adding advanced options
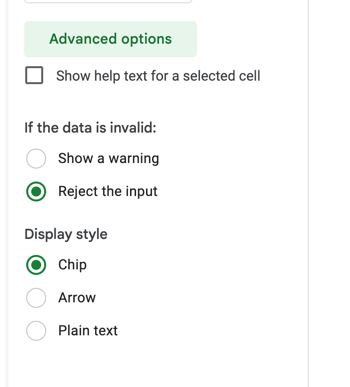
As you can see at the very bottom of the dialog you have the “Show advanced options” button. If you on it you will see that it provides you with some extra options:
- help text for a selected cell (good when collaborating, gives extra content to help them pick the right answer)
- Option to show a warning or reject input
- Option to change the style of the drop-down list
Out of all the options available, I highly recommend playing with the latest one as personally, I am not a fan of the new “chip” layout. I prefer to change my dropdown lists to “arrow” styling instead.
How to Create Multiple Drop-Down Options Using a Range of Cells (Dropdown from range)
The process of creating a dropdown list from a range of cells will be similar to the one where we create entries manually.
The main distinction is that your dropdown list entries are based on another cell’s values, as opposed to being directly stated in the rule.
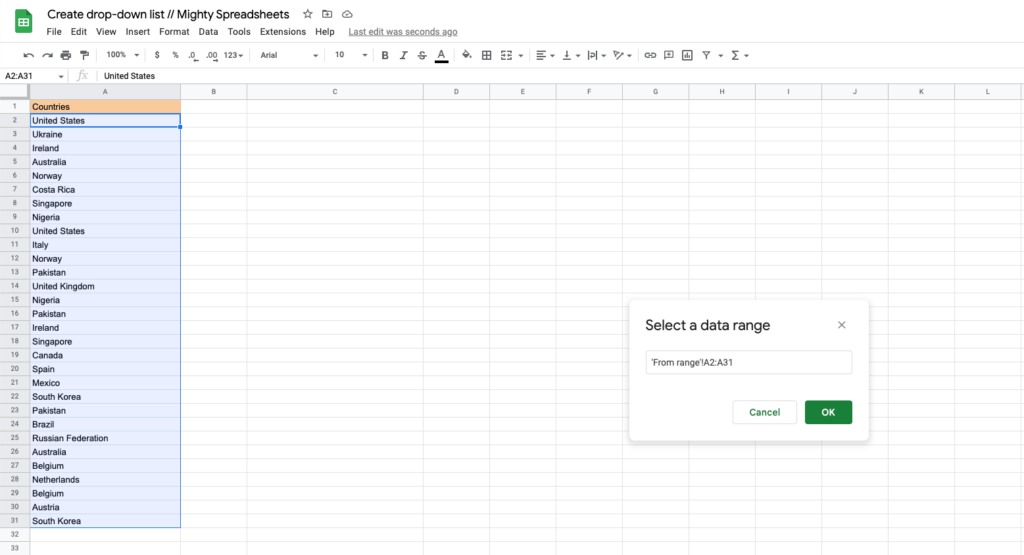
Here’s what we are starting with – a list of countries in A column
Here’s what you need to do:
Step 1: Click on the cell or column where you would like the drop-down list to be placed.
Step 2: On the menu bar at the top, select Data and then choose Data Validation.
Step 3: From the “Criteria” section select “Dropdown (from range)“
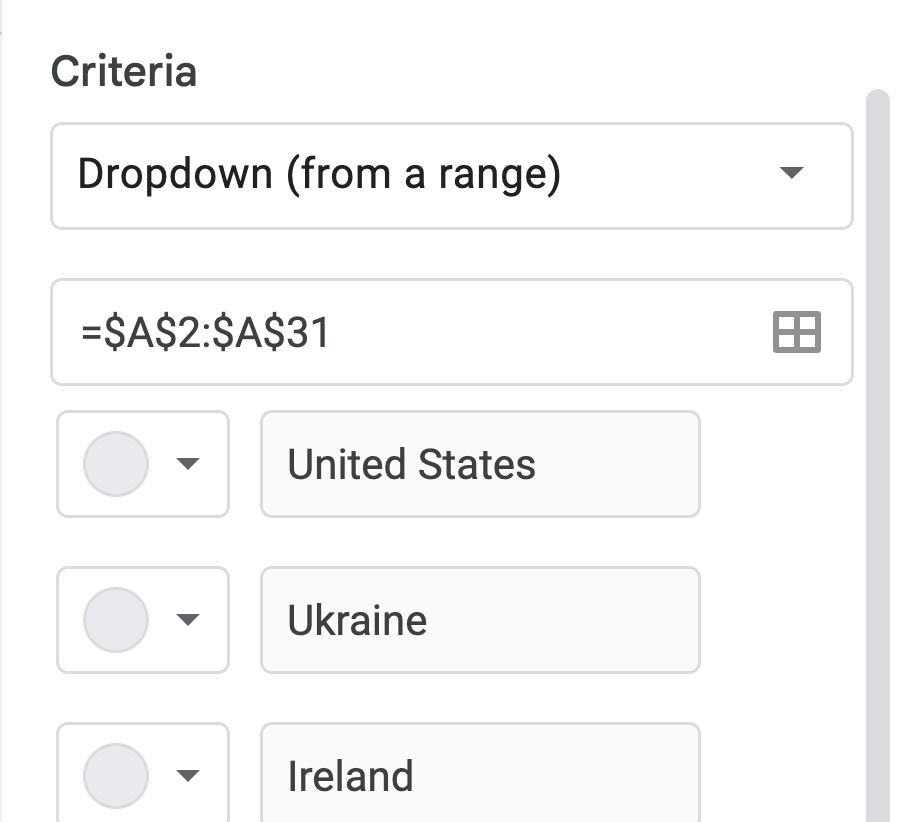
Step 4: Provide a data range for the dropdown. In our case, cells from A2 to A31
Step 5: Start using your dropdown 🙂
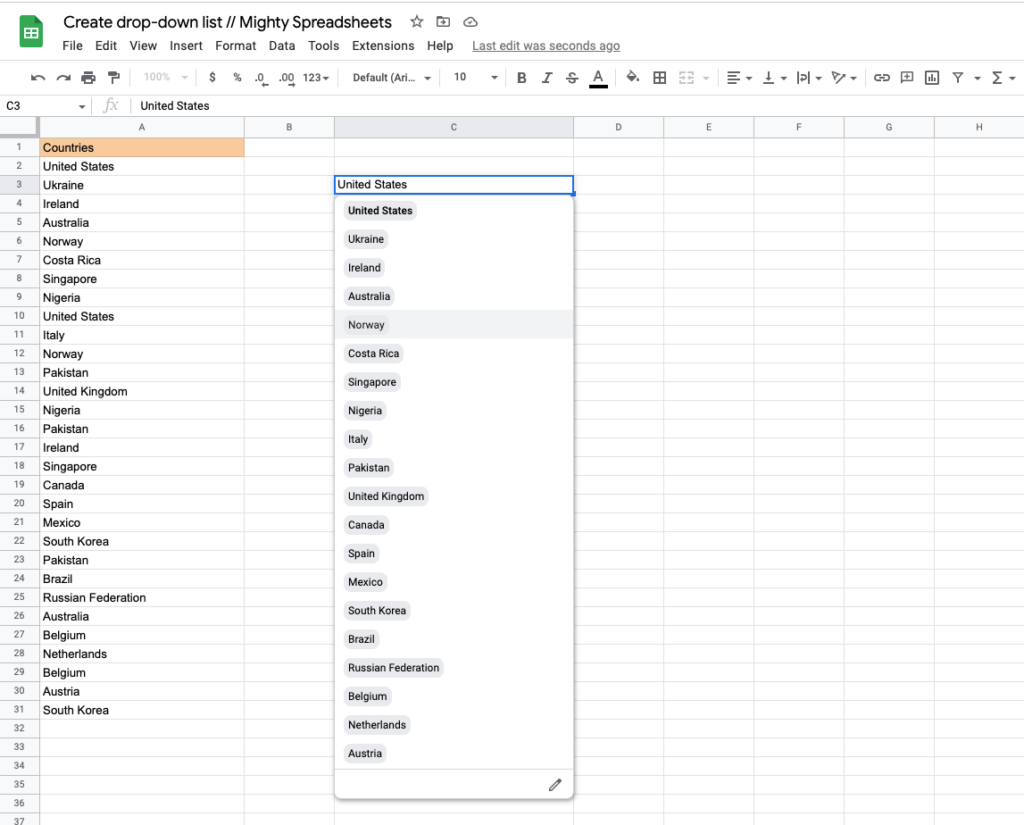
Note: Google Sheets is smart enough to recognize duplicate entries, collating multiple elements that are identical into one single option (notice how we have 30 entries in the A column and only 20 choices).
How to Change/Edit Drop-Down List in Google Sheets
There are two ways to edit the drop-down list that already exists.
Let’s start with the easier and faster one. Simply click on the dropdown that you want to edit, wait for the dialog box to appear, and click on the pencil icon.
This will open a pane on the right-hand side where you’ll be able to edit your settings (i.e. add more items, add colors or delete the ones you don’t longer need).
Alternatively, you can click on Data > Data validation in the options menu, then pick the rule you want to edit.
How to Remove Drop-Down List in Google Sheets
To delete a drop-down list, simply click on it and wait for the dialog box to appear. Then, click on the pencil icon.
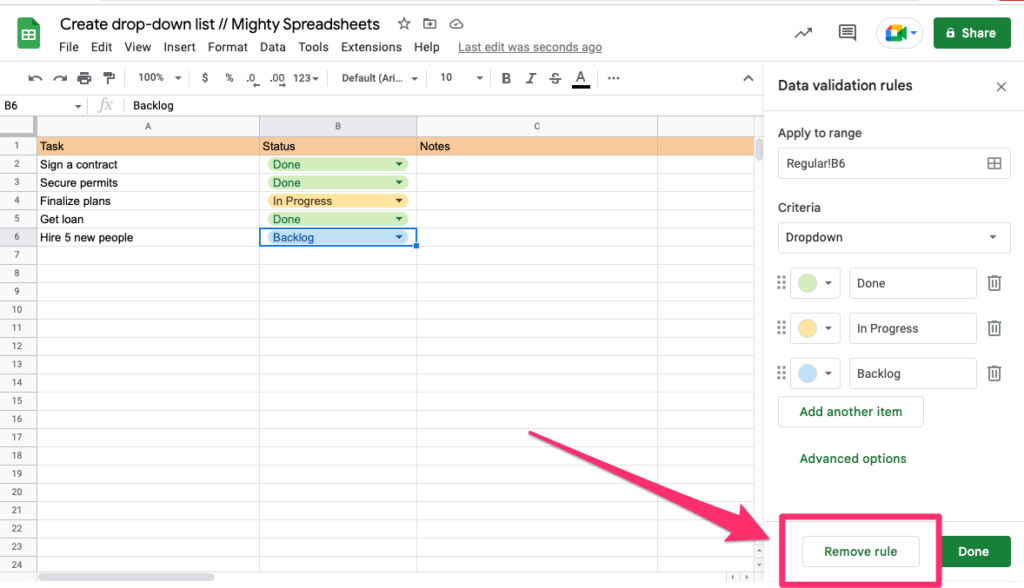
You will see a pane where you can alter the list settings, but at the very bottom, you will find a “remove rule” button. Just click on it and all dropdowns using these rules will be gone.
As an alternative way, you can just click on Data > Data validation in the Options Menu and then on the trash icon next to the rule you want to delete.
How to copy a dropdown list into multiple cells
If you created a dropdown in one cell and you’d like to copy it into multiple cells then all you need to do is copy and paste its value (for example by using a Control / Command + C and Control / Command + V shortcut).
Alternatively, if you just want to copy the dropdown to multiple cells in the same column you can do it easily using the fill handle. Just focus on the cell, drag the fill handle (which is in the bottom right corner of the highlighted cell) and drag it.
How to Add Yes No Dropdown in Google Sheets
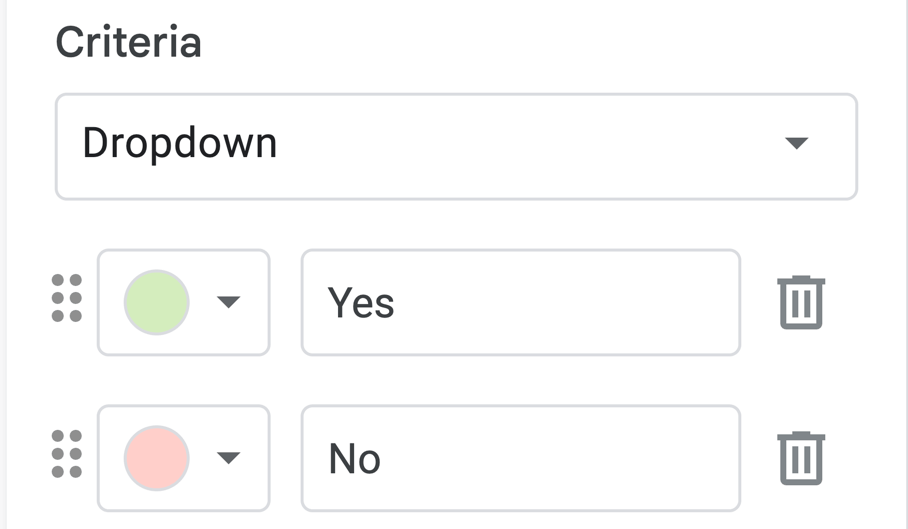
You can easily add a yes-no dropdown the same way you add regular dropdowns (In the Options Menu go to Data > Data validation and set the “Criteria” to “Dropdown“)
The only difference is that there will be two options (“yes” and “no”).
You can also use colors to make it more visually appealing (for example green for yes, and red for no)
Personally, for a yes/no type of field, I would rather use a checkbox than a dropdown.
How To Do a Drop-Down List In The Google Sheets Mobile App (iPhone, iPad, Android)
The IOS version of the Google Sheets App at the moment doesn’t support Data Validation which means that the drop-down list can’t be created on iPhones or iPads
On the other hand, if you are an Android user you can easily create a drop-down selection list from your phone. Here’s the list of steps you need to cover:
- Focus on the cell(s) where you want a drop-down list to appear
- Tap on the three dots menu in the upper right corner
- Tap on “Data validation”
- Then click on “List of items” or “List from a range” under the “Criteria” section
- If you selected “List of items” then just tap on the “Add” button and enter your items
- If you Selected “List from a range” then type the range of cells
- Tap on the DONE button to save your options
My Final Thoughts
Adding a drop-down selection that will allow you to choose from a list of predefined items is an easy way to make data entry more accurate and efficient.
Additionally, by using colors or icons to help differentiate between various selections, the process of selecting an item from your drop-down list can become even more user-friendly.
Hopefully, now you’ve learned how to do it and you will add it to your workflow.