At times, you might need to sync your Gmail account to a spreadsheet from where you can monitor all the required data from a single point. And it is possible in MS Excel. But do you know that you can now even export Gmail to Google Sheets?
You can easily export emails from your Gmail account to Google Sheets using Google Takeout. Besides, you can also use third-party tools like Coupler.io to automate the process. It is also possible to fetch data from your Gmail account right onto a spreadsheet by using custom Apps Script codes and software like Email Parser.
Although there are various methods available to execute this operation, you need to choose the right method that fulfills the demand of your task. So, I’ll be discussing many methods in detail here. Without any further ado, let’s dive into Google Sheets.
Setting Up the Integration For Export Emails To Google Sheets
First of all, you need to know how you can transfer data (especially emails) from your Gmail account to Google Sheets. It is possible to manually copy every email and put it into a spreadsheet in GS.
But that will be a truly rigorous and mechanical process. However, you can easily export your data from your Gmail account as a JSON or MBOX file. You can then easily convert that file to a CSV (comma-separated value) file and then upload it to your Google Sheets for easy synchronization.
However, it can also be easily done by using an API provided by Google. So, depending on your preference and need, you can use various methods to export data and emails to Google Sheets.
Exporting Emails To Google Sheets
If you are a digital marketing specialist or data scientist who needs to keep a tab on the incoming emails right onto a spreadsheet, nothing can be as useful as getting it done automatically in Google Sheets.
And there are two tested methods available to do it. Let’s start from the easiest to the hardest.
Manual Export Methods Through Takeout
No, I’m not talking about manually copying every email and then putting it into a Google Sheets spreadsheet. It will take an enormous amount of time.
However, there is another method available that can easily do this job by using the Google takeout feature. Here are the steps!
- Step 1: Log in to your Google account and navigate to the Takeout page.
- Step 2: Under the “Product” heading, click on the “Deselect All” button.
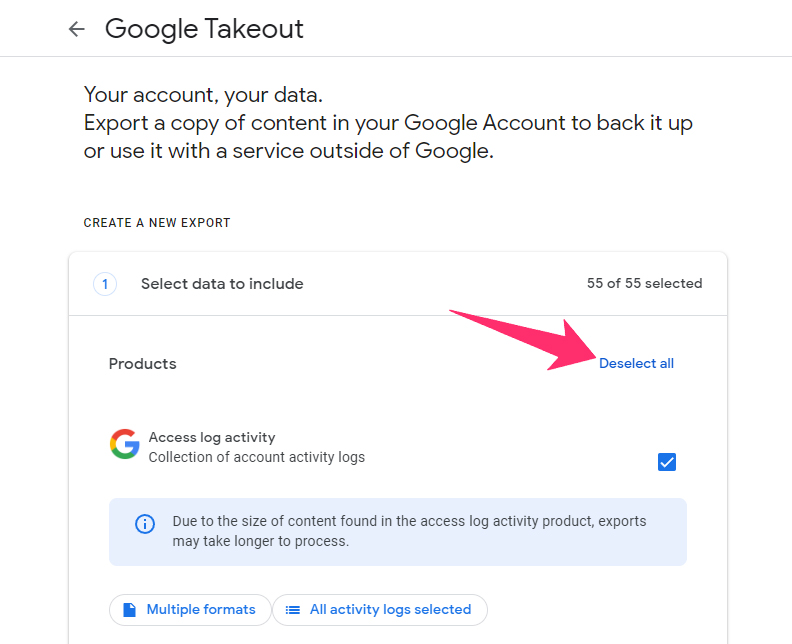
- Step 3: Scroll down the page to check all the options and tick the box beside the “Mail” option.
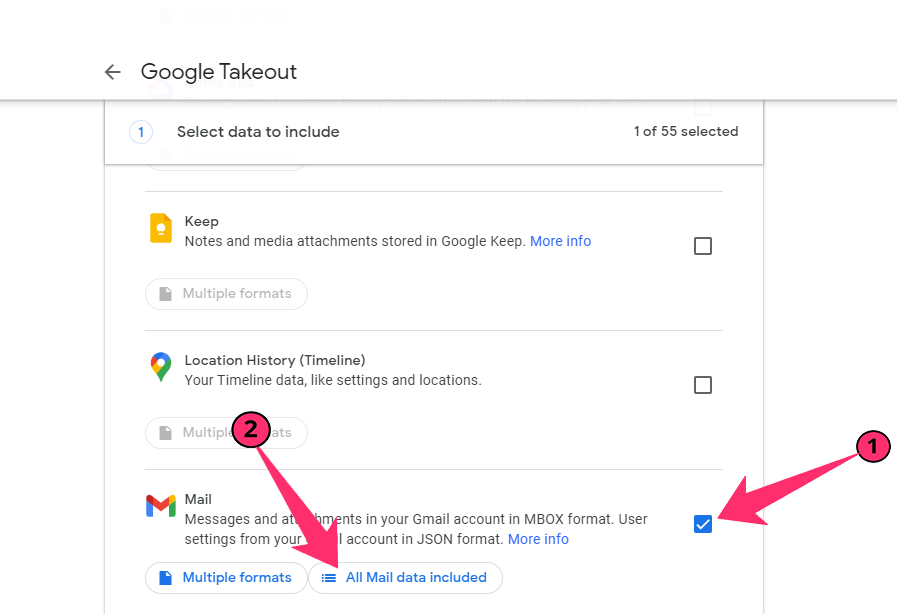
- Step 4: If you don’t want to import all the emails, click on the “All Mail data included” option.
- Step 5: Now, uncheck the box beside the “Include all messages in Mail” option.
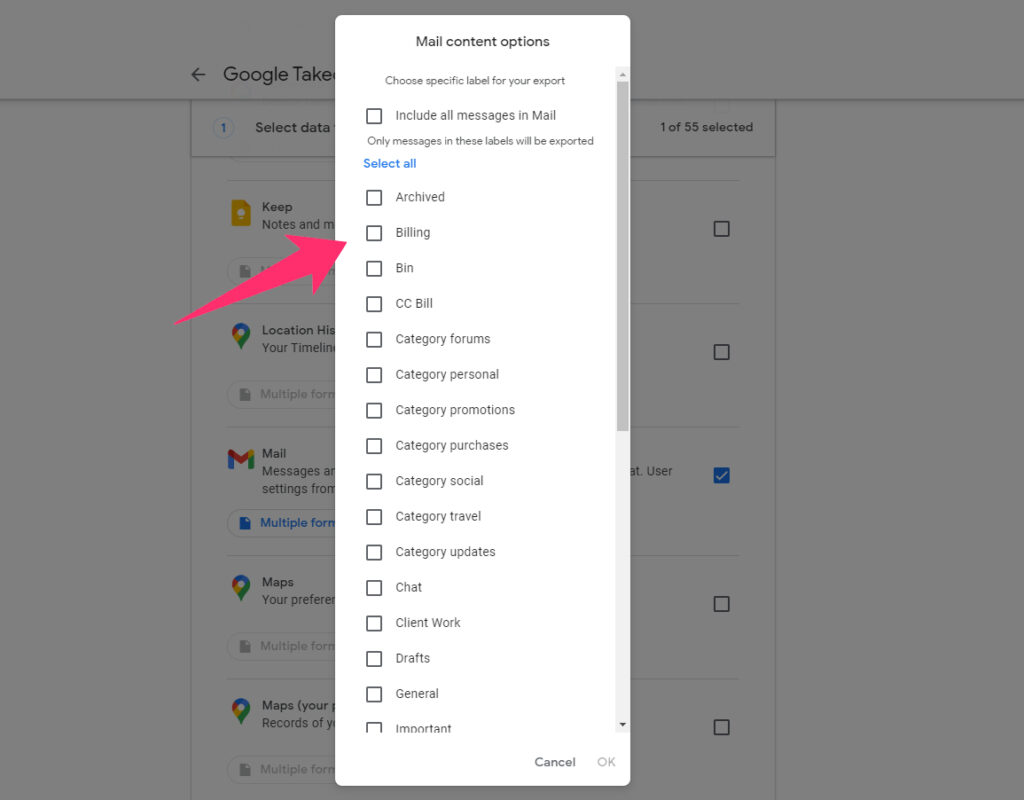
- Step 6: Select the specific labels you want to import from your Gmail account.
- Step 7: Click on the “OK” button located at the top-right corner of the page.
- Step 8: Once you are redirected to the main selection page, click on the “OK” button.
- Step 9: Select the delivery method among the “Send download link via email,” “Add to Google Drive,” “Add to Dropbox,” “Add to OneDrive,” and “Add to Box” options.
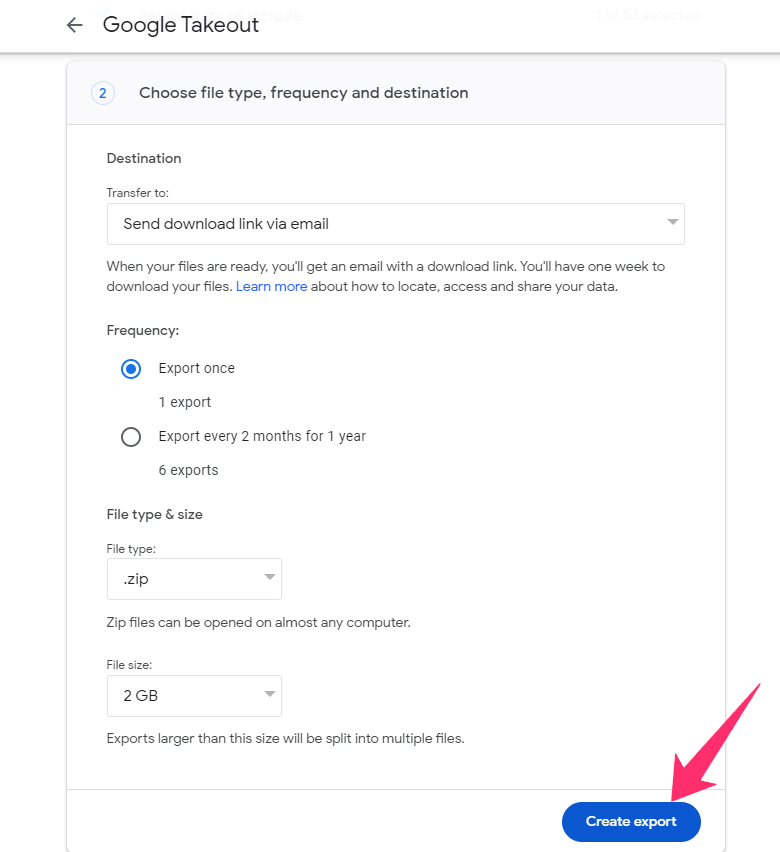
- Step 10: On the next page, select the frequency between the “Export once” and “Export every two months for 1 year” options.
- Step 11: Now, select the file type between ZIP and TGZ, depending on your preference.
- Step 12: Select the expected maximum file size among 1 GB, 2 GB, 4 GB, 10 GB, and 50 GB.
- Step 13: Click on the “Create Export” button at the bottom of the page.
- Step 14: Once the export process is over, you’ll receive an intimation mail on your Gmail account.
- Step 15: Click on the “Download” button to get your exported file containing all emails.
- Step 16: Now, close the Takeout page and log in to your Google Sheets.
- Step 17: Once opened, click on the “File” option from the header menu.
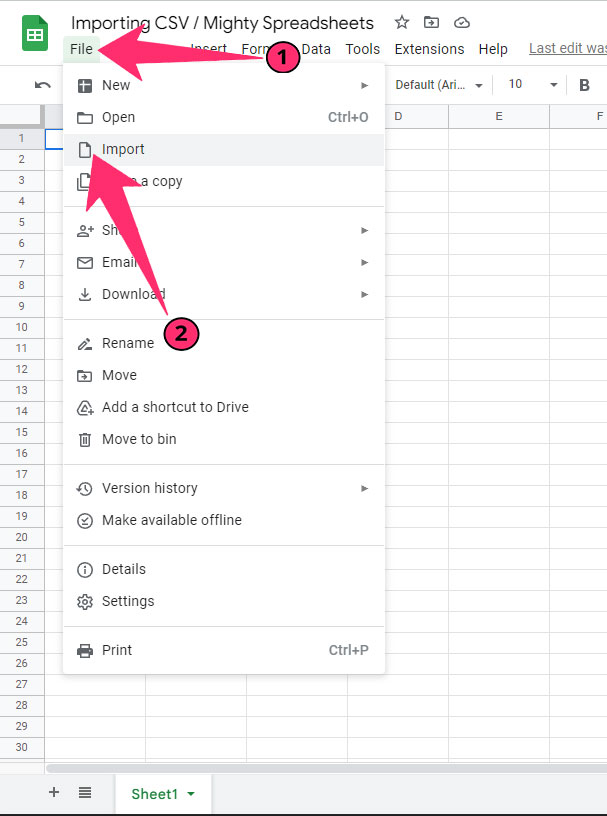
- Step 18: Click on the “Import” option and then select the file you want to import.
- Step 19: You can now see your emails in a consolidated format in Google Sheets.
Depending on how much data and how many emails (with attachments) you are exporting, this process can take a bit of time to complete. So, keep patience and wait until you receive an automated completion email.
And if you have selected the MBOX option, there is no way to upload it directly to Google Sheets. However, you can do it by converting MBOX files to CSV files. And you can easily do it by using third-party tools like SysInfo MBOX Exporter Tool.
Once you convert your MBOX files to a CSV file, you can then follow the rest of the procedure to get it done!
Bonus: There can be hundreds of duplicates on the spreadsheet once you complete your import. However, there is a way to make it right. Just follow my latest guide on removing duplicates in Google Sheets to resolve this issue in no time.
Automating The Export Process Using Third-Party Tools
The previous method I’ve described above is tedious and overly dependent on MBOX to CSV tools. However, there is another method available to automate this process.
And we will be using two tools for this one. The first one is the Google API Console, and the second one is Coupler.io. Let’s check out the steps now.
- Step 1: Open Google Chrome and visit the Google API Console page.
- Step 2: Enter a name in the “Project name” field and select your organization (optional) in the “Location” field.
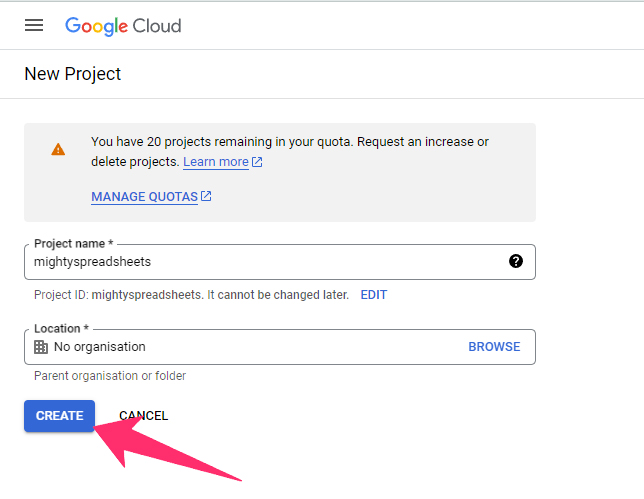
- Step 3: Click on the “Create” option to create a new project with API.
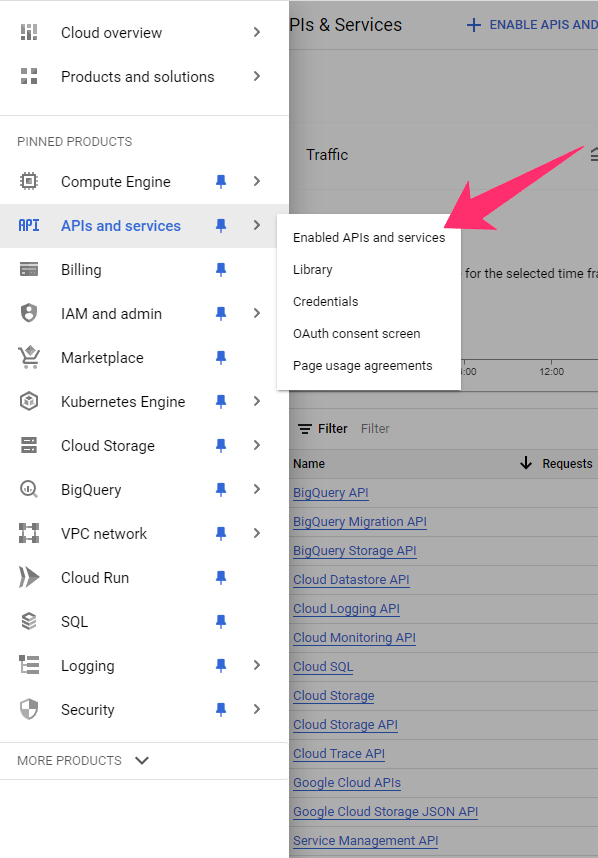
- Step 4: On the “APIs & Services” dashboard, click on the drop-down menu from the header and choose the project you’ve just created.
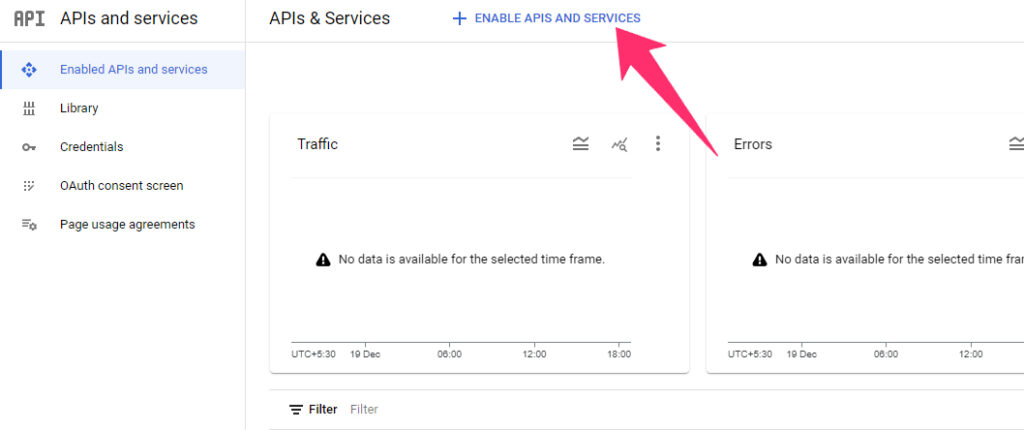
- Step 5: Now, click on the “Enable APIs And Service” option located at the top-right corner.
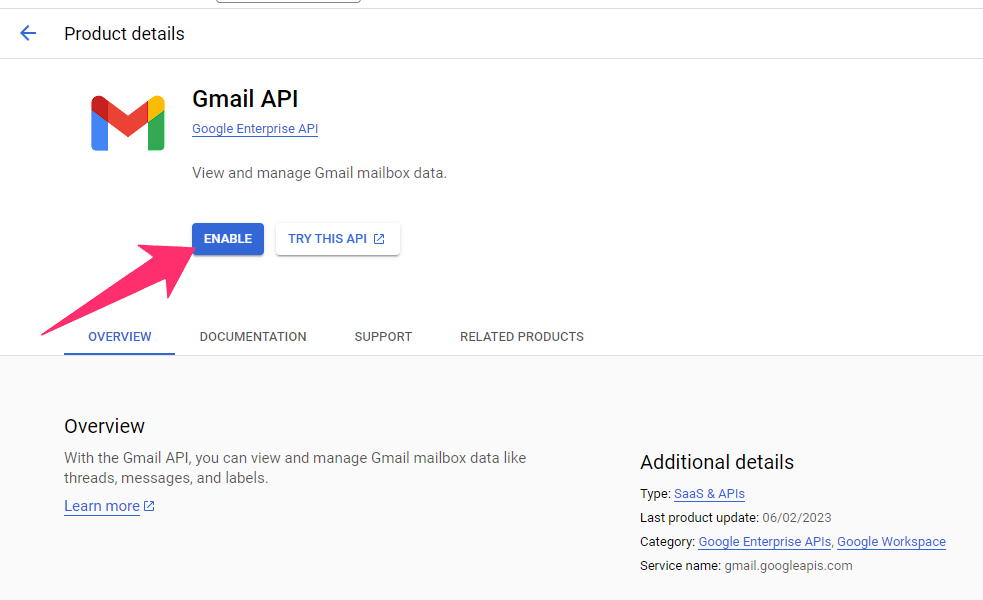
- Step 6: Once you are redirected to the “API Library,” select the “Gmail API” option from the list.
- Step 7: Click on the “Enable” button to activate it.
- Step 8: On the next page, click on the “Create Credentials” option.
- Step 9: Navigate to the left sidebar and click on the “OAuth consent screen” option.
- Step 10: Select the “External” option under the “User Type” header.
- Step 11: Click on the “Create” button.
- Step 12: On the “App information” page, enter the desired name of your app in the “App name” field.
- Step 13: Enter your email ID in the “User Support email” field.
- Step 14: On the “Developer Contact Information” page, enter your email ID again in the “Email Address” field.
- Step 15: Click on the “Save” button followed by the “Continue” button.
- Step 16: On the next “Scopes” page, don’t do anything and just click on the “Save and Continue” button.
- Step 17: Click on the “Add Users” option on the “Test Users” page.
- Step 18: Click on the “Save And Continue” button.
- Step 19: Now, click on the “Back to Dashboard” button on the “Summary” page.
- Step 20: Navigate to the left sidebar and click on the “Credentials” option.
- Step 21: On the right side of the page, click on the “Create Credentials” button.
- Step 22: From the available list, select the “OAuth Client ID” option.
- Step 23: Under the “Application Type” menu, select the “Web application” option.
- Step 24: Enter a name and then insert “https://coupler.io” in the “Authorized redirect URIs” section.
- Step 25: Click on the “Create” button, and you’ll get a popup page.
- Step 26: Copy the “Your Client ID” and “Your Client Secret” credentials to a text editor like Notepad.
- Step 27: Click on the “OK” button to save the settings.
- Step 28: Insert your client ID and secret in the “https://accounts.google.com/o/oauth2/auth?scope=https://www.googleapis.com/auth/gmail.readonly&response_type=code&access_type=offline&redirect_uri=<Your Redirected URL>&client_id=<Your Client ID>” link.
- Step 29: Now, copy the entire link and access it through an incognito page on Google Chrome.
- Step 30: Click on the “Allow” button once you get the “View your email messages and settings” option.
- Step 31: You’ll now be automatically redirected to the home page of Coupler.io.
- Step 32: Copy the code between the “code=” and “&” parameters from the URL.
- Step 33: Insert your credentials in the “https://accounts.google.com/o/oauth2/token?grant_type=authorization_code&code=<Your Authorization Code>&client_id=<Your Client ID>&client_secret=<Your Client Secret>&redirect_uri=<Your Redirected URL>” link.
- Step 34: Now, open a new tab on your browser and launch the Postman app.
- Step 35: Enter the above URL in the “URL” field.
- Step 36: Click on the drop-down menu in the top-left corner and select the “Post” option.
- Step 37: Click on the “Send” option, and you’ll be redirected to a new page.
- Step 38: Visit the Coupler.io website and log in with your credentials.
- Step 39: Click on the “Add Importer” button on your dashboard.
- Step 40: Click on the drop-down menu under the “Source” header and select “JSON Client” from the list.
- Step 41: Choose the desired name of the import and click on the “Continue” button.
- Step 42: Enter the “https://accounts.google.com/o/oauth2/token?grant_type=refresh_token&refresh_token=<Your Refresh Token>&client_id=<Your Client ID>&client_secret=<Your Client Secret>&redirect_uri=<Your Redirect URL>” link in the “JSON URL” field.
- Step 43: Click on the “Continue” button.
- Step 44: Click on the drop-down menu under the “HTTP Method” header and select the “Post” option.
- Step 45: Now, click on the “Proceed to Destination Settings” option.
- Step 46: On the next page, select your Google account and a spreadsheet where you want to auto-sync your emails.
- Step 47: Click on the “Proceed to Schedule Settings” option, and you’ll be redirected to the next page.
- Step 48: Select “Every Hour” from the drop-down menu under the “Interval” header.
- Step 49: Select your preferred “Days of Week,” “Time Preference,” and “Schedule Time Zone” parameters.
- Step 50: Click on the “Save and Run” button to complete the process.
- Step 51: Open the spreadsheet on Google Sheets, which you have pre-defined, and you’ll get your synced emails.
Please note that the Google OAuth access tokens have a validity of just one hour. So, once you get the access token through Postman, you need to complete the whole step within an hour.
Bonus: Do you know that you can now even insert emojis and special characters in GS to enhance the aesthetic appeal of your spreadsheet? To know more, check out my detailed guide on inserting emojis in Google Sheets.
Extracting And Parsing Data From Gmail To Google Sheets
If you don’t want to sync the whole email folder but want just some data to be scraped from those emails, there are two methods available.
We can easily do it by using any third-party tool that can handle regular expressions. Otherwise, we can use a custom App Scripts code to do it. Let’s start with the easiest.
Using Regular Expressions Or Filters To Parse Email Content
Regular expressions are patterns that match a text or value in Google Sheets. However, we can use this to our advantage to fetch specific data or fields from our Gmail account.
But it can’t be done without using a third-party tool. I’m using Email Parser here. Check out the steps now!
- Step 1: Visit the Email Parser website and download the software or access it through the web app.
- Step 2: Create a login credential and log into your account.
- Step 3: Enter your Gmail ID in the “Email Address” field.
- Step 4: Now, select “Gmail Account” from the drop-down menu beside the “Type” option.
- Step 5: Navigate to the “Settings” tab from the bottom box.
- Step 6: Click on the “Authorize Email Parser to access Gmail” button, and a new popup window will appear.
- Step 7: Enter your Gmail ID and Password in the designated field and click on the “Continue” button.
- Step 8: Once verified, you’ll get an “Email Parser is authorized to access Gmail” notification.
- Step 9: Select “Inbox” on the “Gmail label” field.
- Step 10: Once these steps are done, go back to your Email Parser dashboard.
- Step 11: Create a new filter and enter a desired name in the “Email Filter Name” field.
- Step 12: On the “Settings” tab, define the regular expressions on the “Subject Must Contain” field.
- Step 13: Now, tick the box beside the “Evaluate the must contain conditions as regular expressions” option.
- Step 14: You can also define other parameters on the “To must contain,” “CC must contain,” and “Body must contain” fields.
- Step 15: Now, save the settings, and it will auto-sync all the emails matching the defined regular expressions.
- Step 16: After the whole extract is completed, save the output file.
- Step 17: Finally, upload it to your Google Sheets account as a new import.
If you want to automate the process further, you can also connect your Zapier account with Email Parser. It can then directly sync your matched emails and data to Google Sheets using Zapier as a bridge.
Writing Custom Scripts Or Formulas To Extract Emails From Gmail
App Scripts is a useful tool that goes pretty well with all the Google Workspace apps, such as Google Sheets and Google Sheets. And you can make a custom script to sync your Gmail with a spreadsheet on Google Sheets. Here are the steps.
- Step 1: Launch Google Sheets and open a blank spreadsheet.
- Step 2: Click on the “Extensions” option from the main (header) menu.

- Step 3: Click on the “Apps Script” option, and it will redirect you to a new page.
- Step 4: Delete the first three default lines in the code editor box on your right.
- Step 5: Now, paste the following code as it is:
function exportGmailToSheets() {
  var sheetName = "Gmail Export"; // Change this to your desired sheet name
  var searchQuery = "is:unread"; // Change this to your desired Gmail search query
  var threads = GmailApp.search(searchQuery);
  var sheet = SpreadsheetApp.getActiveSpreadsheet().getSheetByName(sheetName);
  // Clear existing data in the sheet
  sheet.clear();
  // Set headers
  sheet.getRange(1, 1, 1, 6).setValues([[“Subject”, “Sender”, “Date”, “Snippet”, “Labels”, “Body”]]);
  // Export Gmail messages to the sheet
  var row = 2;
  threads.forEach(function(thread) {
    var messages = thread.getMessages();
    messages.forEach(function(message) {
      var subject = message.getSubject();
      var sender = message.getFrom();
      var date = message.getDate();
      var snippet = message.getSnippet();
      var labels = message.getLabels().map(function(label) {
        return label.getName();
      }).join(", ");
      var body = message.getBody();
      // Write data to the sheet
      sheet.getRange(row, 1, 1, 6).setValues([[subject, sender, date, snippet, labels, body]]);
      row++;
    });
    // Mark the thread as read
    thread.markRead();
  });
}
- Step 6: Click on the “Save Project” button (floppy icon).
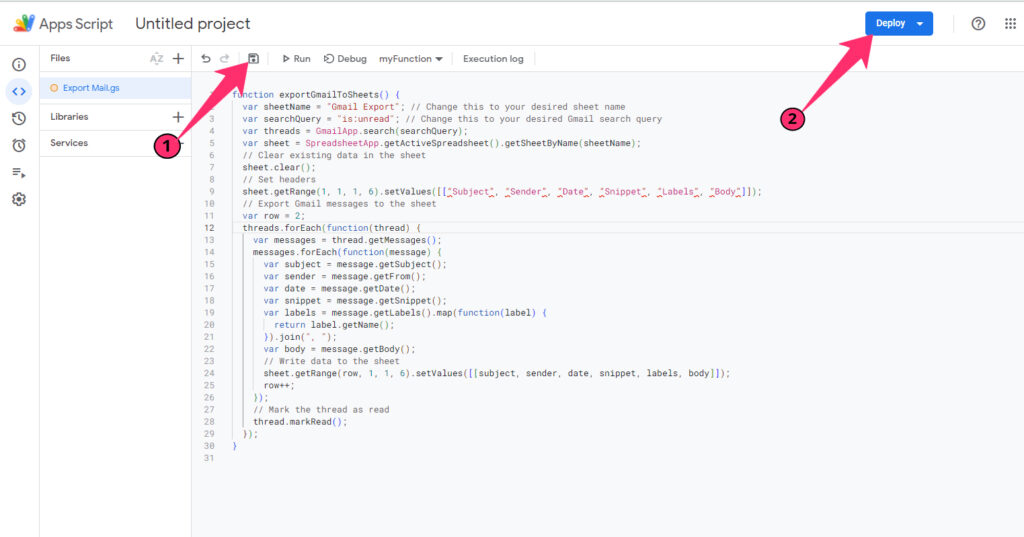
- Step 7: Now, hit the “Deploy” button and grant the necessary permissions.
- Step 8: Reopen the spreadsheet again and click on the “Extensions” tab.
- Step 9: Select and run the Apps Script code you have just deployed.
There are two parameters you can define in this App Scripts code. The first one is “sheetName,” where I’ve used “Gmail Export” as the sheet name. However, you can definite the spreadsheet name here where you want to sync your emails.
And the next one is the email label under the “searchQuery” parameter. Here, I’ve defined “is:unread” to get all the unread messages. However, you can define this parameter to labels, senders, or date ranges, depending on your need.
The script I’ve mentioned above will sync all the emails to a spreadsheet in Google Sheets. But if you want to extract some specific emails or any specific data on a specific email, it is also possible. Check this page to get the complete steps.
Best Tools For Mail Merge For Google Sheets
All the methods I’ve mentioned above need some expertise in Google Sheets to execute perfectly. However, if you are not looking for that much customization, you can surely use some third-party tools to automate the process.
There are hundreds of tools available online, both paid and free versions. But here are my top 5 recommendations to try this year.
There is no doubt that Zapier is the most popular tool of all. But it certainly comes with a hefty price (especially if you don’t use it on a regular basis). You can also search for some free or open-source software to do the same.
Troubleshooting And Limitations While Connect Gmail To Google Sheets
Although Google takes the utmost care with any errors or bugs that trigger in any of their Workspace apps, you may still get some errors while performing the above operations.
However, there are ways to solve those in no time. So, let’s see what the common errors are that we might get.
Common Issues And Error Messages
The most common issue that you can get while syncing your Gmail inbox to Google Sheets is the authentication issue. It can happen with the Takeout method or while using any third-party tools that need access permission.
To resolve this, you can remove all access from your Gmail account and then grant the authentication and access to the third-party tools that you are using for the syncing process.
There is another common issue that can occur in this syncing process is the inability to synchronize the right labels of emails. This issue can be easily solved by defining the email labels that you want to import into the third-party tool you are using.
You also need to make sure that you are using the same Google account for both Gmail and Google Sheets. Besides, you also need to grant access to third-party tools, such as Email Parser, from that same Google account.
Another thing that you must remember while using dedicated email sync apps like coupler.io is the fact that you need API and access tokens. And those tokens are valid for just one hour from the time of first access. So, you must complete all those steps within that timeframe.
Debugging Scripts Or Add-Ons
If you are using the App Scripts code or our custom code which I’ve mentioned above, you may encounter an error. So, while pasting the script on the App Scripts code editor, delete the first three default lines.
You must also change the parameters according to your preferences. Otherwise, the code will work with default parameters. If you are looking for a certain change in the code, you also need to make sure that the code is working properly after the changes.
Now, some issues can even occur if you are using any add-ons or plugins. You can resolve most issues simply by deleting the add-on and then revoking all the access permissions. Once reset, you can then reinstall the add-ons to your Google Sheets.
You also need to make sure that the add-on does not conflict with any third-party tools (such as coupler.io) that you are using. And for additional help, you can always resort to the Google Developers community.
Bonus: If you are working with your team on a complex project on Google Sheets. It is necessary to keep a tab on the changes made. Now you can do that quite easily. Check out my latest guide on the editing history in Google Sheets to know more.
Conclusion
Although Google Takeout needs you to do some manual work, it is the best method for newbies. You don’t need to do any advanced things with that method. However, using third-party tools like coupler.io not just makes your work easy but also gives you loads of customization options.
But if you are trying any method, it is better to use a sample email account and spreadsheet to try it for the first time. Otherwise, your data may get distorted if you fail to execute any email parsing method or if there any bugs trigger while doing it.
FAQs
How do I email someone from Google Sheets?
It is not possible to directly send an email to someone from Google Sheets. You can only collaborate with other people and ask them to become a viewer, editors, or commentators of the spreadsheet project. However, you can automate the emailing process by using Google Sheets while using third-party apps like Lido.
Can I handle attachments or embedded content from emails in Google Sheets?
Yes, it is possible to fetch all the attachments and embedded content from emails in Google Sheets. You need to have a third-party tool like Email Parser to do this work. You can go with regular expressions to get matching data or attachments, or you can create a custom label there and import those directly.
How can I handle multiple email accounts or folders when exporting to Google Sheets?
It is not possible to sync a single spreadsheet with multiple Gmail accounts without using a third-party tool or plugins. However, if you want the complete data of your organization, you can do it easily by using Google Takeout. And for handling multiple email accounts and their data, you can use popular tools like Zapier.