Applying page breaks in your Google Sheets document helps guide your printer on where to stop printing for a specific sheet, automatically moving the remaining columns and rows to the subsequent page.
But how can you effortlessly set these page breaks?
You can insert page breaks by navigating to the “Print” settings, then select the “Custom Page Breaks” option. Simply drag the page break lines to your desired location and confirm the page breaks in the settings. When you print, your spreadsheet will only print up to the page breaks you’ve established.
If you don’t set page breaks, Google Sheets will automatically print as many cells as can fit on a page, moving the excess data to the next page.
However, this might not yield the best print output. If your data is structured or formatted in a complex manner, failing to set page breaks could disrupt the layout.
Although it’s relatively straightforward to view and adjust page breaks in Google Sheets, it can be a bit tricky without knowing the correct method.
Understanding and utilizing this feature can greatly enhance the organization and presentation of your printed spreadsheets.
What is a Page Break in Google Sheets?
Before we dive into how to insert a page break in Google Sheets, it’s crucial to understand what a page break is and what purpose it serves.
A page break is a boundary that can be inserted in your spreadsheet, dictating where a printed page should end.
All rows and columns beyond the page break are automatically moved to the next page during printing.
Adjusting these page breaks allows you to customize which data you wish to print on each page, enhancing the readability of your printed sheets.
Page breaks play a crucial role in ensuring that your print output is optimal and precisely contains the data you need on each page. Moreover, this feature gives you greater control over the print area, particularly useful when dealing with different paper sizes.
Pro tip: For the cleanest, most organized output, it’s advisable to remove all duplicates before your final printout. Check out my latest guide on how to remove duplicates in Google Sheets to learn more about this important data cleanup process!
How To Set Page Breaks In Google Sheets?
Setting proper page breaks is crucial when you’re preparing your sheet for printing. If not defined carefully, your printed page might end up with split columns and rows, disrupting the readability of your data.
Let me guide you through the process of inserting a page break in Google Sheets when you’re planning to print any CSV file.
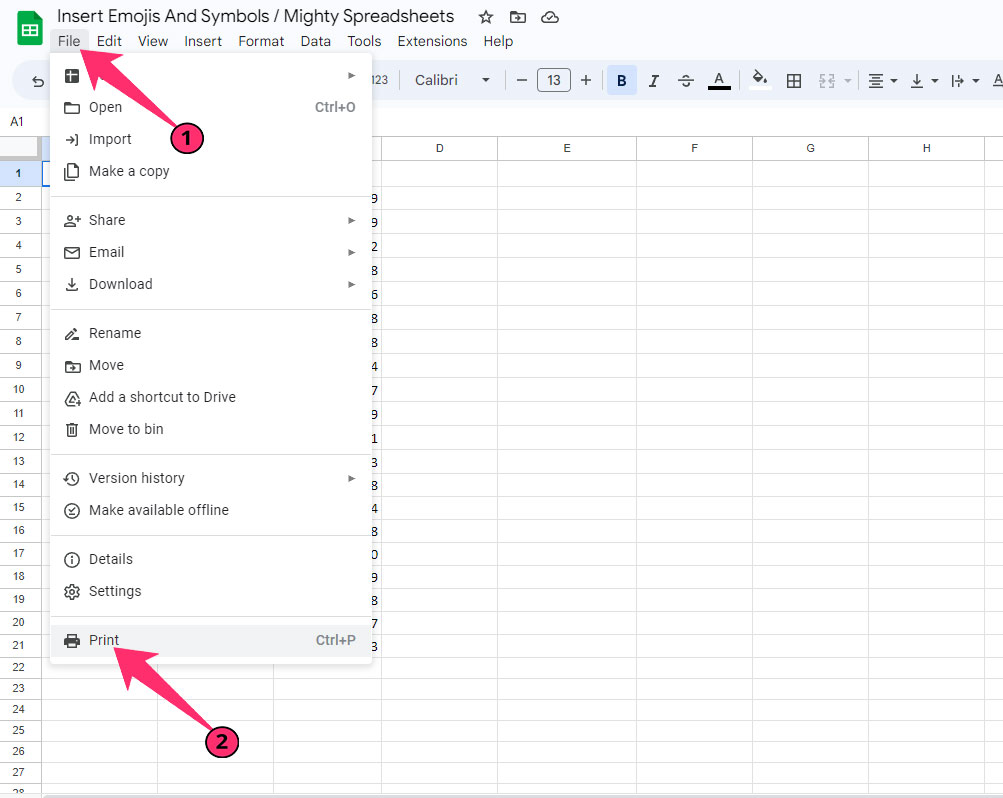
Step 1: Open the spreadsheet you want to print and click on the “File” option from the header menu.
Step 2: From the dropdown list, select the “Print” option. Alternatively, you can use the shortcut “Ctrl + P” to access this feature directly.
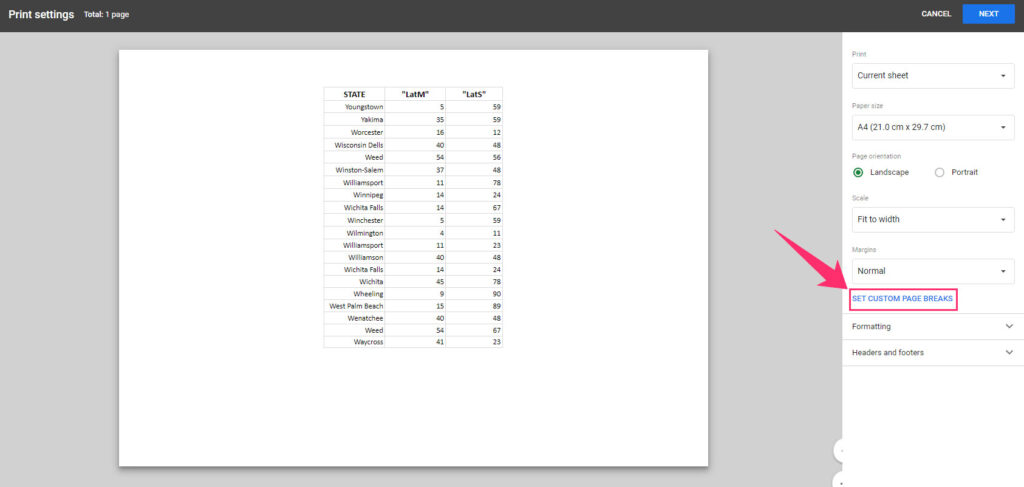
Step 3: On the “Print Settings” page, navigate to the right-hand toolbar.
Step 4: Click on the toggle switch beside the “Custom Page Breaks” option to turn it on.
Step 5: On the preview page, your spreadsheet will be bordered by dotted lines, which represent the default page breaks.
Step 6: Hover your cursor over any of these dotted lines (vertical or horizontal) until it transforms into a two-sided arrow.
Step 7: Click and hold your mouse, then drag the dotted vertical line to the column of your choice, marking where you’d like the page to break.
Step 8: Repeat this process, dragging the dotted horizontal line to the row where you want your page to end.
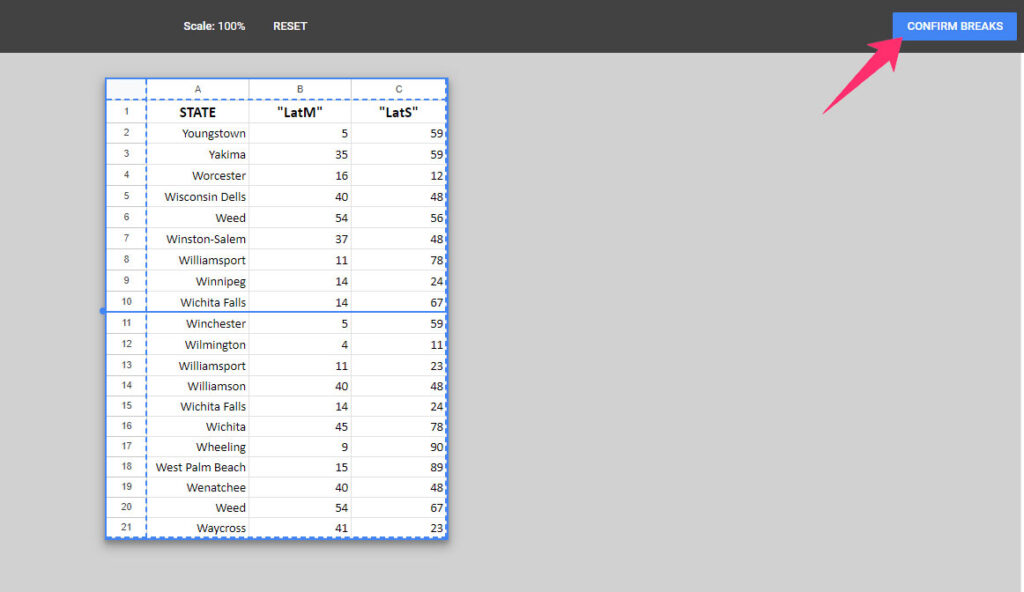
Step 9: Leave the mouse, and the lines will be locked in your desired area.
Step 10: Click on the “Confirm Breaks” option located at the top-right corner of the preview page.
Step 11: Navigate to the right-side toolbar and click on the “Scale” drop-down menu.
Step 12: Select the “Fit to page breaks (100%)” option from the menu.
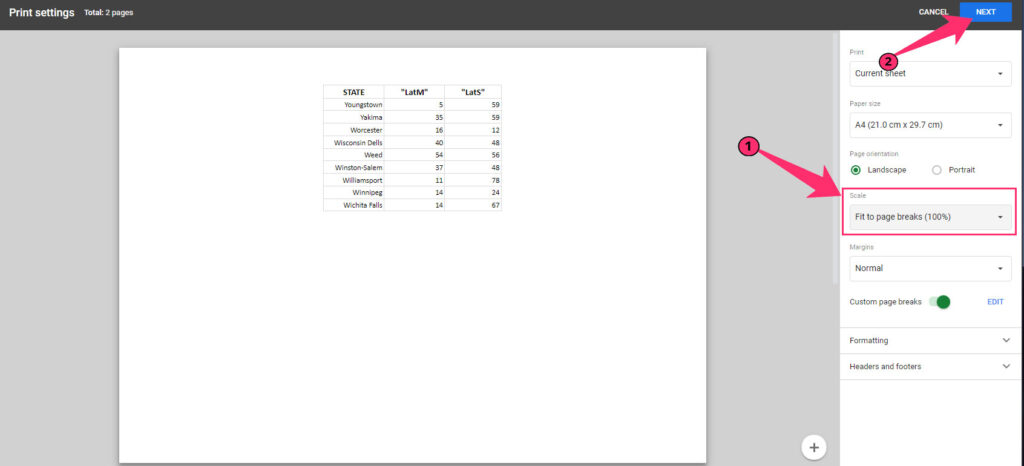
Step 13: Once all the print settings are completed, click on the “Next” button located at the top-right corner.
Step 14: On the print dialog page, click on “Save” or “Print” to get your output.
Default Settings: Upon entering the print settings, page breaks are automatically applied to cells containing values in both rows and columns. On the preview page, you’ll only see these valued cells. Remember, you cannot move your page break into areas with empty cells.
Note: If you are not sure about what to print in a particular sheet, you can simply filter the data and arrange it accordingly to get the best output. Check out my recent guide on how to filter data in Google Sheets to learn more!
How To Edit The Page Break In Google Sheets?
You have already seen that Google Sheets show page lines in the print settings menu. And you can get a preview of the page in the page layout view on Google Sheets.
However, there is an option to edit it as well. Sharing it with you right now!
- Step 1: Launch the spreadsheet you want to adjust and click on the “File” option in the menu bar.

- Step 2: Click on the “Print” option (Or press “Ctrl + P”) to navigate to the print settings page.
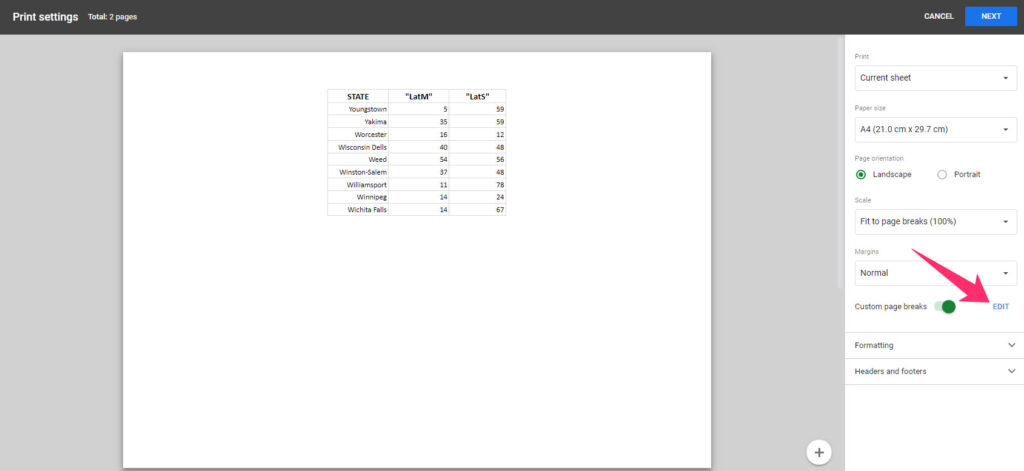
- Step 3: In the toolbar on the right, locate and click on the “Edit” button next to the “Custom Page Breaks” option.
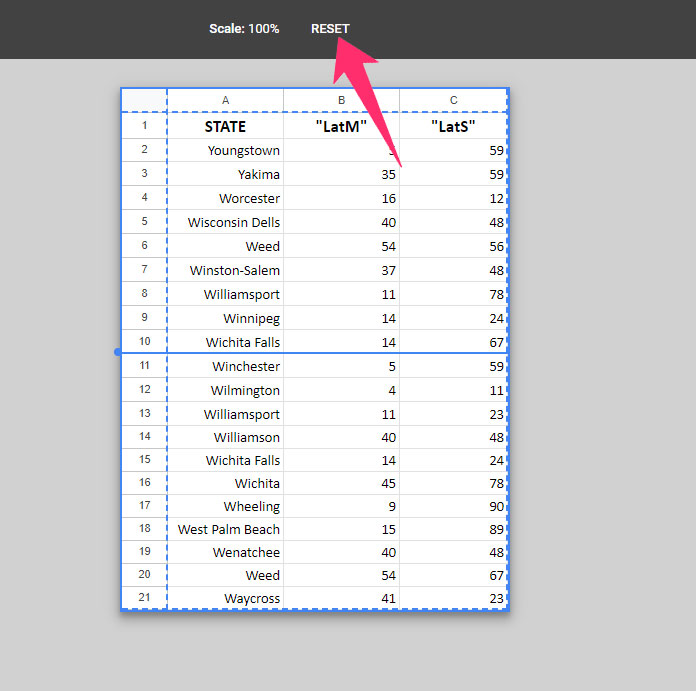
Step 4: In the following screen, click on the “Reset” button located in the menu bar.
Step 5: Drag the dotted lines (which represent your page breaks) to your desired positions by hovering until your cursor changes into a two-sided arrow.

- Step 6: After adjusting the page breaks to your satisfaction, click on the “Confirm Breaks” button in the top-right corner to save your changes.
Tip: Google Sheets allows you to copy the entire formatting of a sheet to avoid repetition across multiple spreadsheets. To learn more about this feature, refer to my recent guide on how to copy formatting in Google Sheets.
How To Remove The Page Break In Google Sheets?
You have already learned how to add page breaks in Google Sheets. At times, you may need to remove those breaks altogether to get a complete view of your spreadsheet. And there is an easy way to do it.
If you want to remove specific page breaks:
Step 1: Press “Ctrl + P” to open the print menu and navigate to the right-hand toolbar.

Step 2: Click on the “Edit” button beside the “Custom Page Breaks” option.
Step 3: On the preview page, hover your mouse over the thick vertical line, and an “X” sign will appear on the top of the page.
Step 4: Do the same for the thick horizontal line, and an “X” sign will automatically appear on the left side of the page.
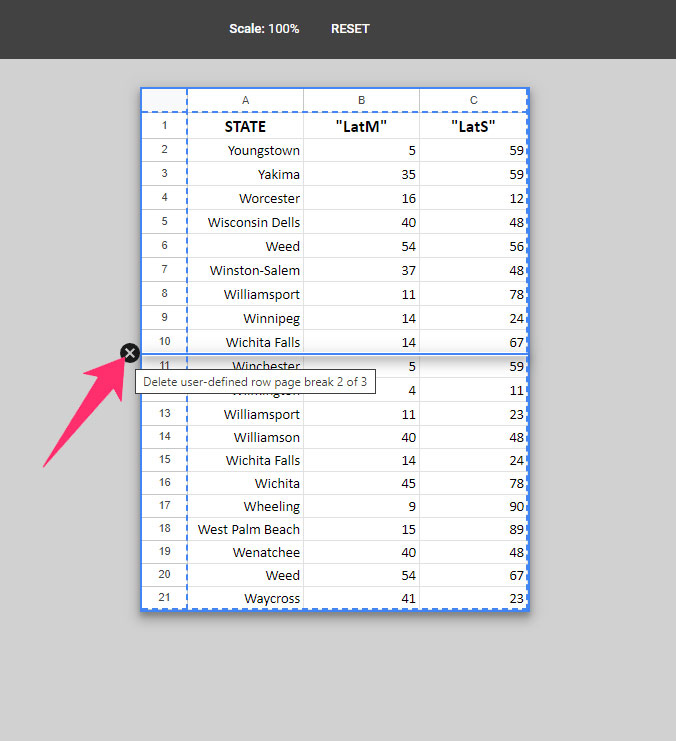
Step 5: Click on the round “X” (cancel) sign to remove that particular page break.

Step 6: Once you remove the desired page break, click on the “Confirm Breaks” button at the top-right corner of the page to save the settings.
If you want to remove all page breaks:
Step 1: Press “Ctrl + P” to launch the print settings.
Step 2: Navigate to the right-side toolbar.
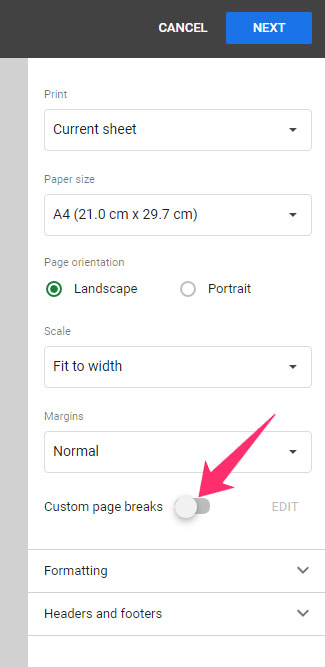
Step 3: Tap on the toggle switch beside the “Custom Page Breaks” option to turn it off.
Step 4: You can now see your entire spreadsheet without any page breaks in the preview.
Is A Section Break The Same As A Page Break?
No, section breaks and page breaks are not the same thing and they serve different unique purposes.
Section breaks are used to separate or organize different parts of a document or spreadsheet. They allow you to apply different formatting options to different sections of your document.
For instance, you might want one section to have a different column layout or orientation than another section.
On the other hand, page breaks are used specifically for print layouts. A page break marks where one-page ends and the next begins.
This is useful when you’re preparing a document or spreadsheet for printing and you want to control where new pages start.
Most Common Issues When Adding Page Breaks In Google Sheets
At times, you may encounter certain errors and bugs in Google Sheets while you try to apply page breaks. And in my experience, there are two most common issues. Let’s solve them one by one.
Custom Page Breaks Are Not Saving In Google Sheets
You may sometimes encounter that the page break settings are not saving even after clicking on the “Confirm Page Breaks” button on the print settings page. According to a support thread of Google, it is a technical error from their side.
In this case, you can’t do anything other than restart your Google Sheets. However, it is better to report that issue to Google so that their developers can have a look at it from their side.
Step 1: Open the spreadsheet in Google Sheets where you are having this issue.
Step 2: Click on the “Help” option from the header menu.
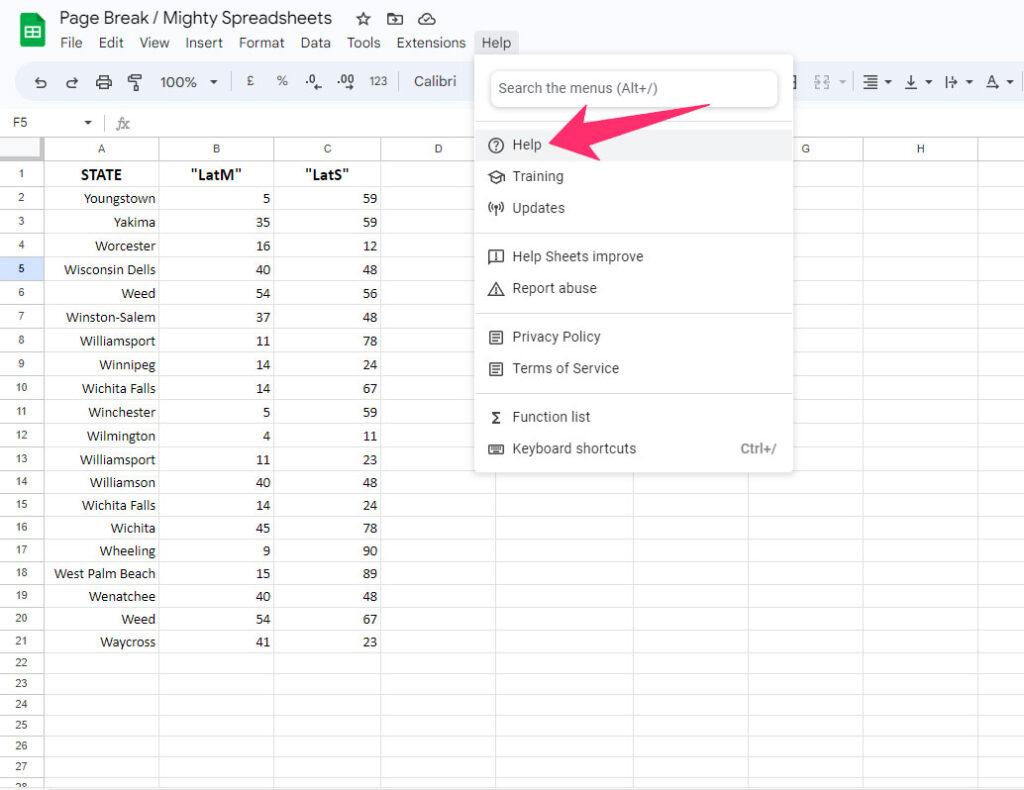
Step 3: Click on the “Help” option again from the drop-down menu, and a popup box will appear.
Step 4: Scroll down and click on the “Send Feedback” option.
Step 5: On the next page, write your issue in brief and tick the “Include Screenshot” option.
Step 6: Click on the “Send” button.
Step 7: Alternatively, you can click on the “Help” option followed by the “Help Sheets Improve” option.
Note: If you have purchased the Workspace domain from Google, you can directly Contact Google Workspace support and let them know you are having this issue.
Why Are Page Breaks Not Working In Google Sheets?
You may even encounter a printing issue after setting a page break. It mainly happens if you have any hidden rows in the spreadsheet. Most users who had this problem in the past have hidden rows on their sheets.
To resolve this error, move the hidden rows to the end of your sheet or after the cells that have values. Once you move those to the bottom, try to insert the page break again.
It will likely solve your issue. If not, don’t hesitate to contact the support through the “Feedback” or “Report” section on the “Help” menu.
Final Note
Once you apply page breaks, always check the preview of the spreadsheet on the “Print Preview” page.
If you set your page breaks too far, the final print output will be too congested. So, check the print preview and adjust your page breaks accordingly.
So, these are the latest guides on how to insert a page break in Google Sheets. Feel free to drop your queries and start a conversation with me in the comment section below.
