At times, you may need to use a particular part of an image for representation purposes on Google Sheets. And we all know that it can be inconvenient to use a separate tool to do that. But do you know that you can now even crop an image in Google Sheets?
You can find both the “Image” and “Drawing” options in the “Insert” menu. While “Image” will simply insert it, the “Drawing” tool can help you to edit the image. Once opened, just click on the “Add Images” button and then on the “Crop Image” button to do it.
However, there are other ways also available to do the cropping job, such as add-ons and extensions. So here, I’m going to reveal all the possible methods to insert and crop images in Google Sheets.
Understanding The Basics Of Image Insertion In Google Sheets
You need to start by knowing the right ways to insert an image first in Google Sheets before you proceed with the cropping task. There are mainly two ways to insert any image.
You can either upload and use an image from your computer or smartphone storage. Or you can directly import it from a live URL. And now, we will be discussing both ways.
Uploading An Image From Local Storage
Before you can crop an image in Google Sheets, you need to first know the right techniques to insert an image. And there are two ways to insert an image, either through drawing or through the image option.
Let’s start with the normal image insertion first. The steps are pretty easy!
- Step 1: Launch Google Sheets and open the spreadsheet where you want to insert an image.
- Step 2: Click on the cell where you want to insert the image.
- Step 3: Click on the “Insert” option from the header menu.
- Step 4: From the drop-down list, hover your pointer over the “Image” option.
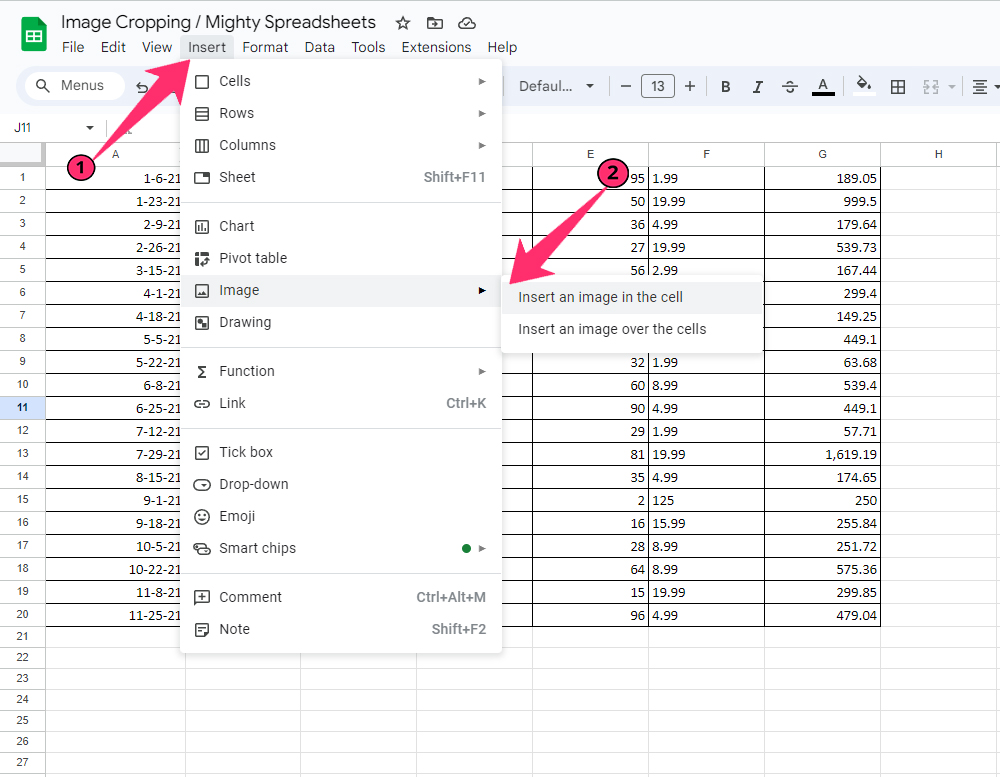
- Step 5: Now, select between “Insert an image in the cell” and “Insert an image over the cell,” depending on your placement preference.
- Step 6: On the popup window, click on the “Upload” option from the header selection tabs.
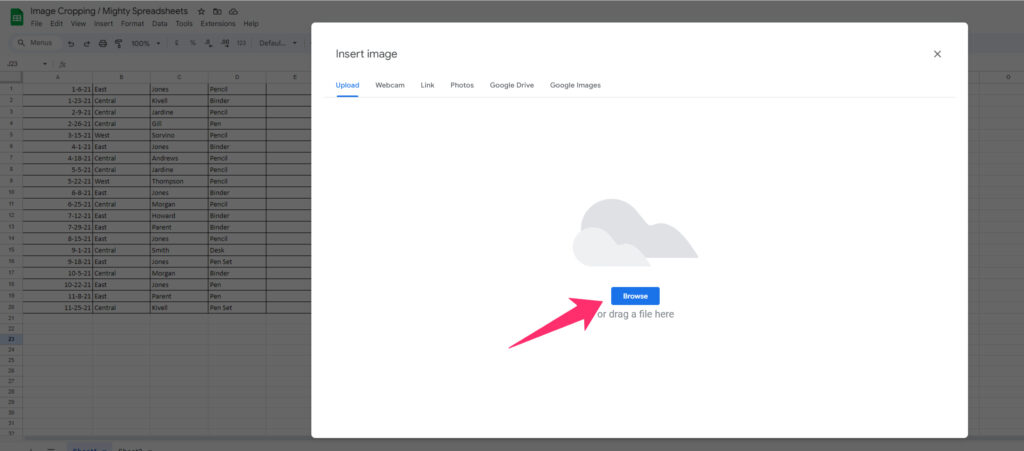
- Step 7: Click on the “Browse” button (Alternatively, you can also directly drag the photo from your local storage to this window).
- Step 8: Select the photo that you want to insert and click on the “Open” button.
- Step 9: Once the uploading completes, you can now see the photo in the spreadsheet.
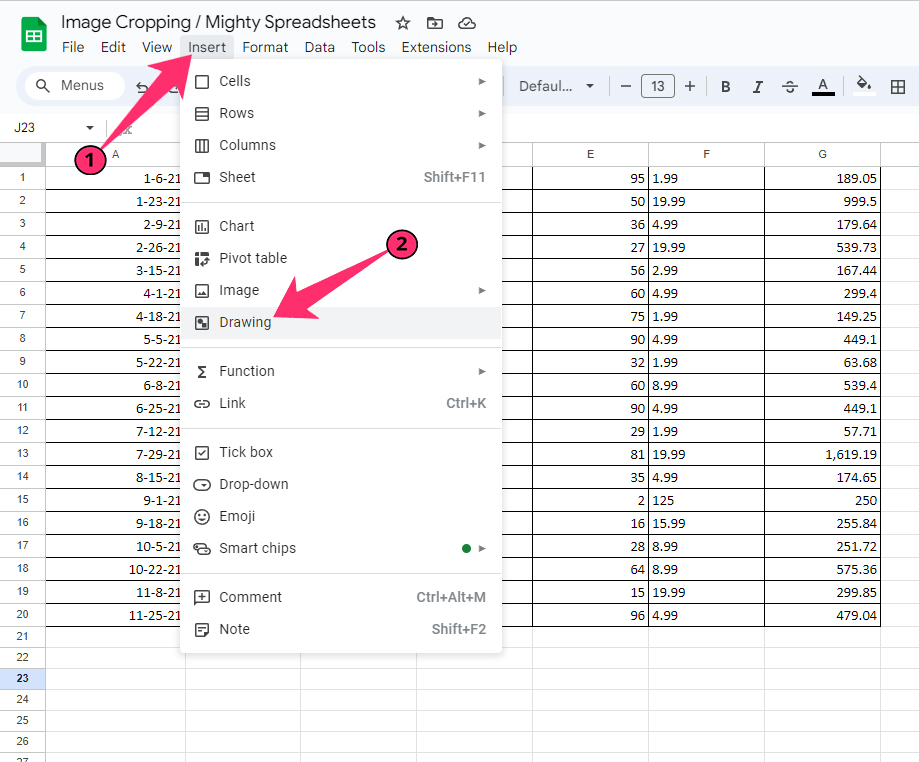
Besides images, you can also use the “Drawing” option to insert an image in Google Sheets. And it gives you much more customization options than images. Let’s check out the steps.
- Step 1: Click on the “Insert” option followed by the “Drawing” option.
- Step 2: On the popup “Drawing” window, click on the “Images” button.
- Step 3: Once another new window appears, click on the “Upload” button from the header tabs.
- Step 4: Now, click on the “Choose an image to upload” button.
- Step 5: Select the image you want to insert and click on the “Open” button.
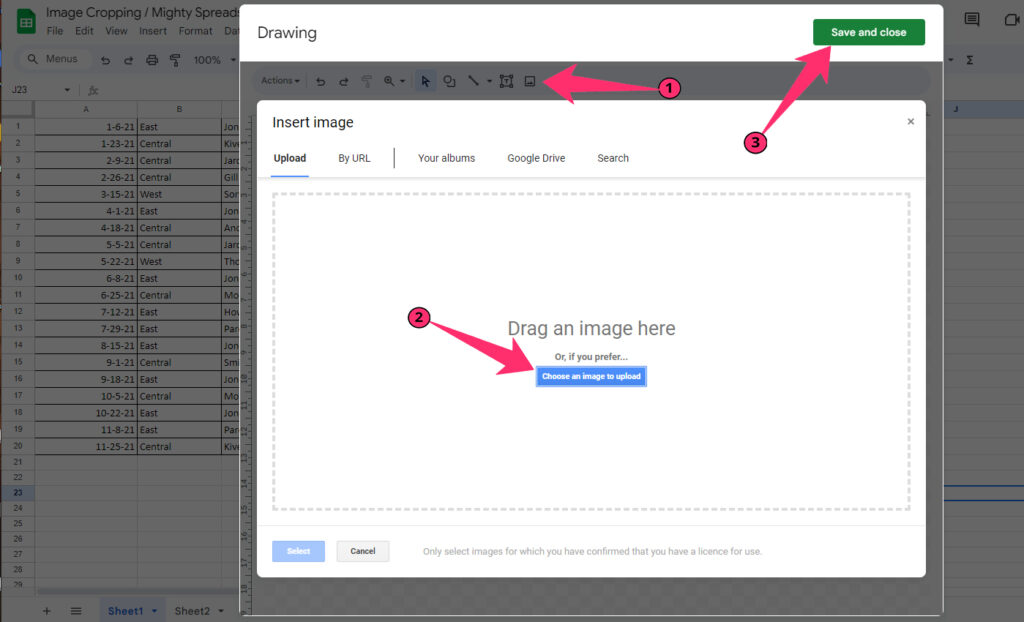
- Step 6: Click on the “Save And Close” button in the top-right corner of the popup window.
- Step 7: Once the image appears on the spreadsheet, you can click, hold, and drag the image to reposition it.
Bonus: Not every people know it, but it is now possible to use Google Sheet as a random number generator. Check out my newest guide on random number generation in Google Sheets to know more.
Inserting An Image Using A URL
Besides uploading it from your local storage (such as your desktop or smartphone memory), you can now also directly insert an image hosted on the web.
You just need the exact permalink of the image to get it done. Here are the steps!
- Step 1: Open your spreadsheet in Google Sheets.
- Step 2: Click on the “Insert” option from the header menu.
- Step 3: Hover your mouse over the “Image” option and select your preferred option from the side menu.
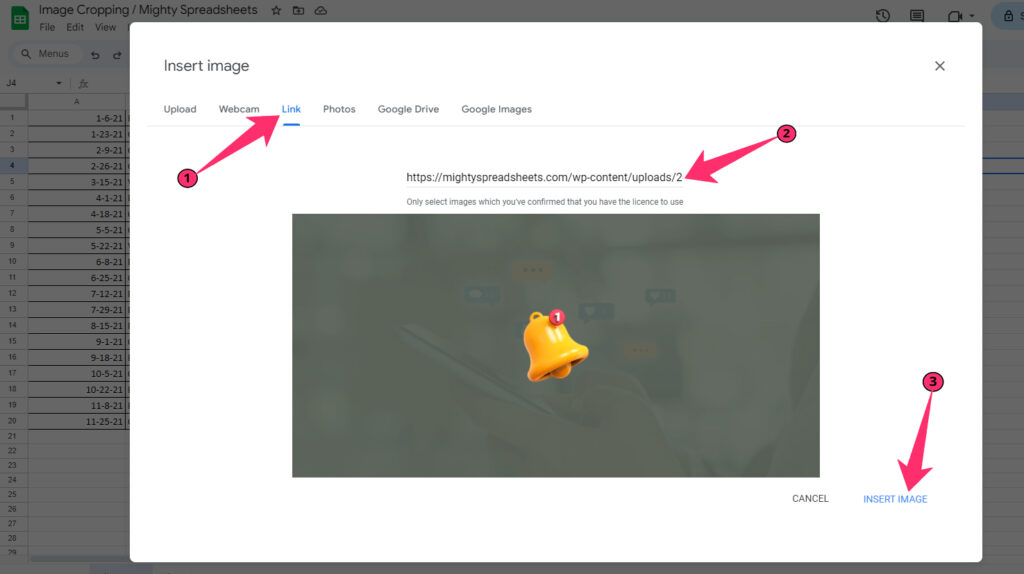
- Step 4: On the popup window, click on the “Link” tab from the header selection menu.
- Step 5: Paste the URL of the image (including https://) in the designated field.
- Step 6: Wait till the preview image start displaying.
- Step 7: Finally, click on the “Insert Image” button to get it on your spreadsheet.
Although these are the steps for the “Image” option, you can follow the same process for the “Drawing” option as well. Right after opening the drawing editor, just click on the “Image” option and then on the “Link” option.
Resizing And Positioning The Image
If you use the “Image” option from the “Insert” menu, it will not be possible to resize and position the image. You need to first upload the image through the “Drawing” option.
This will bring the drawing editor where you can do all the customization. However, you can simply insert the image through the “Drawing” option and resize or reposition the image on the actual spreadsheet.
- Step 1: Open Google Sheets and navigate to the spreadsheet where you want to insert the image.
- Step 2: Click on the “Insert” option from the main header menu.
- Step 3: From the drop-down menu, click on the “Drawing” option.
- Step 4: Once the drawing editor window launches, click on the “Images” option.
- Step 5: Now, select between “Upload” and “By URL” from the header tabs depending on your preference.
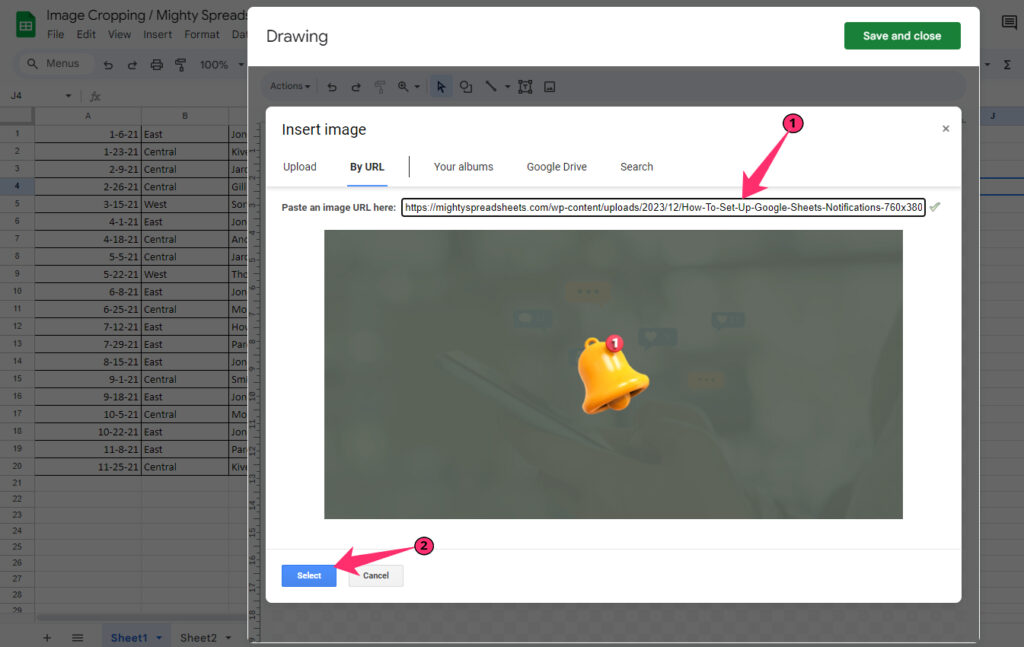
- Step 6: Once the image appears on the drawing editor window, click on the “Save And Close” button.
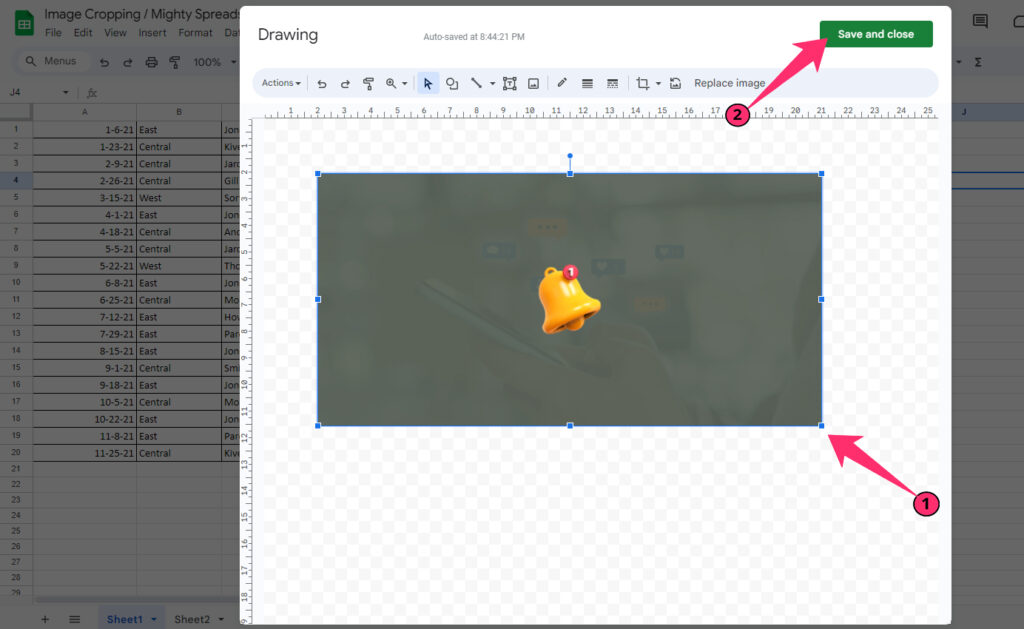
- Step 7: After the image is inserted into your spreadsheet, click to select it.
- Step 8: Click, hold, and drag any of the corner or middle markers of the image to resize it according to your preference.
- Step 9: Now, click and hold the image until the pointer becomes a closed palm icon.
- Step 10: Finally, drag the image to reposition it on the spreadsheet.
You can also do the same steps on the drawing editor itself. But as per my own experience, it is better to insert the image in the spreadsheet first and then resize or reposition it.
Bonus: Do you know that not just images, you can now even insert emojis and special characters? Check out my latest guide on inserting emojis and symbols into Google Sheets to know more.
Techniques For Cropping Images In Google Sheets
There are two ways to crop any image. You can either form-form it or can crop it with a fixed aspect ratio. While free-form cropping is possible with the inbuilt editor, the next one is beyond the reach.
However, you can still do it via a different route. And now, I’ll show you both the ways to properly crop an image in Google Sheets.
Manual Cropping Using The Image Handles (Also in the App)
When Google Sheets was first rolled out for the mass market, it didn’t have an image editor inbuilt. We used to crop the image on third-party tools and then upload it on Google Sheets.
But now, you can easily crop and differently format the image from the inbuilt image editor. Steps are easy, though!
- Step 1: Launch Google Sheets and open your spreadsheet.
- Step 2: From the main header menu, click on the “Insert” option.
- Step 3: Now, click on the “Drawing” option from the drop-down menu.
- Step 4: Once the drawing editor window launches, click on the “Images” tab from the header menu.
- Step 5: Upload your image from your local storage or directly import it from an URL.
- Step 6: Once the image appears on the drawing editor window, click on the “Crop Image” button from the header menu.
- Step 7: This will bring the marker lines around the borders of the image.
- Step 8: Now, click and hold any of the image handles on the corner or at the middle of the border lines.
- Step 9: Drag the handle depending on how much you want to crop.
- Step 10: Once you achieve the right cropping proportion and size, click on the “Save And Close” button.
- Step 11: Finally, check if the cropped image is inserted on the spreadsheet or not.
You can also crop the image with a predefined shape in Google Sheets. And to do that, simply click on the down-arrow icon right beside the “Crop Image” button in the drawing editor.
You can then select any of the shapes, and it will be auto-applied to the image on the editor.
Applying Predefined Aspect Ratios For Consistent Cropping
As of writing this post in mid-2023, Google Sheets doesn’t have any option to crop an image to a predefined aspect ratio. You can only crop it in a free-form manner.
But if you want to insert an image with a fixed aspect ratio, you can do it with any third-party web tool and then upload the image on Google Sheets.
Here, we will be using the Fotor website and Google Sheets together to do this job. Here are the steps.
- Step 1: Open any browser (preferably Google Chrome) and visit the basic editor of Fotor.
- Step 2: On the right panel, click on the “Open Image” button (Alternatively, you can also drag and drop the image).
- Step 3: Select the image that you want to upload and click on the “Open” button.
- Step 4: Once the image loads in the main editor, navigate to the menu panel on your left.
- Step 5: Click on the “Crop” option, and it will fetch the full cropping menu.
- Step 6: Now, select the user ratio that you want to apply.
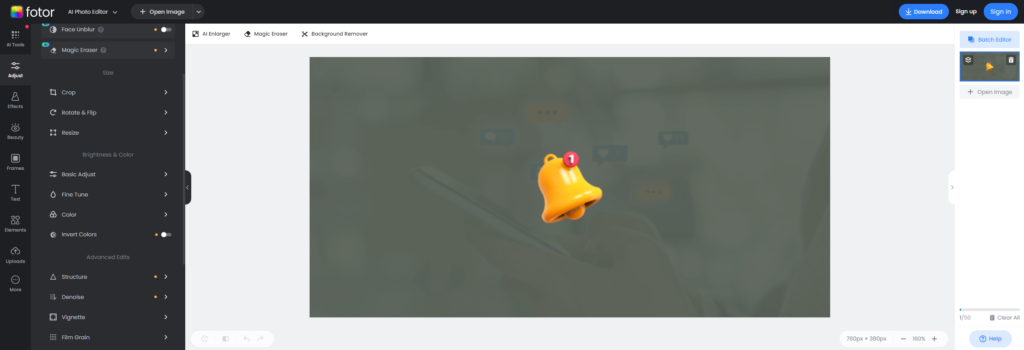
- Step 7: Tick the box beside the “Keep Aspect Ratio” option to make the aspect ratio fixed.
- Step 8: Once applied, cropped part of the image is highlighted on the main editor panel.
- Step 9: Click, hold, and drag the highlighted part and move to the place where you want to crop it.
- Step 10: Once the adjustment is made, click on the “Apply” button on the left panel.
- Step 11: Now, click on the “Download” button in the top-right corner to save the image on your local storage.
- Step 12: Now, launch Google Sheets and open the spreadsheet where you want to insert an image.
- Step 13: Click on the “Insert” button and then on the “Drawing” button.
- Step 14: On the drawing editor window, click on the “Add Image” option.
- Step 15: Upload the edited image from your local storage.
- Step 16: Click on the “Save And Close” button, and the cropped image will appear on the spreadsheet.
- Step 17: Now, you can simply click, hold, and drag the image to reposition it.
While I last checked, Fotor gave me the option to keep the aspect ratio among “1 X 1,” “3 X 2,” “2 X 3,” “4 X 3,” “3 X 4,” “16 X 9,” and “9 X 16.” You can use Adobe Photoshop or any other advanced tool if you are looking for a different or custom aspect ratio.
Bonus: Do you know that you can now even insert a page break in your spreadsheet using Google Sheets? To know more, check out my comprehensive guide on inserting page breaks in Google Sheets.
Using Extensions
As of 2023, there were no such add-ons or extensions that exist for image editing that works with Google Sheets. However, there are a couple of add-ons available for Google Drive that you can use. You can edit the image using those add-ons on Google Drive and then insert the image from the drive into the sheet.
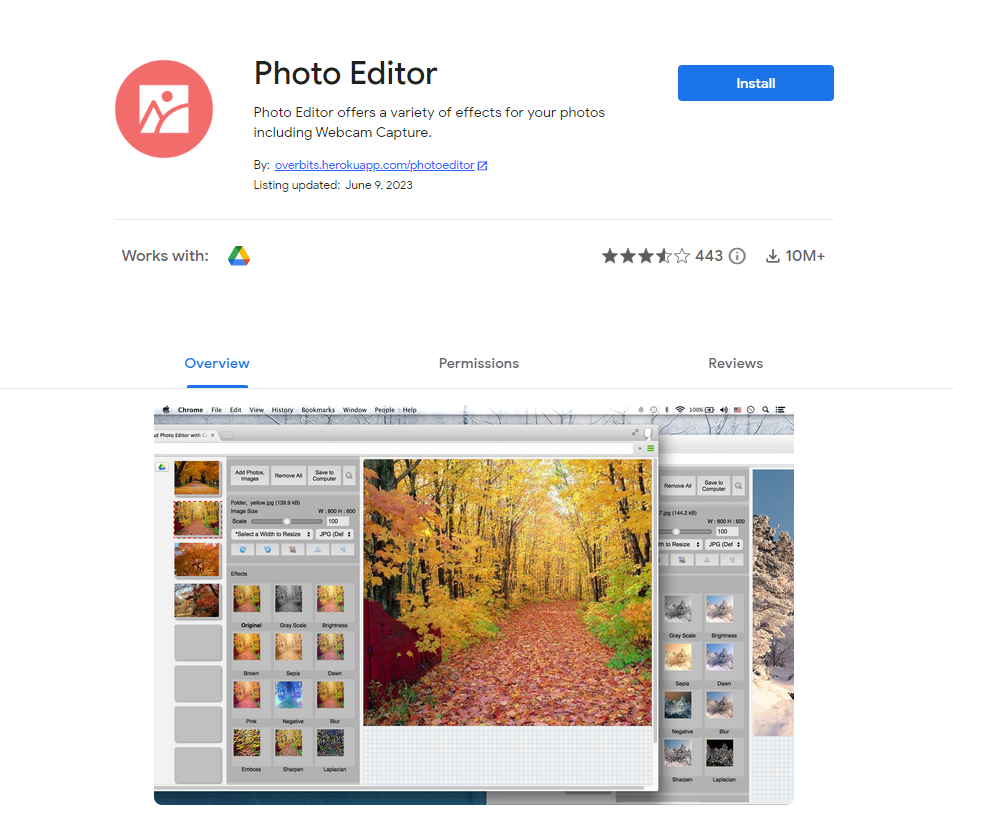
Although there are many add-ons available on Google Workspace Marketplace, my personal favorite is Photo Editor by Overbits. Let’s check out the steps.
- Step 1: Launch any web browser (preferably Google Chrome) and visit this link.
- Step 2: Click on the “Install” button on the top-right corner.
- Step 3: Once a new popup window appears for permission, click on the “Continue” button to grant necessary permissions.
- Step 4: On the next page, select the account that you want to log in with.
- Step 5: Now, tick the box beside the “Select All” option.
- Step 6: Click on the “Continue” button to complete the setup.
- Step 7: On the new popup window, click on the “Done” button.
- Step 8: Go to your Google Drive and double-click on the image that you want to edit.
- Step 9: Once the image opens, click on the “Open with Photo Editor” button at the top of the image.
- Step 10: After you are redirected to a new page, click on the “Login And Authorize” button.
- Step 11: Select the account you want to log in with and click on the “Allow” button.
- Step 12: Crop or edit the image on the photo editor tab.
- Step 13: Once the edit is done, click on the “Google Drive” icon right beside the “Open Files From Google Drive” button in the top-left corner.
- Step 14: Now, close the photo editor tab and launch Google Sheets.
- Step 15: Click on the “Insert” option followed by the “Drawing” option.
- Step 16: On the drawing editor window, click on the “Add Image” option.
- Step 17: Click on the “Google Drive” option from the header selection tab.
- Step 18: Click on the image that you have editor with photo editor and click on the “Select” button.
- Step 19: Once the image appears on the main drawing editor tab, click on the “Save And Close” button to insert the edited image.
Note: Besides this one, you can also use other useful image editing add-ons, such as BeFunky, Img2Go, and Online Image Editor.
Navigating Through Image Cropping Limitations In Google Sheets
Although it is now easy to edit and crop images directly on Google Sheets, there are certain limitations that are still there. The first limitation that I encountered was the inability to crop an image at a fixed aspect ratio with the drawing editor.
The second limitation that I found was the improper display of images in the drawing editor and the spreadsheet. That means the size you see on the drawing editor will not look the same on the spreadsheet.
The third limitation was the inability to re-edit any image once it was inserted. You can only edit before you insert it. Once done, there are no options to access the editing features.
Advanced Techniques And Tips For Image Cropping
We have already discussed both ways to crop an image on Google Sheets. The first method is by using the in-built drawing editor. And the second option is to use an add-on to do the job.
But you can even go a step further if you need advanced controls. Apps Scrips can also be a savior here. Let’s check how we can do it with that.
- Step 1: Launch Google Sheets and open your spreadsheet.
- Step 2: Click on the “Extensions” option from the header menu.

- Step 3: Now, click on the “Apps Script” option, and it will redirect you to a new tab.
- Step 4: Delete the first three default lines in the code editor box on your right.
- Step 5: Paste the following Apps Scripts code:
// Function to crop an image with a specified aspect ratio
function cropImageWithAspectRatio(imageUrl, aspectRatio) {
  var sheet = SpreadsheetApp.getActiveSpreadsheet().getActiveSheet();
  var images = sheet.getImages();
    for (var i = 0; i < images.length; i++) {
    var image = images[i];
    if (image.getAnchorCell() !== null) {
      var imgCell = image.getAnchorCell();
      var imgRange = imgCell.getMergedRanges()[0] || imgCell;
      var imgWidth = imgRange.getWidth();
      var imgHeight = imgRange.getHeight();
      var imgAspectRatio = imgWidth / imgHeight;
      if (Math.abs(imgAspectRatio - aspectRatio) > 0.001) {
        // The image aspect ratio is different from the specified aspect ratio
        var imgBlob = UrlFetchApp.fetch(imageUrl).getBlob();
        // Calculate the new dimensions for cropping
        var newWidth, newHeight;
        if (imgAspectRatio > aspectRatio) {
          newWidth = imgHeight * aspectRatio;
          newHeight = imgHeight;
        } else {
          newWidth = imgWidth;
          newHeight = imgWidth / aspectRatio;
        }
        // Crop the image
        var croppedBlob = imgBlob.getBlob().crop(0, 0, newWidth, newHeight);
        // Replace the image with the cropped version
        sheet.deleteImage(image);
        sheet.insertImage(croppedBlob, imgCell.getColumn(), imgCell.getRow(), newWidth, newHeight);
      }
    }
  }
}
- Step 6: Once done, click on the “Save Project” (floppy icon) button.
- Step 7: Click on the “Deploy” button and give the necessary permissions.
- Step 8: Reopen Google Sheets and click on the “Extensions” tab.
- Step 9: Click to run the Apps Script code you have deployed.
You need to change two lines in this code according to your desired aspect ratio. Provide the URL of the image you want to crop with a specific aspect ratio. Replace “IMAGE_URL_HERE” with the actual URL in the <var imageUrl = “IMAGE_URL_HERE”;> line.
You can also provide the desired aspect ratio in the function call. For example, to crop an image with a 16:9 aspect ratio, use the <cropImageWithAspectRatio(imageUrl, 16/9);> line.
Troubleshooting And Common Challenges
If your image is too big (both pixel-wise and size-wise), you may face trouble editing it with the default drawing editor on Google Sheets. To minimize this loading time, you can just compress the image and bring the size down through a third-party tool and then upload it.
If you are uploading an image through a URL and getting an error, there are two things you need to check. First, you need to check if the URL you are using is correct and also currently live and accessible.
And secondly, you need to check if the photo has public access permission or not. If you still have an issue after that, you can contact the support team from the “Help” menu.
Bonus: If you want to consolidate your data on any spreadsheet, you first need to remove all the duplicates from it. And to do it the best way, follow my detailed guide on removing duplicates in Google Sheets.
Conclusion
If you are looking for some basic cropping without any predefined size or aspect ratio, it is better to use the in-built drawing editor on Google Sheets. It will streamline your process and will easily integrate the image into your spreadsheet.
But, if you are looking for some advanced controls, it is better to use the add-ons that I’ve mentioned above. You can also use my Apps Script code to go all custom. But don’t forget to keep a backup of your spreadsheet before trying anything new.
FAQs
Can I crop an image directly within Google Sheets?
Yes, you can crop an image directly on Google Sheets. Just access the drawing editor by clicking on the “Insert” option from the main menu and then on the “Drawing” option. You can then crop it by clicking on the “Crop Image” button.
Can I Resize The Crop Area Using Side Handles?
Yes, you can resize the crop area of any image on Google Sheets using the side handles. On the drawing editor, just click, hold, and drag the side handles to adjust the cropping area.
What should I do if the image quality or resolution is affected after cropping?
It is highly unlikely that your image quality gets deteriorate after cropping it with the in-built drawing editor. However, it can happen if you are directly importing it from a URL. So, it is better to download the image and then upload it manually.
Can I Crop a picture to a specific shape?
Yes, you can also crop an image to a specific shape on Google Sheets. To do that, click on the “Insert” button followed by the “Drawing” button. On the drawing editor, click on the “Add Image” button and then on the drop-down menu beside the “Crop Image” button. Select any shape, and your image will be auto-cropped according to that shape.