Not just for decoration, you might need to adjust the alignment of texts and other data types for a better and more streamlined workflow. It is not that difficult, though! But do you know how to center text in Google Sheets?
You can use the “Alignment” option in the main toolbar to align any text in the center direction. Besides you can also click on the “Format” menu and then select your desired alignment under the “Alignment” option. Alternatively, you can also use the “Ctrl + Shift + E” shortcut to do it.
However, there are two other types of alignment options available in both the horizontal and vertical directions. So, without any further ado, let’s check out all the ways to adjust the alignment in Google Sheets.
What Are The Default Alignments For Different Data Types In Google Sheets?
You must have seen the scenario where texts automatically get aligned in a certain manner while numbers follow a different alignment in Google Sheets.
This is due to the default alignment setting for different data types. It not only creates a distinction between different data types but also makes it easy to understand.
Currently, Google Sheets has default alignment for the following data types:
| Data Type | Horizontal Alignment | Vertical Alignment |
| Text | Left | Bottom |
| Numbers | Right | Bottom |
| Dates | Right | Bottom |
| Boolean | Center | Bottom |
| Checkboxes | Center | Middle |
| Images (Dynamic elements) | Left | Bottom |
If you insert any image (in any format) in a cell on Google Sheets, it will automatically scale to fit inside the cell. So, even if the default vertical alignment is bottom, you can hardly see any difference.
You can only see the “Bottom” option highlighted in the vertical alignment section on the toolbar.
Bonus: At times, you may need to insert a page break to differentiate between two data groups on the same spreadsheet. And it is now very much possible. Check out my comprehensive guide on inserting page breaks in Google Sheets to know more.
How To Center Text In Horizontal Alignment In Google Sheets?
Two types of alignments are available on Google Sheets: horizontal alignment and vertical alignment. And you can align a single text both ways.
There are three different ways to align text in the center position in the horizontal direction on Google Sheets. Besides the prebuilt option, you can also use a shortcut to do it fast.
Now, let’s check out ways and find out the steps to do it!
Method 1: Using The Toolbar
Google Sheets is amazing for many reasons. It’s fast, reliable, and has lots of premade functionalities. And for aligning any text to the center position, you can use the inbuilt toolbar to do it. The steps are pretty basic.
- Step 1: Launch Google Sheets and open the spreadsheet where you need the alignment.
- Step 2: Click on the cell or the range which you need to align.
- Step 3: Navigate to the main toolbar just below the menu options.
- Step 4: Click on the “Horizontal Align” button (five horizontal lines) to get the drop-down list.
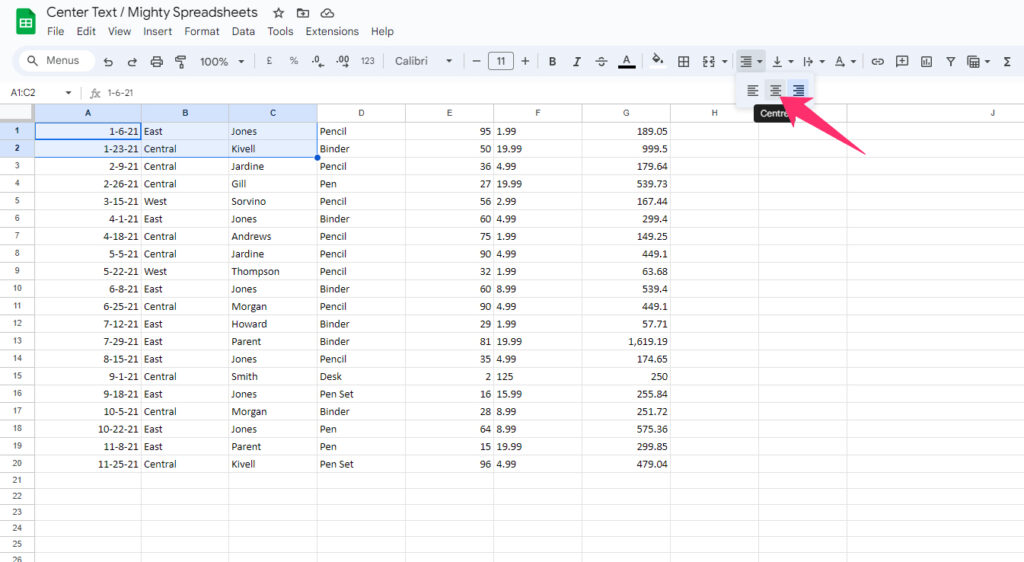
- Step 5: Now, click on the “Center” option (the middle one) to align the text.
- Step 6: Check if the text is now aligned in the center of the cell.
- Step 7: You can also select the “Right” and “Left” option from the drop-down list to pick other alignment options.
You can assign center alignment to the whole spreadsheet at once. To do it, first select the entire spreadsheet by pressing “Ctrl + A” together. Then, follow the above method to align everything in the spreadsheet in the center position.
Bonus: Do you know that you can now even search on Google Sheets to get some specific data? Check out my newest guide on the search option in Google Sheets to know in detail!
Method 2: Using The “Format” Menu
You can find all the available formatting options on Google Sheets under the “Format” menu located in the main header menu. And center alignment is no different, either.
You can now access the same alignment options on the “Format” menu. Here are the steps to do it!
- Step 1: Open your spreadsheet in Google Sheets.
- Step 2: Click on the cell to select it. (You can also select an entire range or the whole sheet).
- Step 3: Now, click on the “Format” option on the main menu.
- Step 4: Hover your mouse over the “Alignment” option, and a new menu will sideload.
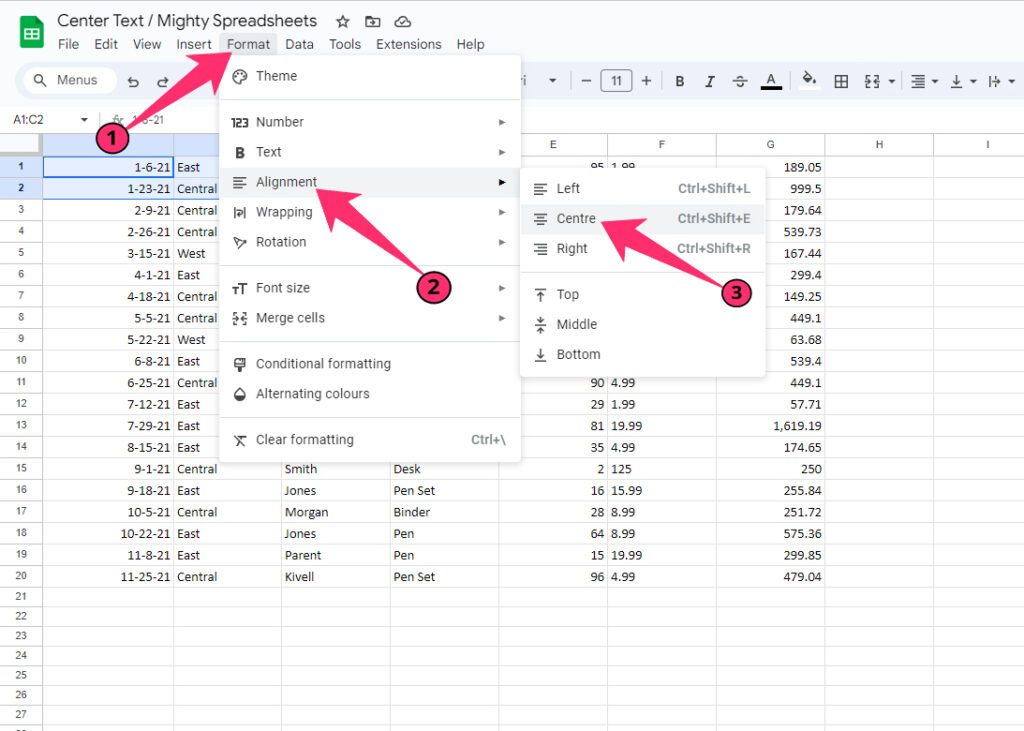
- Step 5: Click on the “Center” option.
- Step 6: You can also alternatively choose “Left” or “Right” alignment from the same menu.
- Step 7: Finally, check if the text you have selected is aligned in the center or not.
Besides the horizontal and vertical alignment, Google Sheets now also allows text wrapping and text direction. Not just center, you can now align a text in any direction on Google Sheets.
Method 3: Using A Shortcut
Google Sheets is known for amazing shortcuts. And now, it is giving stark competition to its archrival, Microsoft Excel, in terms of functionality. You can now find many similar shortcuts in both spreadsheet programs.
And if you don’t know how to center text in Google Sheets, there is also a shortcut available. Let’s know about it!
- Step 1: Open Google Sheets and navigate to your spreadsheet.
- Step 2: Click on the cell that needs to be aligned (You can also select a cell range).
- Step 3: Once the cell is highlighted, press the “Ctrl + Shift + E” buttons together.
- Step 4: Check if your text is now aligned in the center position or not.
- Step 5: Alternatively, you can use the “Ctrl + Shift + L” shortcut for left alignment and “Ctrl + Shift + R” for right alignment.
These shortcuts are universal. So, even if you are a Mac user, you can use these same shortcuts for alignment in Google Sheets. However, shortcuts are not available on the Google Sheets app.
Bonus: There are many easy methods available to clear content from a cell or a range in Google Sheets. But, if you want to know about the easy ways, check out my newest guide on clearing cell content in Google Sheets.
How To Center Text In Vertical Alignment In Google Sheets?
Sometimes, you may need to adjust the vertical alignment as well. And not just horizontally, you can now also align text in vertical directions in Google Sheets.
And there are two distinct methods available. Let’s check out each step in detail!
Method 1: Using The Toolbar
Let’s start with the most elementary method, which is quite similar to the first method of horizontal alignment. The vertical alignment can be done from the main toolbar. Let’s check out the steps!
- Step 1: Launch Google Sheets and open your spreadsheet.
- Step 2: Click on the cell where you need the alignment adjustments (you can also select an entire range).
- Step 3: Once the cell or range is highlighted, click on the “Vertical Align” button on the main toolbar.
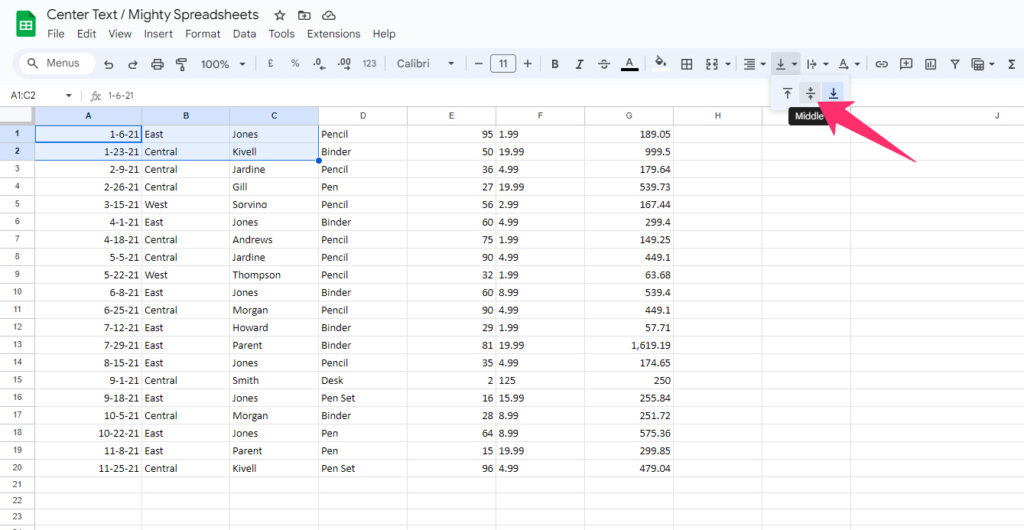
- Step 4: From the drop-down list, click on the “Middle” option to center align vertically.
- Step 5: Check if the text is aligned the right way or not.
- Step 6: You can also alternatively pick the “Top” or the “Bottom” option if you need other alignments.
The vertical alignment depends on the cell height. If your cell height is the same as the text height, you may not notice any changes after the alignment adjustment. But, if you increase the cell height, you can see the clear differences.
Bonus: Do you know that the “CONCATENATE” function is among the most versatile functions on GS? Check out my detailed guide on the “CONCATENATE” function in Google Sheets.
Method 2: Using The “Format” Menu
Similar to the horizontal alignment, there is a prebuilt option present in the format menu on Google Sheets to align text vertically as well. Besides the toolbar, you can also access the alignment options from this menu.
The steps to use this formatting option are pretty basic, though! Let’s check it out!
- Step 1: Open your spreadsheet in Google Sheets.
- Step 2: Click on the cell that needs the alignment adjustments to select it (you can also select a whole range).
- Step 3: Navigate to the main menu.
- Step 4: Click on the “Format” option to get the full list.
- Step 5: Now, hover your mouse over the “Alignment” option, and a side menu will appear.
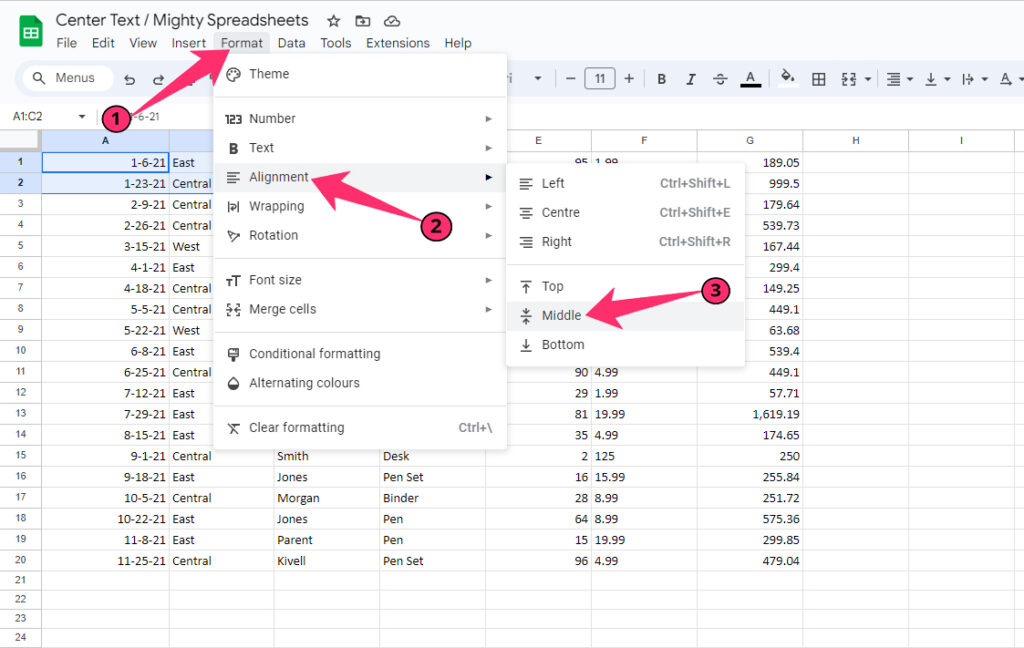
- Step 6: Click on the “Middle” option to align your text in the center position vertically.
- Step 7: Alternatively, you can also select the “Top” or “Bottom” option for other alignments.
- Step 8: Check if the alignment is correct or not!
This option is also applicable to the whole spreadsheet if you need to adjust the complete alignment vertically. You can either use the “Ctrl + A” shortcut or click on the blank box beside the column header to select the entire sheet.
You can then use the above steps to adjust the vertical alignment for the whole spreadsheet.
Bonus: You may need to sometimes refer to another sheet for easy data flow. And to do that the right way, don’t miss my newest guide on referring to another spreadsheet in Google Sheets.
Can You Marge Cells In Center Alignment In Google Sheets?
Although there is no direct method or shortcut available to do that, it is very much possible to merge cells in a center alignment in Google Sheets. But to do that, we need to use two different options.
First, you need to merge the cell the right way. And then, you can define the center alignment to the merged cell. Now, let’s check out the steps!
- Step 1: Launch Google Sheets and open your spreadsheet where you want to perform the operation.
- Step 2: Click on the first cell that you want to merge to select it.
- Step 3: Press and hold the “Shift” key.
- Step 4: Now, click on the last cell of the range that you want to merge.
- Step 5: You can now see the entire cell range is highlighted.
- Step 6: Navigate to the main menu and click on the “Format” option.
- Step 7: Hover your mouse over the “Merge Cells” option, and a side menu will appear.
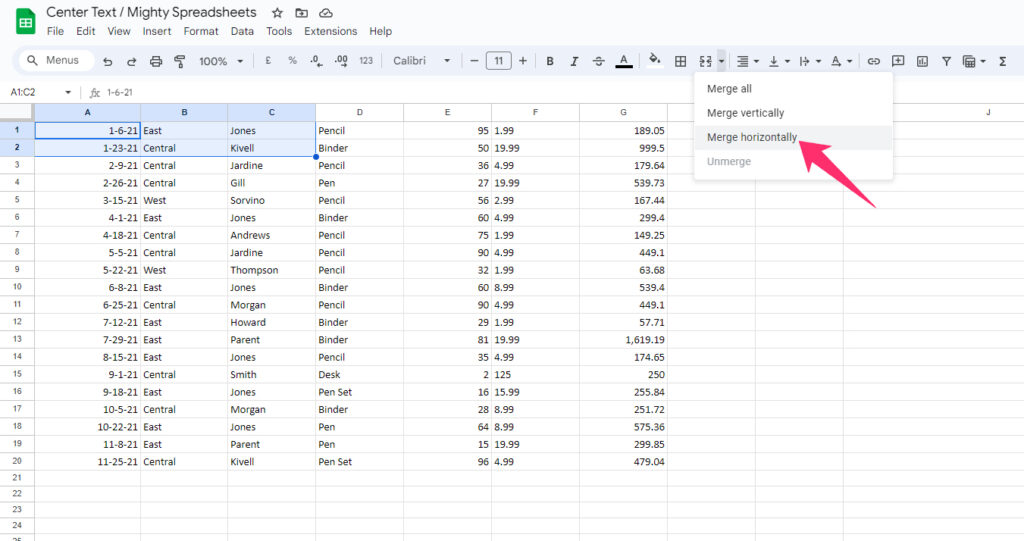
- Step 8: Click on the “Merge Horizontally” option to merge the cells.
- Step 9: Once done, click on the “Format” option again on the main menu.
- Step 10: Now, hover your mouse over the “Alignment” option to fetch the side menu.
- Step 11: Finally, click on the “Center” option to align the merged cell.
You can also use the “Ctrl + Shift + E” shortcut after the eight steps to align the merged cells fast. But to align the merged cell vertically, you need to access the “Format” option or the toolbar.
Final Words
If you are good with the shortcuts (which you need to be if you want to streamline your workflow), it is better to use the alignment shortcuts to adjust the cells. Otherwise, you’ll end up wasting your time jumping through different options and buttons.
However, there is no shortcut available for vertical alignment in Google Sheets, which is definitely a deficit of this spreadsheet program. You don’t have any other option than using the “Format” menu or the toolbar to align text vertically.
FAQs
What is the shortcut for center alignment in Google Sheets?
You need to first select the cell or the entire cell range that needs the alignment adjustment. Once selected, use the “Ctrl + Shift + E” shortcut to align horizontally at the center. But there is no shortcut available for vertical alignments.
Can I center text in Google Sheets after merging cells?
Yes, it is very much possible to align text in the center direction even after merging two or more cells in Google Sheets. To do that, you need to first use the “Merge Horizontally” option, and then, from the toolbar, you can adjust the alignment.