Have you ever faced that situation when someone from your team changed something without letting you know? We all faced this, especially while collaborating with our entire team. But now, you can easily set up Google Sheets notifications.
The “Notification Settings” option can be accessed from the “Tools” tab in the header menu. You can then either configure an “Edit Notification” or a “Comment Notification.” Besides, you can also choose to get either a consolidated report at the end of the day or an instant notification.
But it can be a little tricky for beginners to rightly set up the notifications in Google Sheets. So here, I’m going to reveal all the necessary steps. Without any further ado, let’s start!
How To Set Up Google Sheets Notifications?
Notification is an important thing not just in Google Sheets but also in any other Workspace tools, such as Google Docs and Google Drive. You can easily get instant or consolidated reports right in your mailbox with this feature.
So now, we will look into everything about the notification settings on Google Sheets.
Accessing Notification Settings In Google Sheets
Notification is an alert trigger that helps us to get notified about a specific event in the Windows, Mac, and Linux systems. Almost all software these days are now capable of push notifications and pop-up messages.
Google Sheets also has this feature with which you can get all the updates of the most critical events in your spreadsheet. You can configure your GS in such a way that you’ll receive a notification in your email address when any change or modification occurs.
This feature is extremely helpful if many people on your team are accessing the spreadsheet in Google Sheets. You can instantly get notified if there is any change made by your teammates on a spreadsheet.
It is also easy to access it. You can get it in the “Tool” menu in the main menu bar. From the drop-down menu, just hover your mouse over the “Notification Settings” option to get notification options.
Enabling Notifications For Specific Sheets Or Entire Spreadsheets
Setting up notifications for your spreadsheets in Google Sheets can be extremely helpful, although it has certain limitations. As of now, you can only set up notifications for an entire spreadsheet. There is no way to set up notifications for a specific tab in the spreadsheet without using any third-party tools.
It simply means that there is no option in Google Sheets to customize the notification settings for a single tab of a specific spreadsheet. However, it can be done with a few plugins and add-ons, which I’ll soon discuss.
Bonus: At times, you may need to refer to another cell or even another spreadsheet in Google Sheets. To do it the right way, follow my comprehensive guide on referring to another spreadsheet in Google Sheets.
Customizing Notification Preferences (Frequency, Content, Etc.)
There are two types of notifications you can set up on Google Sheets. The first one is the “Edit” notification, and the other one is the “Comment” notification.
With the first one, you’ll get notifications in your inbox when someone makes any change in the spreadsheet. And with the second one, you’ll get notified when there is any comment on the spreadsheet, either for you or for the entire board.
It is easy to customize your notification preference. Check out the steps.
- Step 1: Launch Google Sheets and open your spreadsheet.
- Step 2: Click on the “Tools” option from the main menu.
- Step 3: Hover your mouse over the “Notification Settings” option, and a side menu will load.
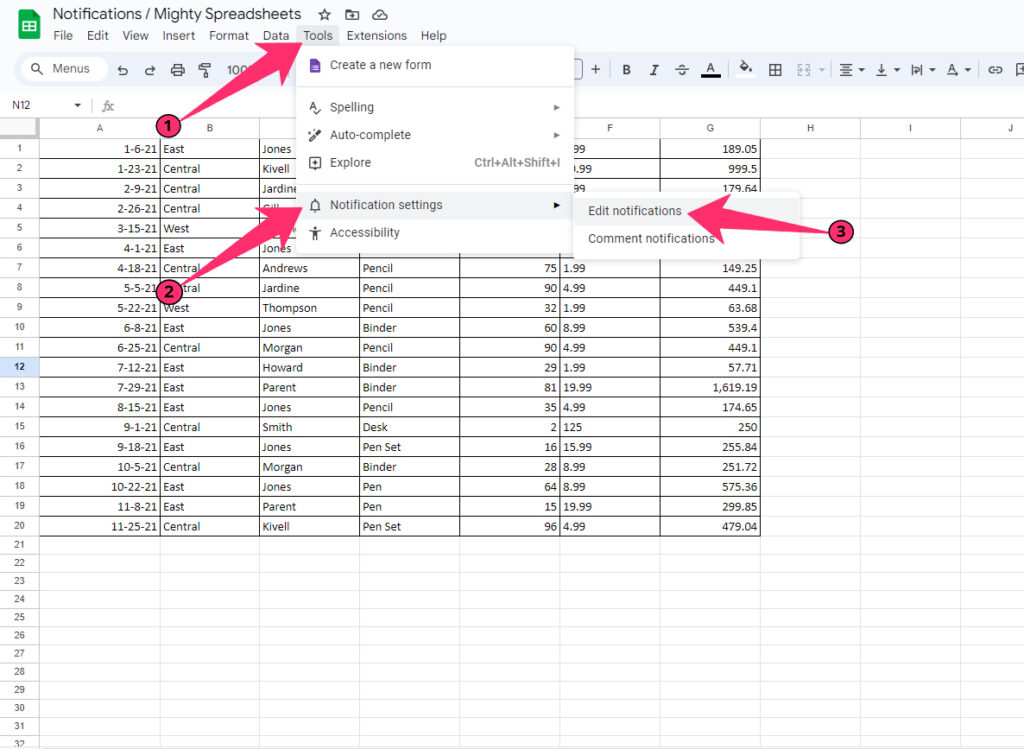
- Step 4: Now, click on the “Edit” or “Comment” notification that you want to customize.
- Step 5: On the new pop-up window, navigate to the notification that you want to edit.
- Step 6: Click on the “Edit” option on the right side of the notification.
- Step 7: Set up new rules of customization and click on the “Done” button.
Kindly note that it is now possible to enable multiple notifications on a single spreadsheet. You can now turn on both the edit and the comment notification on your email ID at the same time.
Types Of Google Sheets Notifications
There are two types of notifications you can now enable on Google Sheets. And both these types of notifications are further customizable to match your preference. So, let’s see what they are and how they work in real life.
Notifications Of Edits
The first type of notification that you can find on Google Sheets is the edit notification. It means when someone makes any changes or makes edits to a spreadsheet, you’ll get a notification.
You can turn this to give you an instant notification or a daily digest at a preferred time. Now, let’s check out the steps.
- Step 1: Open the spreadsheet on Google Sheets.
- Step 2: Click on the “Tools” option from the header menu.
- Step 3: Hover your pointer over the “Notification Settings” option.
- Step 4: On the sideloaded menu, click on the “Edit notification” option.
- Step 5: Click on the “Add another notification rule” option at the bottom of the pop-up window.

- Step 6: Select your preference between the “Any changes are made” and “A user submits a form” options.
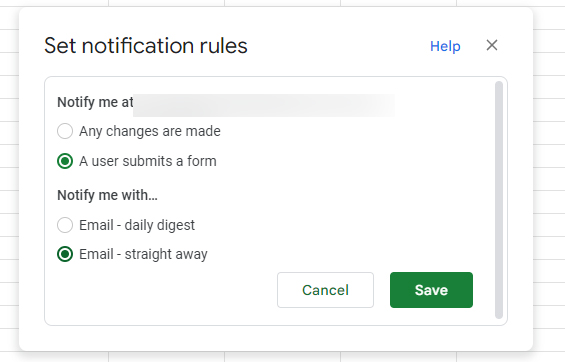
- Step 7: Further select your frequency preference between the “Daily digest” and “Straight away” options.
- Step 8: Once done, click on the “Save” button to finish the settings.
You need to make sure that you are receiving your notification in your primary inbox. If you are getting it in your “Promotional” or “Spam” folder, just drag and drop it to your main inbox to change the folder preference.
Email Notification Of Comments
The comment is a great feature in Google Sheets where teammates can communicate with each other without disturbing the main spreadsheet. It helps a lot if a team is working on the same spreadsheet.
However, it is also true that it is very difficult to keep track of the comments if multiple users are using the same spreadsheet. But there is a way to track it. You can simply turn on the comment notification to get an instant or consolidated report. Steps are also pretty easy.
- Step 1: Open the spreadsheet in Google Sheets for which you want to turn on the comment notification.
- Step 2: Click on the “Tools” option from the main menu.
- Step 3: Hover your mouse over the “Notification Settings” option.
- Step 4: On the sideloaded menu, click on the “Comment Notification” option.
- Step 5: Select your preference among the “All Comments,” “Comments for you,” or “None” options.
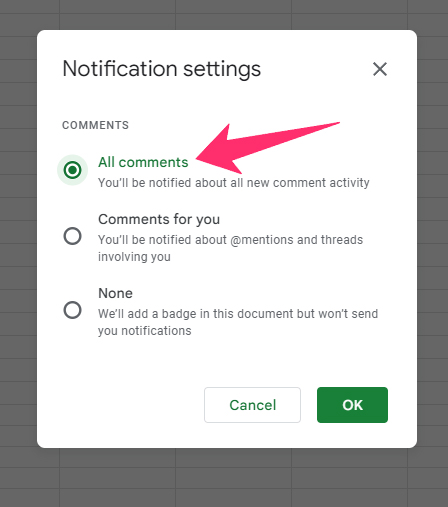
- Step 6: Click on the “OK” button to save the settings.
If you select the “None” option in your notification preference settings, it will automatically add a badge to the spreadsheet. But it will not be going to send you any notification summary in your email.
Bonus: Do you know that you can now even insert a page break in GS? Check out my comprehensive guide on inserting page breaks in Google Sheets to know more!
Customizing Notification Rules & More
You must have already understood the right ways to set up the edit and comment notification in Google Sheets. However, it is also possible to edit and customize your preference afterward. Steps are easy, though!
- Step 1: Launch Google Sheets and open your spreadsheet.
- Step 2: Click on the “Tools” option from the main menu and hover your pointer over the “Notification Settings” option.
- Step 3: Click on the preferred option between “Edit notifications” and “Comment notifications.”
- Step 4: Once you get a new pop-up window, navigate to the notification that you want to edit.
- Step 5: Now, click on the “Edit” button.
- Step 6: Set up new rules depending on your preference and click on the “Save” button.
As I’ve said earlier, you can also set up multiple notifications for a single spreadsheet. And it is also possible to edit each one of those to set up new rules.
Managing Google Sheets Notifications
It is not everything to just set up the notification settings for a spreadsheet on Google Sheets, as you also need to rightly manage it to unlock the real potential of this feature.
So now, we will take a detailed look at managing the notifications on GS!
Reviewing And Managing Notifications
I’ve already shown you the right ways to edit or modify a notification setting. And there are four types of parameters you can change in any notification settings.
The first two are about the type of notification you want, and the other two are about the frequency of the notification. Let’s check each of those.
- Any Changes Are Made: If you select this preference, you’ll get a notification once there is any kind of changes in the spreadsheet. You’ll get a notification when anyone you have shared the spreadsheet with makes any changes.
- A User Submits A Form: You are maybe already aware that you can easily link a Google Sheet with user forms (both Google Forms and third-party forms). While using these preference settings, you’ll get an email notification whenever anyone submits a form.
Google Sheets now offer two different time settings for any type of notification. And depending on your preference and requirements, you can choose between these two.
- Email – Daily Digest: You’ll get a consolidated report of all the changes made on the spreadsheet. You can either choose to get it at the end of the day or can also choose any preferred time. This setting is ideal if you are looking for a summary report for your entire team.
- Email – Right Away: If you are looking for an instant notification whenever there is any change or modification in Google Sheets, this feature can do that. By enabling this notification frequency, you can track the edits of your spreadsheet in real-time.
Bonus: Can you believe it if I tell you that it is now even possible to use Google Sheets as a random number generator? Yes, follow my detailed guide on random number generation in Google Sheets to know more.
Disabling Or Modifying Notification Settings
It is easy to edit and modify any notification settings on Google Sheets, and I’ve shown you already how to do it the right way. But you can also disable any notification preference you have turned on for a specific spreadsheet.
You can easily delete it from the same menu. And the steps are also pretty easy!
- Step 1: Open your spreadsheet in Google Sheets for which you want to delete any particular notification.
- Step 2: Click on the “Tools” option from the main menu.
- Step 3: To sideload the contextual menu, hover your mouse over the “Notification Settings” option.
- Step 4: Click on the “Edit Notifications” option.
- Step 5: Once a new pop-up window appears, navigate to the notification that you want to delete.
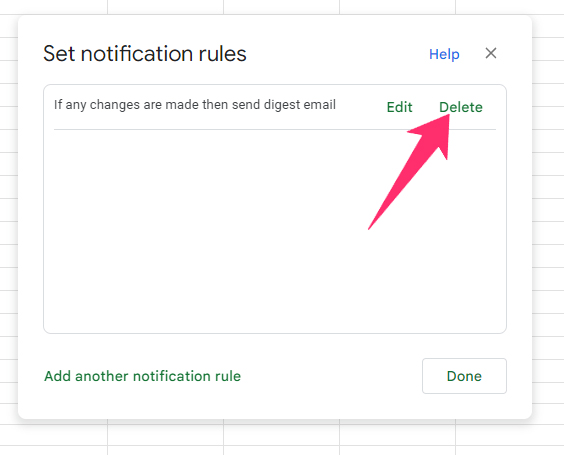
- Step 6: Click on the “Delete” button.
- Step 7: Finally, click on the “OK” button to save the settings.
Please note that it is not possible to revive any notification once you delete it from the notification settings. So, double-check before deleting any notification settings on Google Sheets.
Dealing With A High Volume Of Notifications
You can’t configure Google Sheets’ default notification option to send notification emails to multiple email IDs at once. Besides, you also can’t set any specific trigger as well.
But using a third-party tool can handle all these. My personal favorite is the “Check Sheet” add-on available on the Google Workspace Marketplace. Here are the steps.
- Step 1: Launch Google Sheets and open any existing or blank spreadsheet.
- Step 2: Click on the “Extensions” option from the main menu.
- Step 3: Hover your pointer over the “Add-Ons” option and then click on the “Get Add-ons” option.
- Step 4: On the “Google Workspace Marketplace” window, click on the search bar.
- Step 5: Type “Check Sheet” and hit the enter button.
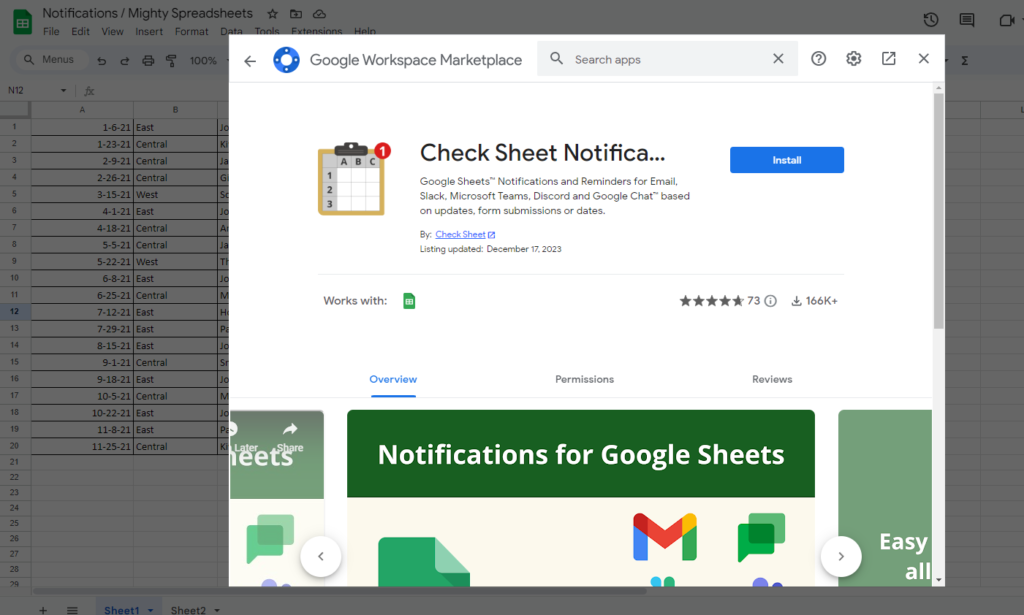
- Step 6: Click on the very first result that appears and then click on the “Install” button.
- Step 7: Once installed, close the “Google Workspace Marketplace” window.
- Step 8: Navigate to your spreadsheet again, click on the “Extensions” option, and then click on the “Check Sheet” option.
- Step 9: Once you get the side widget, you can configure your notification for multiple email IDs.
Bonus: The “IF” function is one of the most versatile functions that can help you with so many things. To know in detail, check my detailed guide on the “IF” formula in Google Sheets.
Advanced Features And Integrations
I’ve already discussed all the basic features and settings of the default notification option in Google Sheets. But you can do a lot more! So now, let’s dive into some advanced things.
Using Apps Script For Custom Notifications
Apps Script is the most versatile function in Google Sheets that lets anyone create useful add-ons and scripts using basic coding skills. Even if you are not into the coding stuff, you can simply follow the steps mentioned below.
- Step 1: Click on the “Extensions” option from the main menu.

- Step 2: Now, click on the “Apps Script” option, and a new window will open.
- Step 3: On the code editor, delete the first three default lines.
- Step 4: Paste the following code as it is:
//function to send custom email notifications based on cell changes
function sendEmailNotification(e) {
  // Change the email address to your desired recipient
  var recipientEmail = "[email protected]";
  // Get the active sheet and the range that was edited
  var sheet = e.source.getActiveSheet();
  var range = e.range;
    // Get the edited value and the row and column of the edited cell
  var editedValue = e.value;
  var editedRow = range.getRow();
  var editedColumn = range.getColumn();
    // Set the condition for sending email notifications (e.g., if the edited value is greater than 100)
  if (editedValue > 100) {
    // Set the subject and body of the email
    var subject = "Custom Email Notification";
    var body = "The value in cell " + sheet.getRange(editedRow, editedColumn).getA1Notation() + " was changed to: " + editedValue;
        // Send the email
    MailApp.sendEmail(recipientEmail, subject, body);
  }
}
- Step 5: Click on the “Save” button (floppy icon) from the main menu.
- Step 6: Now, click on the clock icon “Triggers” in the Apps Script editor.
- Step 7: Click on the “Add Trigger” option located in the lower right corner.
- Step 8: Select the “sendEmailNotification” function, “On edit,” and “From spreadsheet” as the event source.
- Step 9: Click on the “Save” button to save the trigger.
By default, this notification script will send you an instant notification whenever there is a change that has a greater value than 100. You can customize two things here.
First, you can replace the “[email protected]” email ID with your actual email ID. And second, you can edit the “editedValue > 100” parameter depending on your need.
Exploring Third-Party Add-Ons For Enhanced Notification Capabilities
Most of the default features of Google Sheets have certain limitations. But we can effectively overcome those limitations by using either Apps Script or third-party add-ons.
I’ve already shown you the way to incorporate Apps Script to set up custom triggers. Besides, I’ve also shown you how to use the “Check Sheet” add-on. But now, I’ll discuss another of my personal favorite add-on called Magic Cell. Check out the steps.
- Step 1: Open Google Sheets and then open any spreadsheet.
- Step 2: Click on the “Extensions” option from the header menu.
- Step 3: Hover your mouse over the “Add-Ons” option and click on “Get Add-ons.”
- Step 4: Once you get to the “Google Workspace Marketplace” window, click on the search bar.
- Step 5: Type “Magic Cells” in the designated field and hit the enter button.
- Step 6: Click on the first result to go to the main page, and then click on the “Install” button.
- Step 7: Follow the on-screen instructions to install it and then exit from the marketplace window.
- Step 8: Click on the “Extensions” again and then on the “Magic Cells” option.
- Step 9: On the side widget, select your monitoring preference among the “Single-cell notifications,” “Row,” “Column,” and “Range” options.
- Step 10: Now, select your trigger parameters among the “equal to,” “greater than,” “less than,” “not equal to,” “changes,” and “contains” options.
- Step 11: Finally, select your trigger preference among the “Edit,” “Form Submission,” “Hourly,” and “Daily” options.
- Step 12: Save the settings and close the Magic Cells add-ons once done.
Bonus: To get any consolidated report or to maintain a clean workflow, it is mandatory to remove all the duplicates from a spreadsheet. And to do it the right way, follow my detailed guide on removing duplicates in Google Sheets.
Troubleshooting Google Sheets Notifications
Google is known for providing stable tools in its workspace suite. And most of the features of Google tools, such as Google Sheets, are free from unwanted errors. But at times, it may trigger. So, you need to have a clear idea of how to deal with those errors.
Common Issues And Error Messages
The first issue that you may encounter in Google Sheets’ notification settings is the improper trigger problem. So, to fix it, you need to recheck if you have set the parameters the right way. If necessary, edit the notification and redo it.
You may also get timing issues in your notification delivery. It mainly happens if there is any server issue on Google’s side. You can’t do anything about it. But if it remains like that for more than 6 hours, do contact the support center of Google.
You may even get an error if you have set up the form submission parameter. In that case, you need to first check your Google Form to know if there is any error. And then, you need to delete the old settings and create a new one.
Resolving Notification Delivery Problems
If your notifications are not delivered to your email inbox, there can be several issues. First, check if you are logged in with the same Google account that you are using for Gmail. If you are using a different one, check if you are receiving notification emails on the linked Gmail account or not.
If you find no issues there, just remove the notification settings and create a new parameter. You can do it for both the “Edit Notification” and the “Comment Notification.”
If these are not resolving your error, it is better to contact the support center at Google to get advanced fixes from their end.
Conclusion
So, these are all the notification settings you need to know while using Google Sheets. If you are looking for basic notifications, such as edit or comment notifications, it is better to use the default notification settings.
But, if you are looking for some advanced Google Sheets notifications, it is better to use reliable third-party add-ons like Magic Cell Notification and Check Sheet Notification. You can also use custom App Scripts to create your own notification trigger.
FAQs
How Do I Trigger An Email In Google Sheets?
To trigger an email in Google Sheets, you need to click on the “Tools” option followed by the “Notification Settings” option. Now, select between “Edit Notification” and “Comment Notification,” depending on your preference. Finally, select your parameters for the trigger to initiate email notifications.
Are There Any Third-Party Add-Ons That Enhance Google Sheets Notification Capabilities?
Yes, there are many reliable third-party add-ons available in the Google Workspace Marketplace that can effectively enhance the functionality of Google Sheets’ notifications. My personal favorites are surely the “Magic Cell Notification” and “Check Sheet Notification” add-ons.
Can Google Sheets Send Email Notifications For Specific Events?
Yes, you can configure Google Sheets in such a way that it will send you a notification for any specific events on the spreadsheet. You can do it by using the “Notification Settings” option in the “Tools” menu. You can configure it to give you a consolidated notification or an instant notification, depending on your preference.
How Do I Notify Multiple Users For Changes In Google Sheets?
There is no way to trigger emails for multiple users for any change in Google Sheets without using third-party add-ons. However, you can set individual triggers to individual email IDs to let every person on your team know about the changes.