Maintaining a clean spreadsheet by properly managing your data is necessary if you are looking for structured data that is easy to work with. And this cleaning process starts with eliminating all the blank spaces. So now, I’ll give you a detailed guide on how to delete empty rows in Google Sheets.
You need to first identify and filter the empty rows either manually or with the COUNTA function. You can also use the “Sort range” option in the “Data” menu to group the empty cells and then delete those in one go. And for more complex spreadsheets, you can use add-ons and app scripts to remove blank cells and rows.
But identifying and deleting can be tricky at times. So, to help you, I’ve arranged this tutorial from the easiest method to the most complex one. But before we jump to the solutions, let’s first understand the ways to identify empty rows.
- 2 Ways Of Identifying Empty Rows And Blank Cells
- 6 Ways To Remove Blank Rows In Google Sheets
- 3 Tips For Preventing Empty Rows And Unused Rows
- Final Note
2 Ways Of Identifying Empty Rows And Blank Cells
Before you know how to delete empty cells in Google Sheets, you need to first understand the right ways to identify those empty rows. Identification can be tricky, especially if you have a complex spreadsheet.
There are two ways to identify blank cells and rows in Google Sheets.
#1. Visual Inspection
Yes, the good old way! Before you try to remove blank rows in Google Sheets, you need to scroll and manually check for empty cells. Although it will not be challenging to find the empty rows, it can be a little tough to pinpoint empty cells in a large data set.
If you are working with a simple spreadsheet with a few rows and columns, it can be a quick solution to identify blank cells through visual checks. But we don’t recommend this for complex ones. Besides, you may not be able to identify blank cells efficiently, as humans are prone to errors.
Note: If you are working with a team, you can invite your team members to help you identify blank cells and rows. And to do that, check out my latest guide on sharing and collaborating in Google Sheets.
#2. Using The ‘COUNTA’ Function To Find Empty Rows
For complex sheets, it is better to use a filter to identify all the empty rows at once. We can easily count the number of empty cells in a row using the COUNTA functions.
Example: We have data from the B column to the F column. And within those, there are empty rows. The steps to identify blank cells using the COUNTA formula are as follows.
- Step 1: Click on the empty cell just after your data set ends in a particular row. (We are using G2 here, as we have data from B to F)
- Step 2: Click on the formula field and enter the “=COUNTA(B2:F2)” formula.
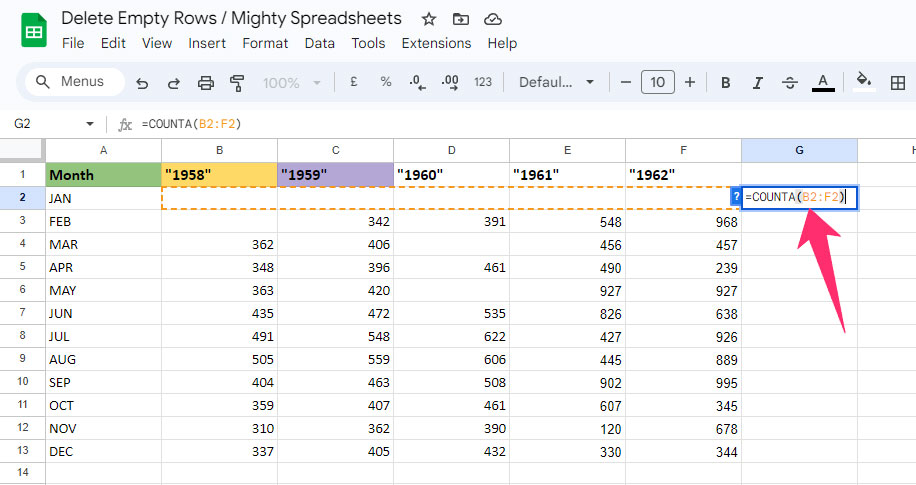
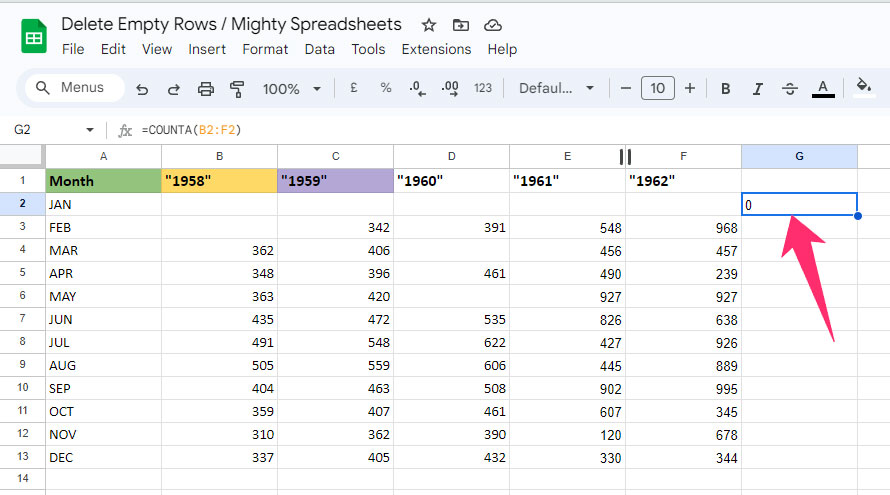
- Step 3: Hit enter and then drag the corner of the G2 cell to the row that has data. (We have data in the first 14 rows).
- Step 4: It will automatically show digits in the helper cells in the G column. All the rows having empty values will have “0” in the G column.
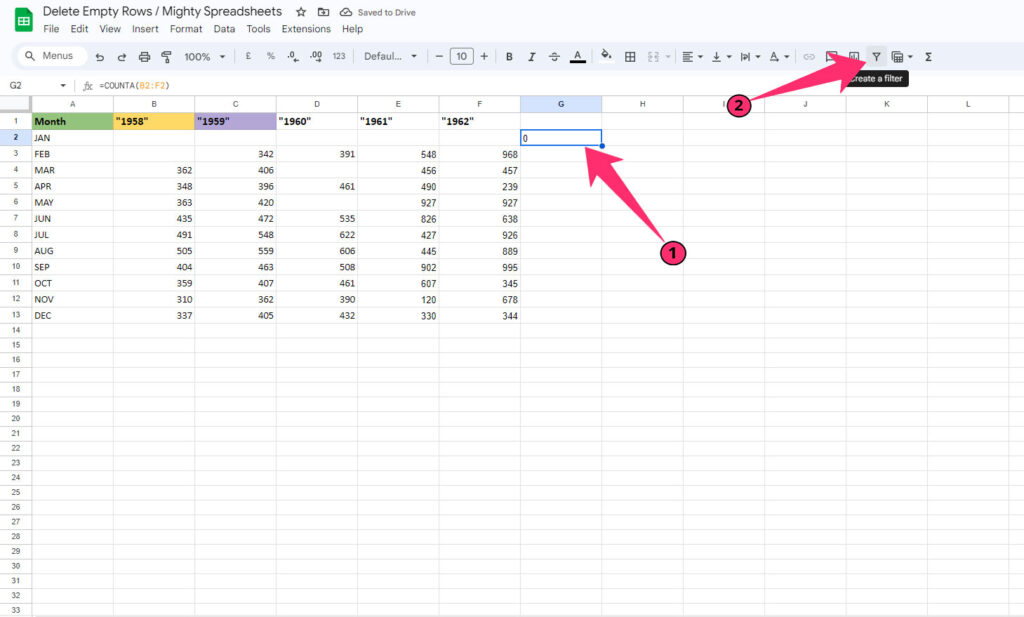
- Step 5: Select the header of the output column (Here it is G).
- Step 6: Click on the “Create a Filter” option (Funnel icon) on the toolbar.
- Step 7: Click on the filter icon that appears in the first cell of your output column (It is G1 in our case).
- Step 8: From the new popup window, untick all the digits except “0” (uncheck “blank” as well).
- Step 9: Click on the “OK” button, and you’ll get all the filtered rows that are empty.
You can also use the “=COUNTBLANK” formula similarly to identify the number of empty cells in a particular row. Define the range after this function, and it will show how many empty cells are there.
Note: You can also group rows and columns before you start filtering your data. And it will make it easier to work with. To know the easiest way, don’t forget to check out my guide for grouping rows and columns in Google Sheets.
6 Ways To Remove Blank Rows In Google Sheets
We hope you’ve rightly understood how to identify the blank rows and cells. So now, we can proceed with the tricky part. There are four tested methods to delete empty rows in Google Sheets.
I’m going from the easiest to the most complex one. And each of these methods can be useful in different cases.
#1. Manually Delete Empty Rows And Blank Cells In Google Sheets
If you are working with a simple data set and manually identifying blank cells and rows, you can also manually delete those.
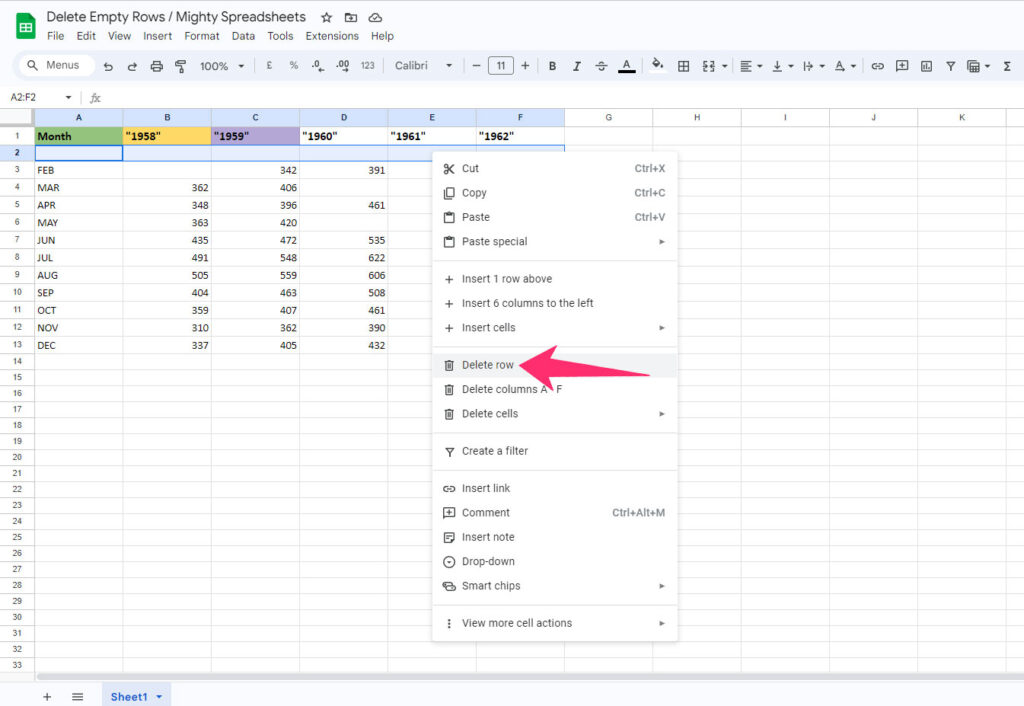
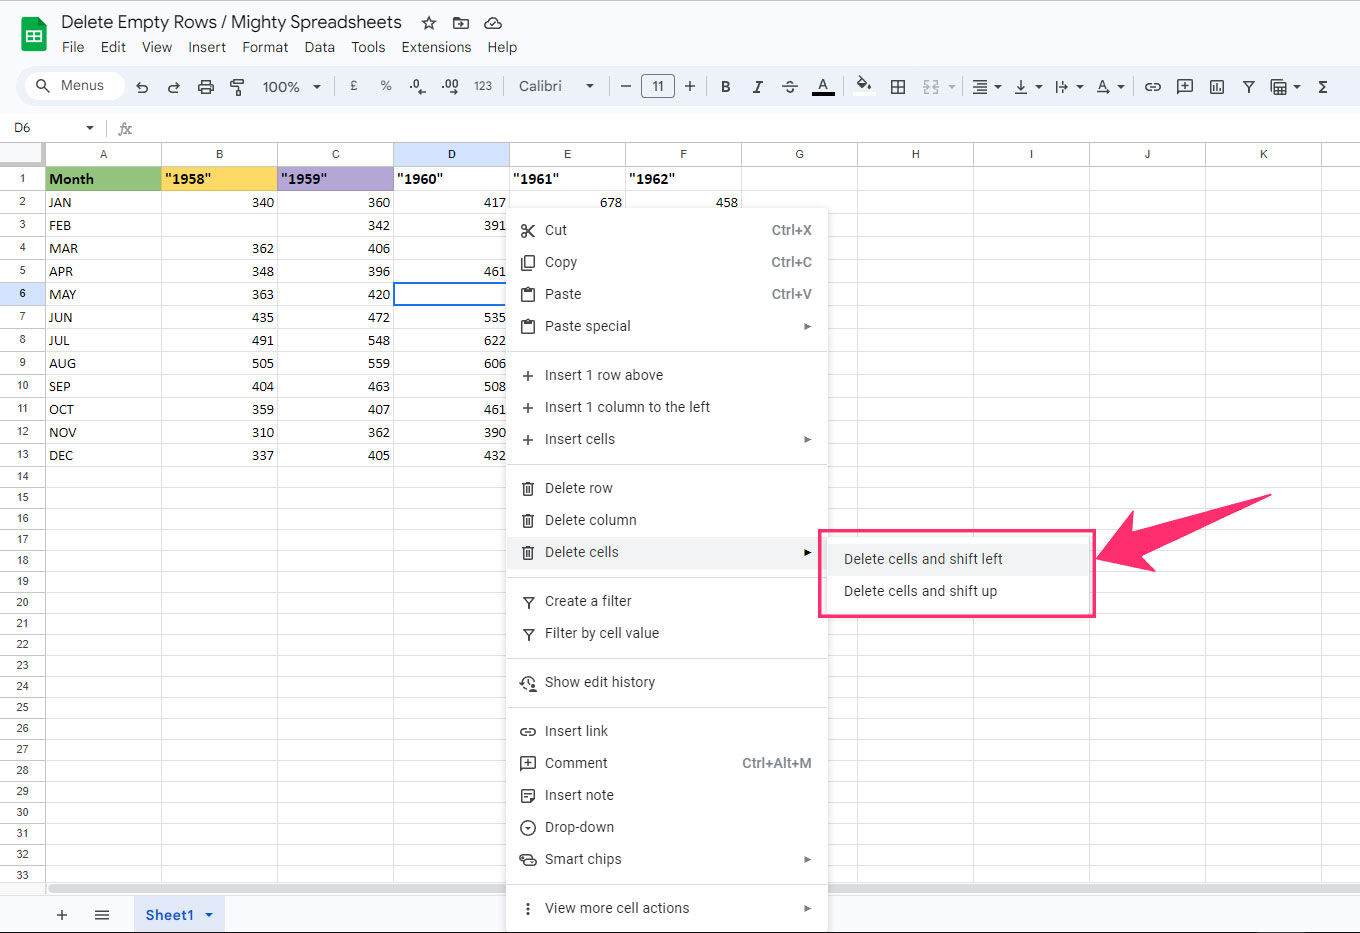
- To delete an empty row: Right-click on the row header and click the “Delete Row” option.
- To delete an empty cell: Right-click on the empty cell, click on the “Delete cells and shift left” or “Delete cells and shift up,” depending on your need.
There is a trick to identifying blank rows quickly, even if it has a good amount of data. And you can use this in a few simple steps.
- Step 1: Select the first row of your spreadsheet.
- Step 2: Press “Cmd + Shift + Down Arrow” (for Mac) or “Ctrl + Shift + Down Arrow” (for Windows).
- Step 3: It will automatically select all the rows before the next empty row.
- Step 4: Once you identify the first empty row, manually delete it, and repeat the process.
Bonus: You don’t need to apply the formula on each cell of a column manually, as it can be painstaking to do that. There is an easy workaround. To know more, check out my newest guide on applying a formula to an entire column on Google Sheets.
#2. How To Delete A Single Empty Row In Google Sheets?
It is pretty easy to delete an empty row in Google Sheets, even manually. It also gives us more control to pick and select each empty cell and then delete it. The steps are simple, though!
- Step 1: Open your spreadsheet and navigate to the blank row.
- Step 2: Right-click on the row number of the empty row.
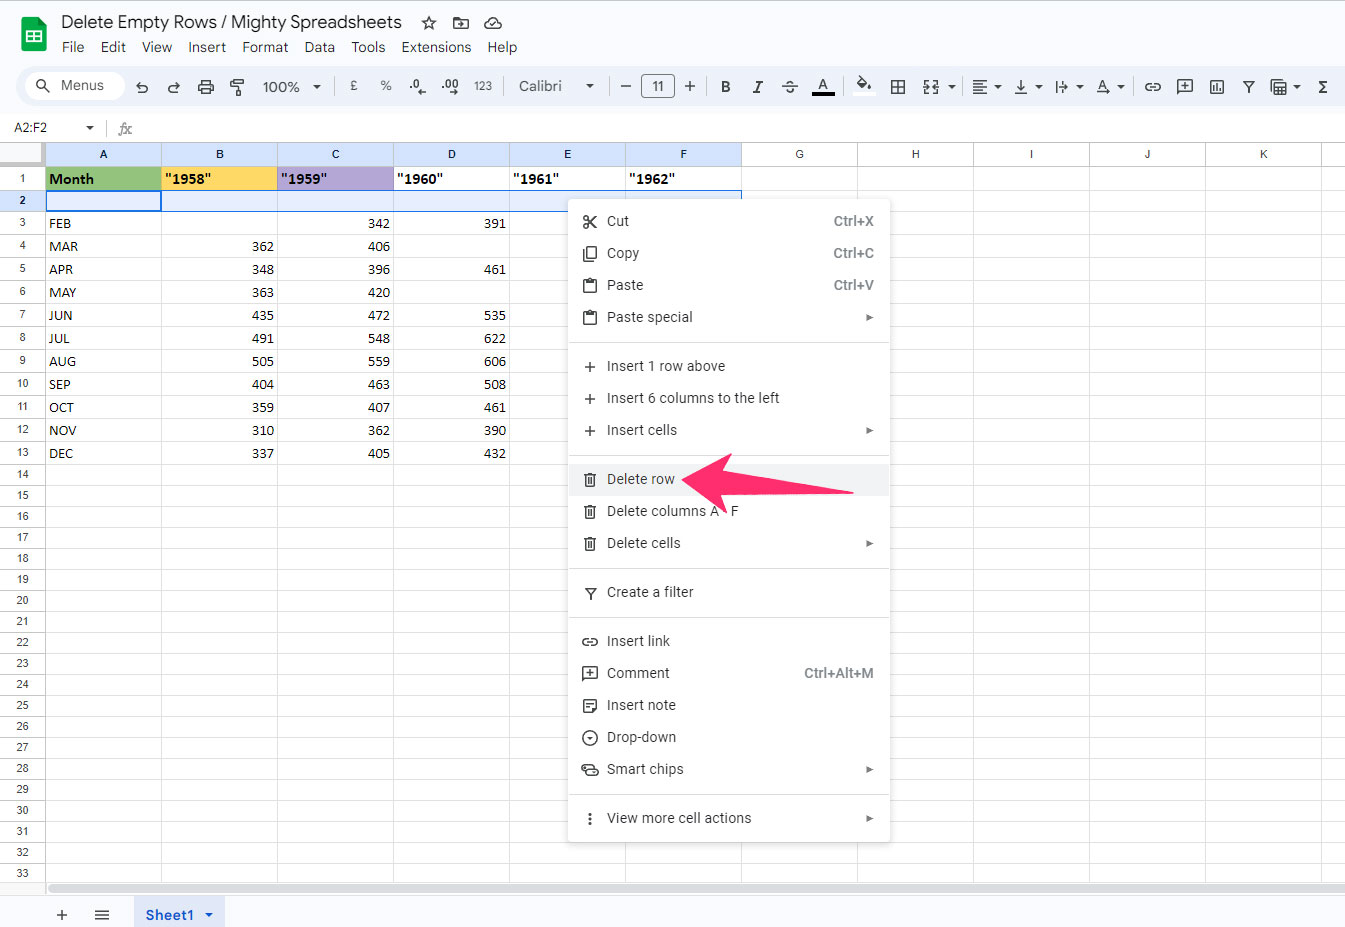
- Step 3: Once you get a contextual menu, click on the “Delete Row” button.
- Step 4: The row will be deleted, and the rest of the data will shift upward.
Please note that once you delete any row in Google Sheets, the rest of the data will shift upward. And there is no way to leave a blank space there.
How To Delete Multiple Empty Rows In Google Sheets?
Once you understand the easiest ways to delete a single empty row, you need to know now how to delete all empty rows in Google Sheets the right way. I’m giving you some easy steps to do that.
- Step 1: Open your spreadsheet in Google Sheets and select the entire data range (including blank cells).
- Step 2: Click on the “Data” option from the header menu.
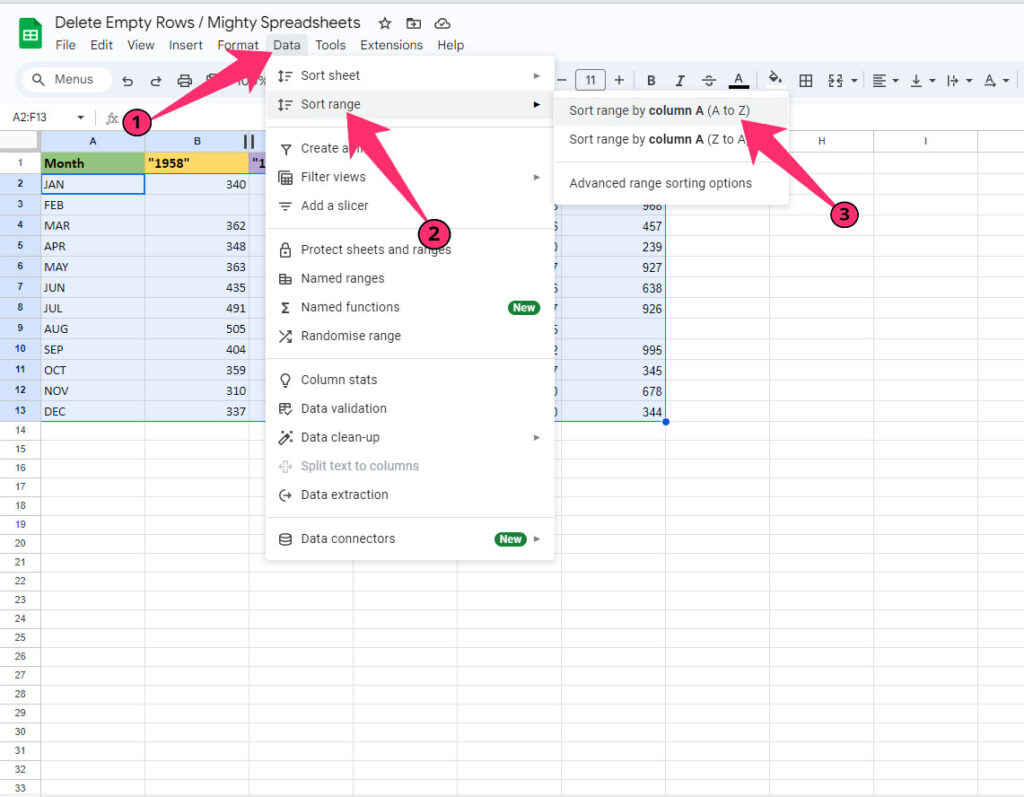
- Step 3: Hover your mouse over the “Sort range” option.
- Step 4: Click on the “Sort range by Column A (Z to A)” option.
- Step 5: It will group all the empty rows at the end of the data set.
- Step 6: Scroll down and click on the row number of the first empty row in your data set.
- Step 7: Hold the “Shift” button and click on the last empty row to select all the empty rows.
- Step 8: Right-click on the row number.
- Step 9: Click on the “Delete rows <row number> – <row number>” option to delete all empty rows at once.
Note: You need to select the sorting in ascending order (from Z to A) and not opposite. If you sort your data in descending order (from A to Z), the empty rows may get sorted at the middle of the data set and even at the top. This will create issues if you are working with a large set.
Undoing A Deletion
You must have already understood how to delete simple and multiple empty rows in Google Sheets the easy way. But there is a catch! Once you delete any row after sorting it, it will not be possible to revive those rows again in exact order.
If you undo the changes, the rows will be back but not in the order that they were originally there. There is only one way to get your data back in exact order. And that is through restoring the sheet through edit history.
- Step 1: Click on the “Edit History” button (watch sign) in the header menu.
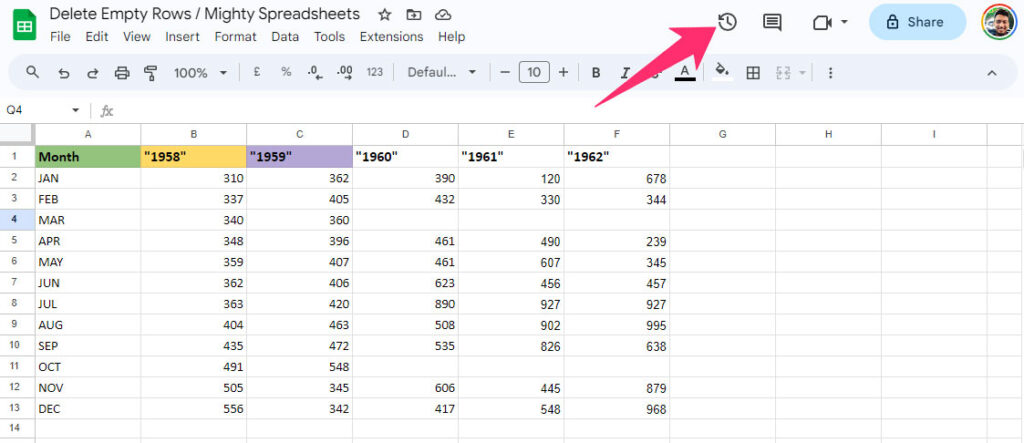
- Step 2: You can see all the available versions of your sheet (with different dates and times) on the right-hand panel.
- Step 3: Select any other available version than the one you are currently using.

- Step 4: Click on the green “Restore this version” button at the top of the spreadsheet.
Bonus: You can now check the entire edit history in Google Sheets to know about the last edits by your teammates. And it is extremely helpful for a collaborative project. Check out my detailed guide on editing history in Google Sheets to know more.
Remove Empty Rows In Google Sheets Using The ‘Filter’ Function
If you have empty rows spread throughout the spreadsheet (not consolidated), you must group the empty rows first. You can easily do it by using a filter in Google Sheets. Here are the easy steps to do it.
- Step 1: Open your spreadsheet in Google Sheets.
- Step 2: Select the entire range by pressing “Cmd + A” (for Mac) or “Ctrl + A” (for Windows).
- Step 3: Click on the “Data” tab on the header menu and select the “Create a filter” option.
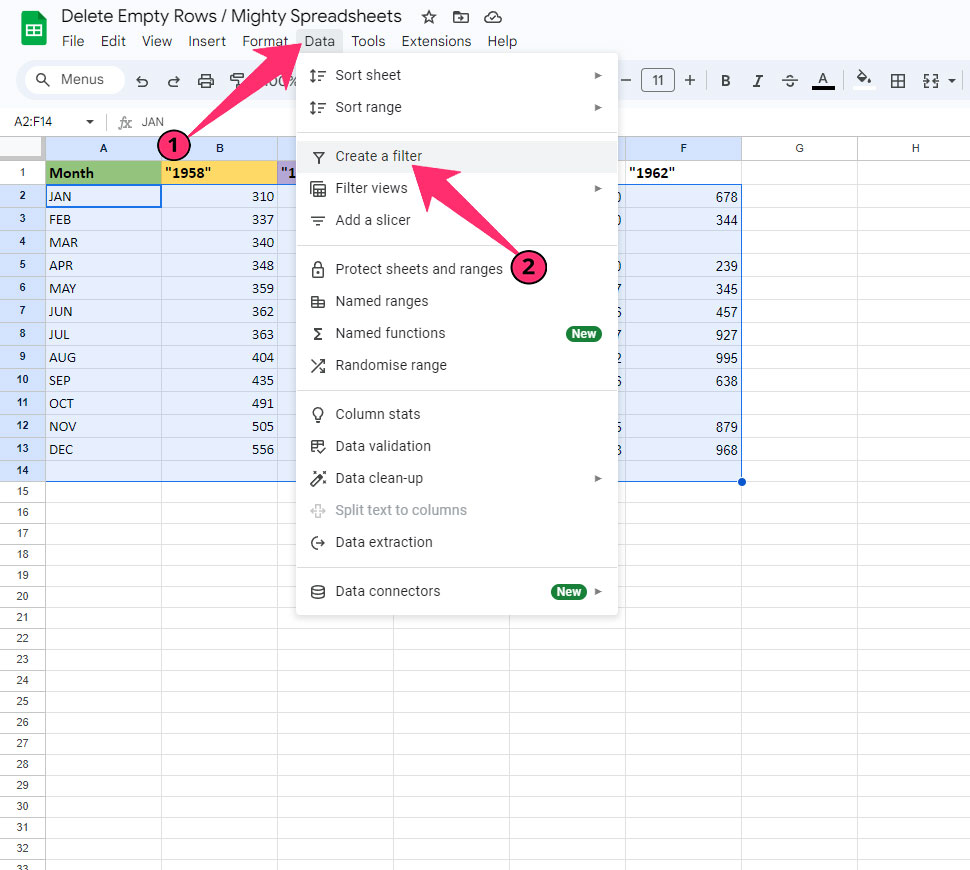
- Step 4: You can now see the filter sign at the top of each column.
- Step 5: Click on the filter sign of the first column.
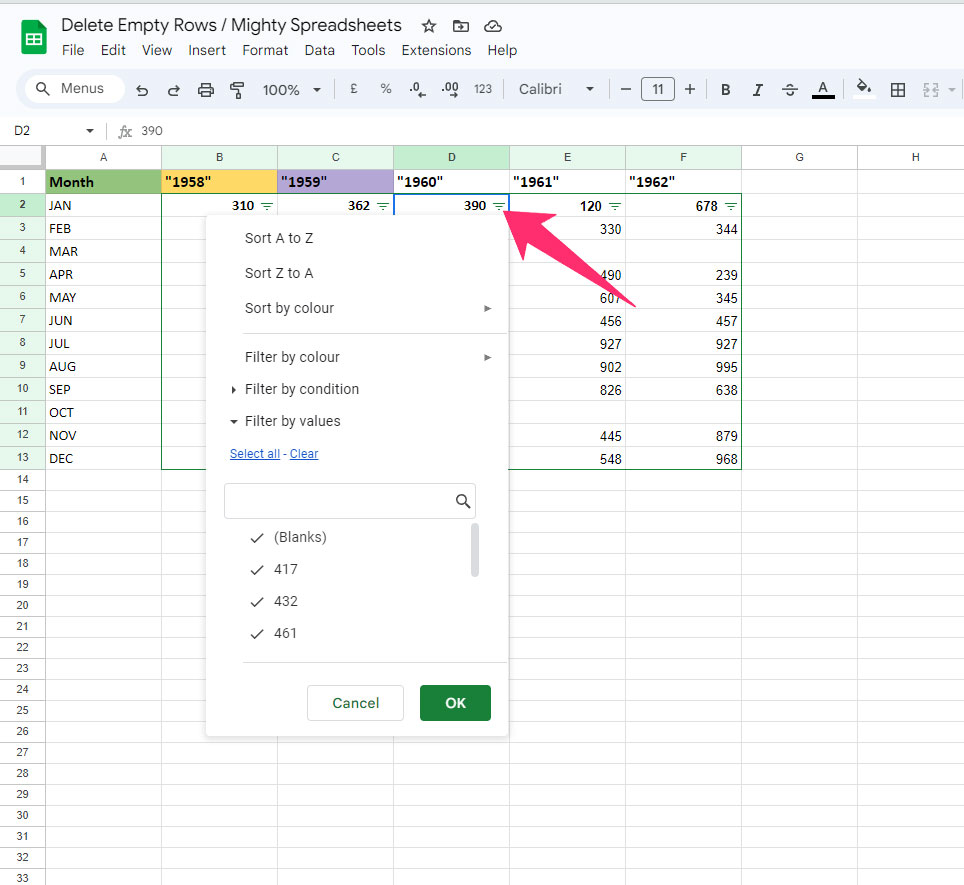
- Step 6: Once you get a popup window, click on the “Clear” button highlighted in blue.
- Step 7: It will automatically reset all the filters from your dataset.
- Step 8: Click on the “(Blanks)” option at the bottom of the popup window.
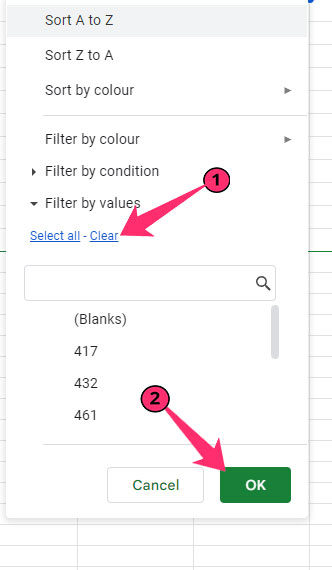
- Step 9: Click “OK,” and it will only show all the empty rows in groups.
- Step 10: Now, click on the row number of the first row in the filtered set.
- Step 11: Hold the “Shift” button and click on the last empty row to select all the rows.
- Step 12: Right-click on the row number to fetch the contextual menu.
- Step 13: Click on the “Delete selected rows” option to remove them at once.
Bonus: Do you know that you can now automatically number your rows without any manual effort? Check out my new guide to auto-numbering rows in Google Sheets the easy way!
Remove Empty Rows With An Add-On
It can be tricky to remove all the empty cells from a complex data set, even if you know how to get rid of empty rows in Google Sheets correctly. Here, official add-ons can be a lifesaver.
Although there are several add-ons available, we will use the “Remove Rows and Files (By Steve Webster)” add-on in this tutorial.
- Step 1: Launch Google Sheets and click on the “Extensions” button from the header menu.
- Step 2: Hover your mouse over “Add-ons” and click on the “Get add-ons” option.
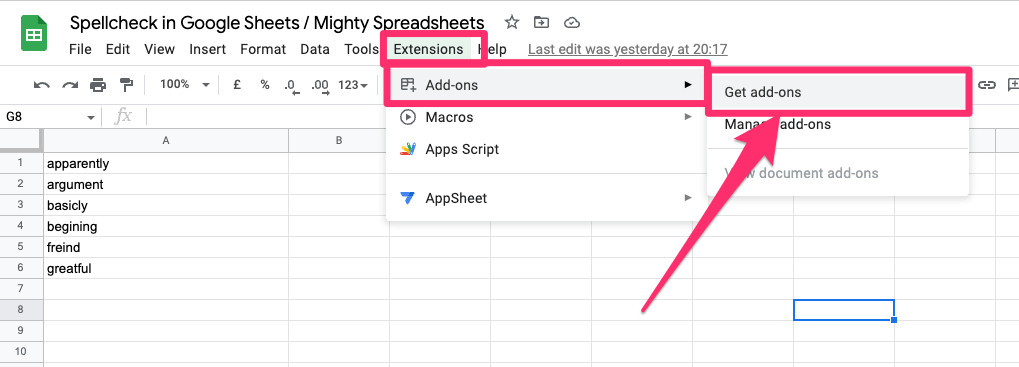
- Step 3: This will bring the “Google Workspace Marketplace” in a popup window.
- Step 4: Click on the search button (magnifying glass icon) and type “Remove empty rows” in the designated field.
- Step 5: Hit the enter button to fetch all the available add-on options.
- Step 6: Click on the “Remove Rows and Files (By Steve Webster)” option.
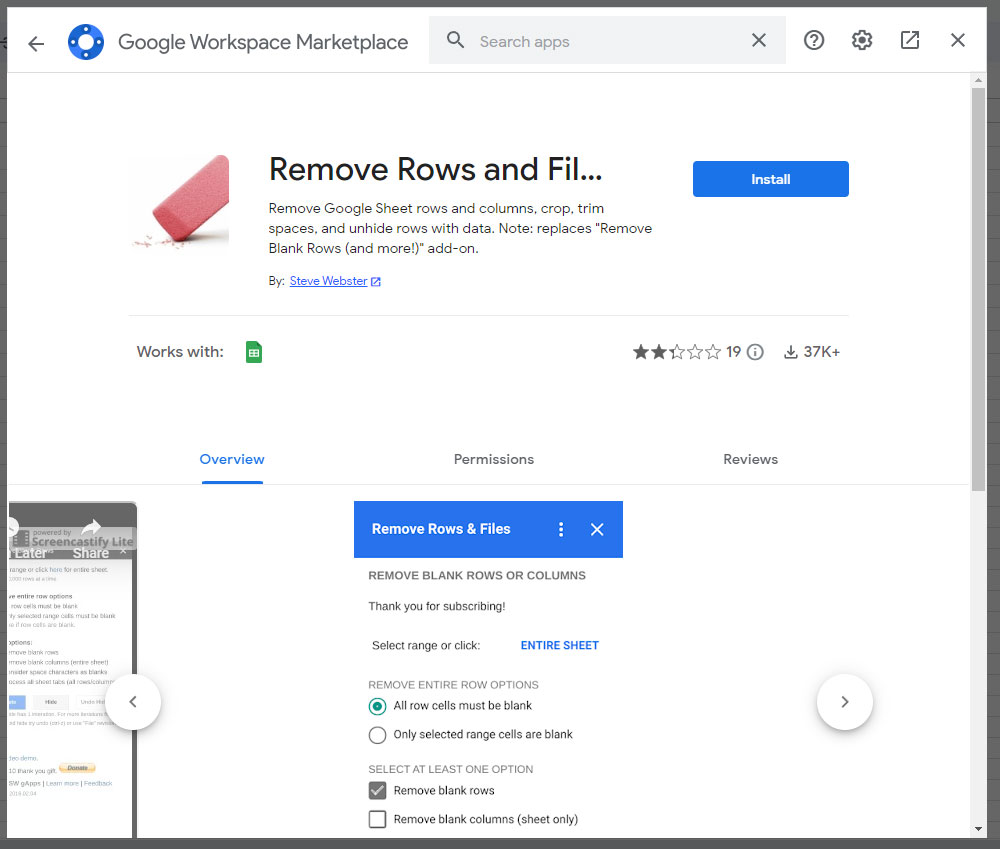
- Step 7: Click the “Install” button on the new page.
- Step 8: Once you get the “Remove Rows and Files needs your permission in order to start installing” message, click on the “Continue” button.
- Step 9: Choose the Google account you want to use and click on the “Allow” button.
- Step 10: Click on “Done” and close the “Google Workspace Marketplace” window.
- Step 11: Click on the new “Eraser” sign on your sidebar (on the right side).
- Step 12: Once you get a new panel on your right, select “Entire Sheet” in the “Select range or click:” option.
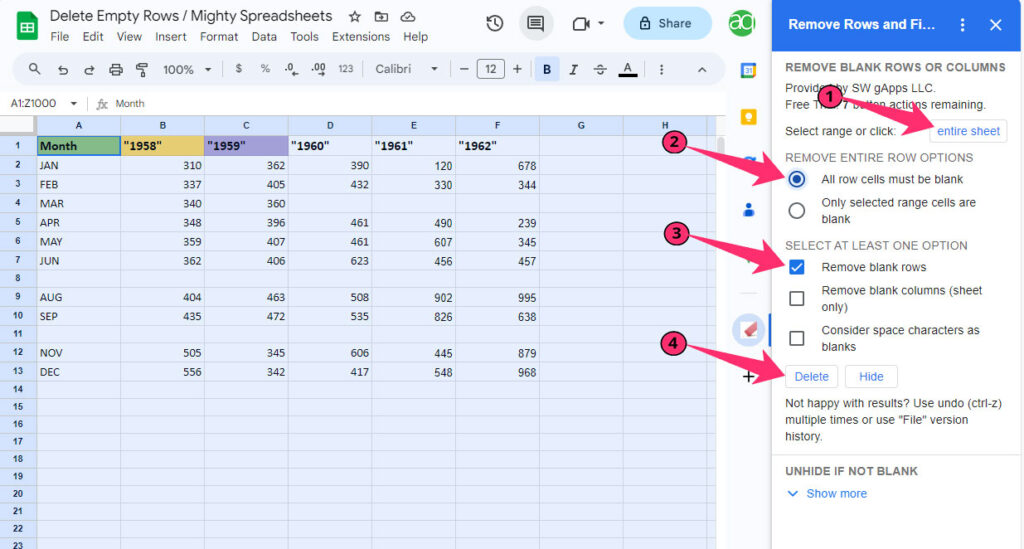
- Step 13: Tick both the “All row cells must be blank” and “Remove blank rows” options.
- Step 14: Click on the “Delete” button, and it will automatically delete all the empty rows.
Please note that this plugin offers free trials up to 7 times. So, you can only run this add-on to delete empty rows seven times without paying anything. You can obviously get the full-access paid version by paying $0.25/month per user.
You can get the complete tutorial on how to use this add-on in this YouTube video.
Remove Empty Rows Using Scripts
If you don’t trust add-ons (as they can get access to all your files), you can also create your own app script to remove blank rows in Google Sheets. You can even do it without any coding knowledge (having apt coding knowledge is helpful, though!).
Just follow the steps I’ve mentioned below and copy the codes in your app script to do it easily!
- Step 1: Launch Google Sheets and open your spreadsheet.
- Step 2: Click on “Extensions” from the header menu and then on “Apps Script.”

- Step 3: On the newly opened window, delete the default line (first three lines).
- Step 4: Paste the following code:
function removeBlanks() {
var ss = SpreadsheetApp.getActiveSpreadsheet().getActiveSheet()
var selectedRange = ss.getActiveRange();
selectedRange.sort({column: 1, ascending: true})
}
function onOpen() {
var ui = SpreadsheetApp.getUi();
ui.createMenu('Data')
.addItem('Remove Blanks', 'removeBlanks')
.addToUi();
};
- Step 5: Click on the “Save” button (Floppy icon) and then on the “Run” button.
- Step 6: Select the Google account you want to proceed with and give the necessary permissions.
- Step 7: You can now find a new menu item called “Data.” Click on that.
- Step 8: Click on the “Remove Blanks” option.
- Step 9: It will remove all the empty rows and give you a notification once done.
This script will sort and arrange the data in ascending order depending on the first column’s parameter. So, it will only select and delete empty rows if the first cell of that row is blank. It will not delete specific empty cells in a row.
3 Tips For Preventing Empty Rows And Unused Rows
Even if you know how to delete empty rows in Google Sheets, you need to know about the importance of preventing any empty rows from appearing on your spreadsheet. And we have three proven tips that you can try.
Organizing Data Entry
To start with, you need to first make sure that you are entering data in a consolidated way in your spreadsheets. If you are working with a complex one where you need to feed a lot of data, it is better to create groups first. And within that group, never leave any empty row.
You can also use the “Remove duplicates” option periodically to eradicate the empty rows. Just launch your spreadsheet in Google Sheets, and click on the “Data” button. Now, click on the “Data cleanup” option followed by the “Remove duplicates” option.
Select all the columns in the popup window and click on the green “Remove duplicates” button. It will delete all the empty rows leaving just one. It is because all the empty rows are exact duplicates of the first empty row.
You can then manually delete the only empty row in your spreadsheet to make it consolidated. And to learn more about this method, follow my latest guide on removing duplicates in Google Sheets.
Using Data Validation To Avoid Blank Cells
Data validation is another thing to know once you understand how to delete unused rows in Google Sheets. A structured validation can eliminate empty rows even in a complex spreadsheet.
Data validation is also necessary if you are importing your data because it can accidentally create empty rows.
Once you have fed all the data or completed importing your entire data set, you can use the data validation technique. The steps are really easy.
- Step 1: Click on the “Data” option from the header menu.
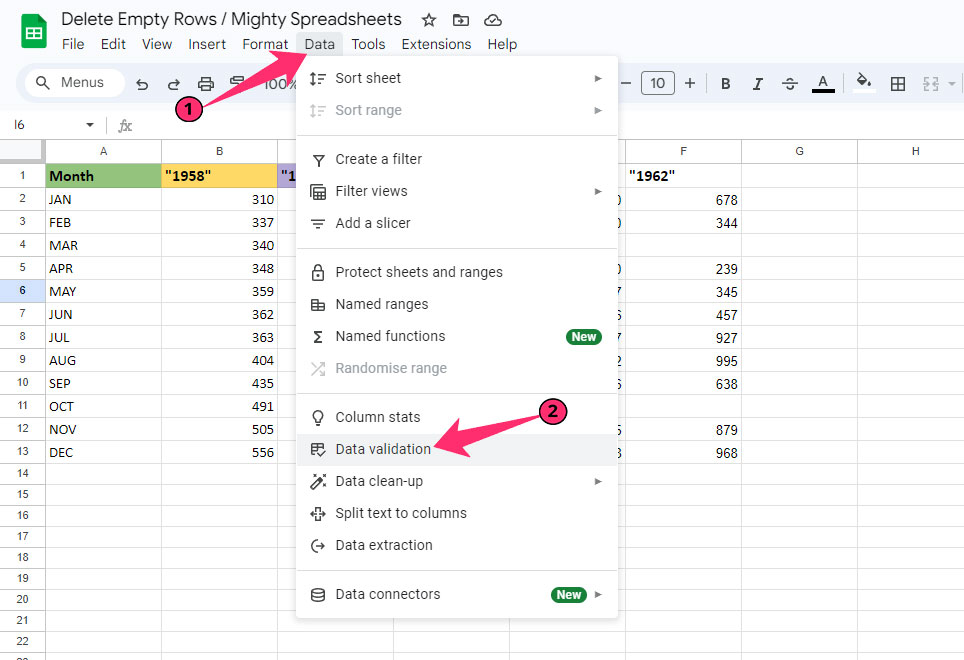
- Step 2: Click on the “Data validation” option, and a side panel will appear.
- Step 3: Select your range or entire sheet in the “Apply to range” section.
- Step 4: Select the criteria of your data validation (such as text contains or equals to).
- Step 5: Tick the “Show a warning” option in the “If the data is invalid” header.
- Step 6: Click “Done,” and it will validate your data.
With data validation, you can even set a custom formula. So, every time you want to feed any data that is not satisfying the formula in the data validation, you’ll get a warning.
Periodically Auditing The Spreadsheet
There is no way to get a clean and structured spreadsheet unless you invest time in periodically checking and editing data. If you are working with a complex spreadsheet where you have fed various data in a large set, you need to check it even more frequently.
I’ve mentioned all the ways to remove the empty cells and rows from Google Sheets. So, you can try those methods periodically to get more structured data without any blank cells or rows.
But I’ll also advise you to filter your data first before you start working on it. I’ve already given more insight into filtering data the right way in Google Sheets. Do check that out!
Final Note
I’ve mentioned six tested methods on how to delete empty rows in Google Sheets. It is better to start using the COUNTA formula to filter the empty rows first and then delete those in one go. And if you have non-structured data, it is better to use an add-on or app script to make it easier.
Maintaining a clean and organized spreadsheet is absolutely necessary if you want the best output and productivity in the shortest possible time. If you find this tutorial blog helpful, share it with your friends and colleagues. And do keep your eye on Mighty Spreadsheet to get more useful tutorials like this.